MacBook Pro 15" Unibody Mid 2010 Front Display Glass Replacement

What you need

  1. MacBook Pro 15" Unibody Mid 2010 Front Display Glass Replacement, Lower Case: step 1, image 1 of 1
    • Remove the following ten screws securing the lower case to the upper case:

    • Three 13.5 mm (14.1 mm) Phillips screws.

    • Seven 3 mm Phillips screws.

    • When removing these screws, note how they come out at a slight angle. They must be reinstalled the same way.

  2. MacBook Pro 15" Unibody Mid 2010 Front Display Glass Replacement: step 2, image 1 of 1
    • Using both hands, lift the lower case near the vent to pop it off two clips securing it to the upper case.

    • Remove the lower case and set it aside.

  3. MacBook Pro 15" Unibody Mid 2010 Front Display Glass Replacement, Battery: step 3, image 1 of 1
    • Remove the two 7.4 mm Tri-point screws securing the battery to the upper case.

    • Note: For certain repairs (e.g. hard drive), removing the battery is not necessary but it prevents any accidental shorting of electronics on the motherboard. If you do not remove the battery, please be careful as parts of the motherboard might be electrified.

    • You do not necessarily have to follow steps 3-6 to remove the battery in order to replace the hard drive. However it is recommended to remove all power sources from electronics before working on them.

  4. MacBook Pro 15" Unibody Mid 2010 Front Display Glass Replacement: step 4, image 1 of 1
    • Use the tip of your finger to carefully peel back the corner of the warning label to reveal a hidden Tri-point screw.

    • Remove the last 7.4 mm Tri-point screw securing the battery to the upper case.

  5. MacBook Pro 15" Unibody Mid 2010 Front Display Glass Replacement: step 5, image 1 of 2 MacBook Pro 15" Unibody Mid 2010 Front Display Glass Replacement: step 5, image 2 of 2
    • Lift the battery by its plastic pull tab and slide it away from the long edge of the upper case.

    • Do not try to completely remove the battery just yet.

  6. MacBook Pro 15" Unibody Mid 2010 Front Display Glass Replacement: step 6, image 1 of 1
    • Tilt the battery away from the logic board enough to access the battery cable connector.

    • Pull the battery cable connector away from its socket on the logic board and remove the battery from the upper case.

    • Pull the battery cable connector away from the center of the logic board.

    • If you're installing a new battery, you should calibrate it after installation:

    • Charge it to 100%, and then keep charging it for at least 2 more hours. Next, unplug and use it normally to drain the battery. When you see the low battery warning, save your work, and keep your laptop on until it goes to sleep due to low battery. Wait at least 5 hours, then charge your laptop uninterrupted to 100%.

    • If you notice any unusual behavior or problems after installing your new battery, you may need to reset your MacBook's SMC.

  7. MacBook Pro 15" Unibody Mid 2010 Front Display Glass Replacement, Display: step 7, image 1 of 1
    • Use the flat end of a spudger to carefully pry the AirPort/Bluetooth ribbon cable up off its socket on the logic board.

  8. MacBook Pro 15" Unibody Mid 2010 Front Display Glass Replacement: step 8, image 1 of 1
    • Pull the camera cable connector straight out of its socket on the logic board.

    • Pull the cable parallel to the face of the logic board toward the optical drive opening.

  9. MacBook Pro 15" Unibody Mid 2010 Front Display Glass Replacement: step 9, image 1 of 1
    • Use the tip of a spudger to pry the three antenna connectors up off the AirPort/Bluetooth board.

  10. MacBook Pro 15" Unibody Mid 2010 Front Display Glass Replacement: step 10, image 1 of 2 MacBook Pro 15" Unibody Mid 2010 Front Display Glass Replacement: step 10, image 2 of 2
    • De-route all three antenna cables from their channels in the AirPort/Bluetooth housing.

    • De-route the camera cable from its channel in the AirPort/Bluetooth housing.

  11. MacBook Pro 15" Unibody Mid 2010 Front Display Glass Replacement: step 11, image 1 of 1
    • Remove the following two screws securing the AirPort/Bluetooth housing to the upper case:

    • One 3.8 mm Phillips

    • One 8.6 mm Phillips

  12. MacBook Pro 15" Unibody Mid 2010 Front Display Glass Replacement: step 12, image 1 of 1
    • Remove the AirPort/Bluetooth assembly from the upper case, minding any cables that may get caught.

  13. MacBook Pro 15" Unibody Mid 2010 Front Display Glass Replacement: step 13, image 1 of 2 MacBook Pro 15" Unibody Mid 2010 Front Display Glass Replacement: step 13, image 2 of 2
    • Remove the 8.6 mm Phillips screw securing the antenna/camera cable retainer to the upper case.

    • Remove the antenna/camera cable retainer from the upper case.

  14. MacBook Pro 15" Unibody Mid 2010 Front Display Glass Replacement: step 14, image 1 of 1
    • Remove two of the three 6 mm T6 Torx screws securing the right side of the display to the upper case.

    • We purposely have you leave one screw attaching the display to the upper case to aid in future steps.

  15. MacBook Pro 15" Unibody Mid 2010 Front Display Glass Replacement: step 15, image 1 of 3 MacBook Pro 15" Unibody Mid 2010 Front Display Glass Replacement: step 15, image 2 of 3 MacBook Pro 15" Unibody Mid 2010 Front Display Glass Replacement: step 15, image 3 of 3
    • Grab the plastic pull tab secured to the display data cable lock and rotate it toward the DC-In side of the computer.

    • Pull the display data cable straight out of its socket on the logic board.

    • Do not lift up on the display data cable, as its socket is very fragile. Pull the cable parallel to the face of the logic board.

  16. MacBook Pro 15" Unibody Mid 2010 Front Display Glass Replacement: step 16, image 1 of 2 MacBook Pro 15" Unibody Mid 2010 Front Display Glass Replacement: step 16, image 2 of 2
    • Remove the 8.6 mm Phillips screw securing the display data cable retainer to the upper case.

    • Remove the display data cable retainer from the upper case.

  17. MacBook Pro 15" Unibody Mid 2010 Front Display Glass Replacement: step 17, image 1 of 1
    • Remove two of the three 6 mm T6 Torx screws securing the left side of the display to the upper case.

    • We purposely have you leave one screw attaching the display to the upper case to aid in future steps.

  18. MacBook Pro 15" Unibody Mid 2010 Front Display Glass Replacement: step 18, image 1 of 1
    • Open your MacBook Pro so the display is perpendicular to the upper case.

    • Place your opened MacBook Pro on a table as pictured.

    • While holding the display and upper case together with your left hand, remove the remaining T6 Torx screw from the upper display bracket.

  19. MacBook Pro 15" Unibody Mid 2010 Front Display Glass Replacement: step 19, image 1 of 1
    • Be sure to hold the display and upper case together with your left hand. Failure to do so may cause the freed display/upper case to fall, potentially damaging each component.

    • Remove the last remaining T6 Torx screw securing the display to the upper case.

  20. MacBook Pro 15" Unibody Mid 2010 Front Display Glass Replacement: step 20, image 1 of 3 MacBook Pro 15" Unibody Mid 2010 Front Display Glass Replacement: step 20, image 2 of 3 MacBook Pro 15" Unibody Mid 2010 Front Display Glass Replacement: step 20, image 3 of 3
    • Grab the upper case with your right hand and rotate it slightly toward the top of the display so the upper display bracket clears the edge of the upper case.

    • Rotate the display slightly away from the upper case.

    • Lift the display up and away from the upper case, minding any brackets or cables that may get caught.

  21. MacBook Pro 15" Unibody Mid 2010 Front Display Glass Replacement, Front Display Glass: step 21, image 1 of 2 MacBook Pro 15" Unibody Mid 2010 Front Display Glass Replacement, Front Display Glass: step 21, image 2 of 2
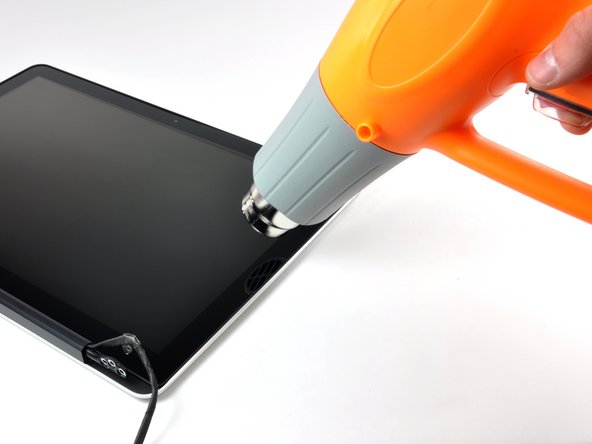
    • In the following steps, you will use a heat gun to soften the adhesive securing the outer black border around the underside of the front glass panel to the display. The area the adhesive is applied to is shown in red in the second picture.

    • Before starting, be sure to clean the display glass with lint-free cloth moistened with a mild solution; it will make the suction cup adhere better, and will make checking for dust on reassembly easier

    • With the heat gun set to low, start by heating the outer black border near the upper right corner of the glass panel.

    • Always aim the heat gun away from the soft rubber strip around the display glass. Heating the rubber will cause it to melt slightly, turning its finish from matte to glossy. Touching overheated rubber can cause it to permanently deform.

    • Due to the heat applied, it is normal for a layer of condensation to develop on the inside of the glass panel and/or the outside of the LCD. It can be removed with glass cleaner once the glass is separated from the display.

  22. MacBook Pro 15" Unibody Mid 2010 Front Display Glass Replacement: step 22, image 1 of 3 MacBook Pro 15" Unibody Mid 2010 Front Display Glass Replacement: step 22, image 2 of 3 MacBook Pro 15" Unibody Mid 2010 Front Display Glass Replacement: step 22, image 3 of 3
    Tool used on this step:
    Heavy-Duty Suction Cups (Pair)
    $14.95
    Buy
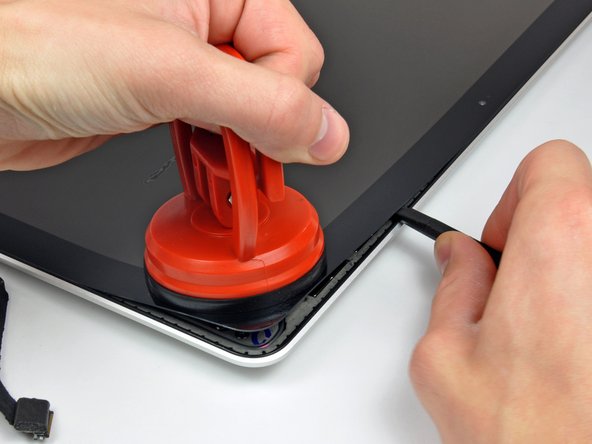
    • With the panel sufficiently heated, fasten a heavy-duty suction cup near the upper right corner of the display glass.

    • Don't fasten the suction cup on top of the rubber strip around the edge of the display glass.

    • To attach the suction cups we sell, first position the suction cup with the movable handle parallel to the face of the glass panel. While lightly holding the suction cup against the glass, raise the movable handle until it is parallel with the other handle.

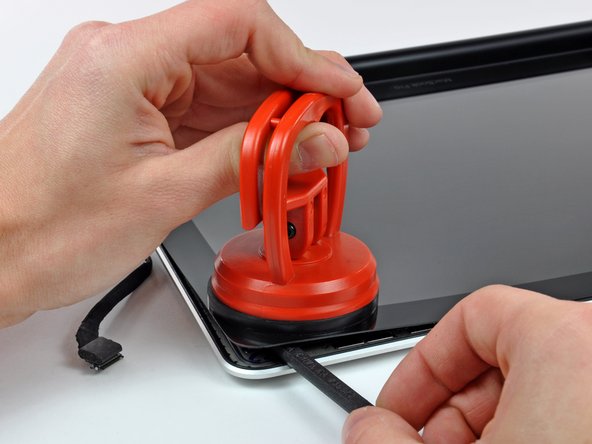
    • Slowly and gently pull the corner of the display glass up off the display assembly.

    • If only the top edge of the glass lifts up (as seen in the third picture), repeat steps one and two until you can lift up the corner of the panel.

  23. MacBook Pro 15" Unibody Mid 2010 Front Display Glass Replacement: step 23, image 1 of 3 MacBook Pro 15" Unibody Mid 2010 Front Display Glass Replacement: step 23, image 2 of 3 MacBook Pro 15" Unibody Mid 2010 Front Display Glass Replacement: step 23, image 3 of 3
    • Gently lift the corner of the display glass enough to insert a spudger between it and the display assembly.

    • Use the flat end of a spudger to gently pry up the adhesive securing the front glass to the display.

    • Pry up the glass panel a few inches away from the upper right corner along the top and right edges of the display.

  24. MacBook Pro 15" Unibody Mid 2010 Front Display Glass Replacement: step 24, image 1 of 2 MacBook Pro 15" Unibody Mid 2010 Front Display Glass Replacement: step 24, image 2 of 2
    • Use a heat gun to soften the adhesive under the black strip along the right side of the front glass panel.

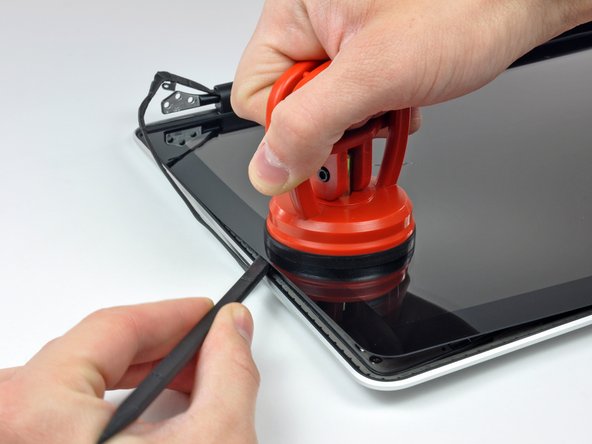
    • Attach a suction cup along the right side of the front glass panel.

    • Pull up on the glass panel while you use the flat end of a spudger to separate it from the rest of the display assembly.

    • Continue working along the right edge of the front display glass until it is separated from the display.

    • It may be helpful to use a guitar pick or another thin plastic object to keep the upper right corner of the front glass panel from sticking back down to the display assembly.

  25. MacBook Pro 15" Unibody Mid 2010 Front Display Glass Replacement: step 25, image 1 of 2 MacBook Pro 15" Unibody Mid 2010 Front Display Glass Replacement: step 25, image 2 of 2
    • Use your heat gun to soften the adhesive under the black strip along the top edge of the glass display panel.

    • Attach a suction cup near the top edge of the glass display panel and use it to pull the glass panel up off the display.

    • Work along the top edge of the glass panel, carefully using the flat end of a spudger to separate the adhesive if necessary.

  26. MacBook Pro 15" Unibody Mid 2010 Front Display Glass Replacement: step 26, image 1 of 2 MacBook Pro 15" Unibody Mid 2010 Front Display Glass Replacement: step 26, image 2 of 2
    • Use a heat gun to soften the adhesive under the black strip near the upper left corner of the glass display panel.

    • Attach a suction cup near the upper left corner of the glass display panel.

    • Pull up on the suction cup and use the flat end of a spudger to carefully pry the glass display panel out of the display assembly.

    • Once the upper left corner has been separated from the display, it may be helpful to use a guitar pick or another thin plastic object to keep the glass from sticking back down to the display assembly.

  27. MacBook Pro 15" Unibody Mid 2010 Front Display Glass Replacement: step 27, image 1 of 2 MacBook Pro 15" Unibody Mid 2010 Front Display Glass Replacement: step 27, image 2 of 2
    • Use a heat gun to soften the adhesive under the black strip along the left side of the front glass panel.

    • Attach a suction cup along the left side of the front glass panel.

    • Pull up on the glass panel while you use the flat end of a spudger to separate it from the rest of the display assembly.

    • Continue working along the left edge of the front display glass until it is separated from the display.

  28. MacBook Pro 15" Unibody Mid 2010 Front Display Glass Replacement: step 28, image 1 of 2 MacBook Pro 15" Unibody Mid 2010 Front Display Glass Replacement: step 28, image 2 of 2
    • Now that the top, left, and right edges of the glass are free from the display, slowly lift the top edge of the glass panel and gently rotate it out of the display.

    • If necessary, use the flat end of a spudger to free the bottom edge of the glass display panel from the display assembly.

    • Before reassembling, be sure to clean both the inside of the glass display panel and the LCD as any dust or fingerprints trapped inside will be annoyingly visible when the machine is on.

  29. MacBook Pro 15" Unibody Mid 2010 Front Display Glass Replacement: step 29, image 1 of 2 MacBook Pro 15" Unibody Mid 2010 Front Display Glass Replacement: step 29, image 2 of 2
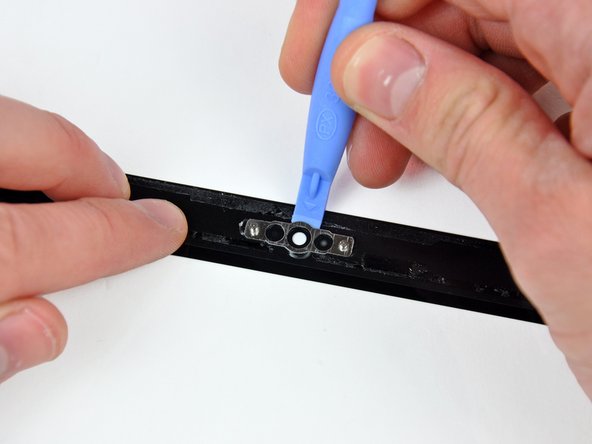
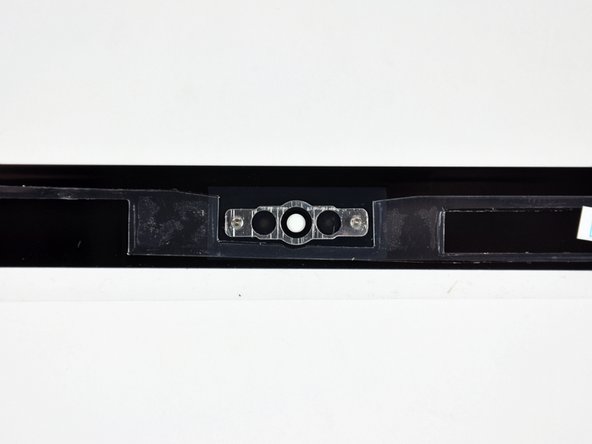
    • Insert the edge of a plastic opening tool between the display glass and the camera bracket, and run it around the camera bracket to separate it from the display glass.

    • Do not forget to stick the camera bracket down to the new front display glass before reassembly.

  30. MacBook Pro 15" Unibody Mid 2010 Front Display Glass Replacement: step 30, image 1 of 3 MacBook Pro 15" Unibody Mid 2010 Front Display Glass Replacement: step 30, image 2 of 3 MacBook Pro 15" Unibody Mid 2010 Front Display Glass Replacement: step 30, image 3 of 3
    • During the glass removal process, the camera cable may stick to the adhesive on the glass panel, disconnecting it from the camera board as the panel is lifted. If your camera cable is still connected to the camera board, skip this step.

    • To reconnect the cable, first use the tip of a spudger to remove the piece of foam tape over the camera cable ZIF socket.

    • Use the tip of a spudger to flip up the ZIF cable retainer on the camera cable socket.

    • Insert the camera cable into its socket on the camera board and use the tip of a spudger to snap down the ZIF cable retainer, locking the cable in place.

    • Reapply the piece of tape covering the camera cable socket.

Conclusion

To reassemble your device, follow these instructions in reverse order.

21 other people completed this guide.

6 Comments

It is easier to start in one of the lower corners. The glass is not held by the rubber bushing.

RodriguezAlberto - Reply

Is it really necessary to remove the display from the uppercase? Why can't you just start from step 21?

Hampus - Reply

I was wondering the same, is absolutely necessary to disassemble the screen to change the glass? Can I jump to step 21?

caholzmann -

No you don't need to remove the Top or Display to replace the glass.

Robert Lachman - Reply

I'm under the presumption that this method would be similar for other unibody versions such as the early / late 2011?

Circuit Tree - Reply

Add Comment

View Statistics:

Past 24 Hours: 1

Past 7 Days: 6

Past 30 Days: 22

All Time: 74,006