
MacBook Pro 15" Unibody Late 2011 RAM Replacement

What you need

  1. MacBook Pro 15" Unibody Late 2011 RAM Replacement, Lower Case: step 1, image 1 of 1
    • Remove the following ten screws securing the lower case to the upper case:

    • Three 13.5 mm (14.1 mm) Phillips screws.

    • Seven 3 mm Phillips screws.

    • When removing these screws, note how they come out at a slight angle. They must be reinstalled the same way.

  2. MacBook Pro 15" Unibody Late 2011 RAM Replacement: step 2, image 1 of 1
    • Using both hands, lift the lower case near the vent to pop it off two clips securing it to the upper case.

    • Remove the lower case and set it aside.

  3. MacBook Pro 15" Unibody Late 2011 RAM Replacement, Battery Connector: step 3, image 1 of 2 MacBook Pro 15" Unibody Late 2011 RAM Replacement, Battery Connector: step 3, image 2 of 2
    • For certain repairs (e.g. hard drive), disconnecting the battery connector is not necessary but is recommended as it prevents any accidental shorting of electronics on the motherboard. If you do not disconnect the battery connector, please be careful as parts of the motherboard might be electrified.

    • Use the edge of a spudger to pry the battery connector upwards from its socket on the logic board.

    • It is useful to pry upward on both short sides of the connector to "walk" it out of its socket.

  4. MacBook Pro 15" Unibody Late 2011 RAM Replacement: step 4, image 1 of 1
    • Bend the battery cable slightly away from its socket on the logic board so it does not accidentally connect itself while you work.

  5. MacBook Pro 15" Unibody Late 2011 RAM Replacement, RAM: step 5, image 1 of 3 MacBook Pro 15" Unibody Late 2011 RAM Replacement, RAM: step 5, image 2 of 3 MacBook Pro 15" Unibody Late 2011 RAM Replacement, RAM: step 5, image 3 of 3
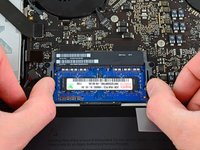
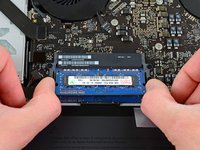
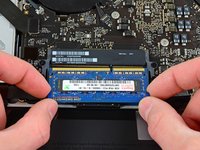
    • Release the tabs on each side of the RAM chip by simultaneously pushing each tab away from the RAM module.

    • These tabs lock the chip in place and releasing them will cause the chip to "pop" up.

    • After the RAM chip has popped up, pull it straight out of its socket.

    • Repeat this process if a second RAM chip is installed.

Conclusion

To reassemble your device, follow these instructions in reverse order.

115 other people completed this guide.

3 Comments

There's a visual of the screw configuration on the apple support website:

https://support.apple.com/en-us/HT201165

ff95 - Reply

Great tutorial, but I think moderate might be a bit of an understatement; this project took me roughly five minutes, and I’ve never taken apart a computer before.

Tyler Alberico - Reply

Sooo easy, thanks for great tutorial, I wish I had done this years ago.

hmg - Reply

Add Comment

View Statistics:

Past 24 Hours: 1

Past 7 Days: 10

Past 30 Days: 50

All Time: 62,433