Free Shipping on Domestic Orders $75+

MacBook Pro 15" Unibody Late 2008 and Early 2009 Left Fan Replacement

What you need

    1. MacBook Pro 15" Unibody Late 2008 and Early 2009 Left Fan Replacement, Access Door: step 1, image 1 of 2 MacBook Pro 15" Unibody Late 2008 and Early 2009 Left Fan Replacement, Access Door: step 1, image 2 of 2
      • With the case closed, place the Unibody top-side down on a flat surface.

      • Depress the grooved side of the access door release latch enough to grab the free end. Lift the release latch until it is vertical.

      Ask FixBot

      Add Comment

    2. MacBook Pro 15" Unibody Late 2008 and Early 2009 Left Fan Replacement: step 2, image 1 of 1
      • The access door should now be raised enough to lift it up and out of the Unibody.

      Ask FixBot

      Add Comment

    1. MacBook Pro 15" Unibody Late 2008 and Early 2009 Left Fan Replacement, Battery: step 3, image 1 of 1
      • Be sure the access door release latch is vertical before proceeding.

      • Grab the translucent plastic tab and pull the battery up and out of the Unibody.

      • If the latch is depressed it will lock the battery in place.

      Ask FixBot

      Add Comment

    1. MacBook Pro 15" Unibody Late 2008 and Early 2009 Left Fan Replacement, Lower Case: step 4, image 1 of 1
      • Remove the following eight screws securing the lower case to the chassis:

      • One 5.4 mm Phillips screw.

      • Three 14 mm Phillips screws.

      • Four 3.5 mm Phillips screws.

      Ask FixBot

      Add Comment

    2. MacBook Pro 15" Unibody Late 2008 and Early 2009 Left Fan Replacement: step 5, image 1 of 1
      • Using both hands, lift and remove the lower case off the upper case.

      Ask FixBot

      Add Comment

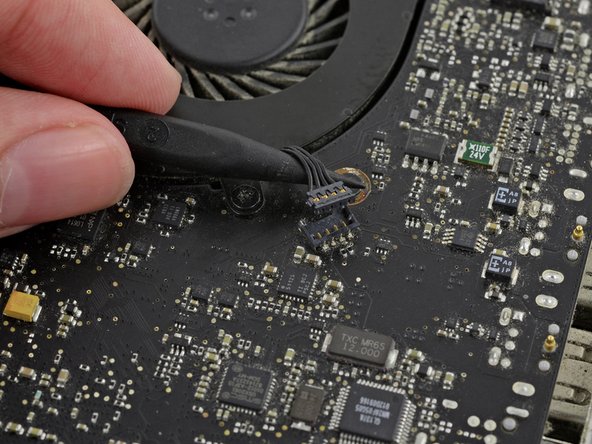
    1. MacBook Pro 15" Unibody Late 2008 and Early 2009 Left Fan Replacement, Left Fan: step 6, image 1 of 2 MacBook Pro 15" Unibody Late 2008 and Early 2009 Left Fan Replacement, Left Fan: step 6, image 2 of 2
      • Use a spudger to pry the fan connector straight up off the logic board.

      • Be sure to only pry up on the connector itself not on the socket or you may damage the machine.

      • It is useful to twist the spudger axially from beneath the fan cable wires to release the connector.

      Ask FixBot

      Add Comment

    2. MacBook Pro 15" Unibody Late 2008 and Early 2009 Left Fan Replacement: step 7, image 1 of 1
      • Remove three 3.5 mm Phillips screws securing the left fan to the upper case and logic board.

      Ask FixBot

      Add Comment

    3. MacBook Pro 15" Unibody Late 2008 and Early 2009 Left Fan Replacement: step 8, image 1 of 1
      • Lift the fan out of the upper case.

      Ask FixBot

      Add Comment

Conclusion

To reassemble your device, follow these instructions in reverse order.

Cancel: I did not complete this guide.

94 other people completed this guide.

1 Guide Comment

Very easy to do following the instructions, Thank you. A word of caution though, The fans screws are really tight so be careful and use a good fitting screw driver. The screw heads are easily damaged.

Poppy - Reply Share

Add Comment

View Statistics:

Past 24 Hours: 1

Past 7 Days: 6

Past 30 Days: 52

All Time: 56,730