
MacBook Pro 15" Retina Display Mid 2012 Upper Case Assembly Replacement

What you need

  1. MacBook Pro 15" Retina Display Mid 2012 Upper Case Assembly Replacement, Lower Case: step 1, image 1 of 1
    • Remove the following P5 pentalobe screws securing the lower case to the MacBook Pro:

    • Eight 3.0 mm

    • Two 2.3 mm

  2. MacBook Pro 15" Retina Display Mid 2012 Upper Case Assembly Replacement: step 2, image 1 of 1
    • Lifting from the edge nearest the clutch cover, lift the lower case off the MacBook Pro.

    • Set the lower case aside.

  3. MacBook Pro 15" Retina Display Mid 2012 Upper Case Assembly Replacement, Battery Connector: step 3, image 1 of 1
    • Peel back the warning label covering the battery connector.

  4. MacBook Pro 15" Retina Display Mid 2012 Upper Case Assembly Replacement: step 4, image 1 of 2 MacBook Pro 15" Retina Display Mid 2012 Upper Case Assembly Replacement: step 4, image 2 of 2
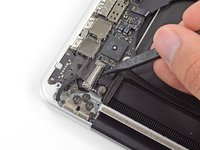
    • Using the flat end of a spudger, gently pry the battery connector straight up out of its socket on the logic board.

    • Bend the battery cables back and out of the way, ensuring that the battery connector doesn't accidentally make contact with the logic board.

  5. MacBook Pro 15" Retina Display Mid 2012 Upper Case Assembly Replacement, AirPort/Camera Cable: step 5, image 1 of 1
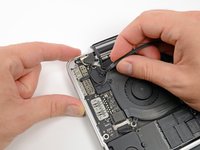
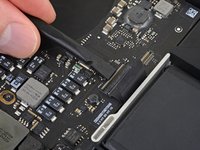
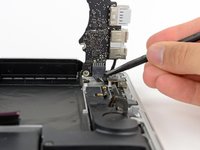
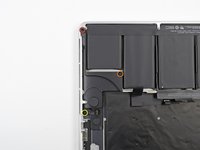
    • Use a spudger or tweezers to pry the three AirPort antenna cables straight up off of their sockets on the AirPort board.

    • The cable connection points are fragile. Be careful to lift only on the connector, and not on the socket or cable.

    • To reconnect, align the connector carefully into position over the socket, and press it down firmly with the flat of your spudger.

  6. MacBook Pro 15" Retina Display Mid 2012 Upper Case Assembly Replacement: step 6, image 1 of 1
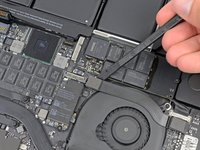
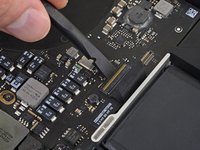
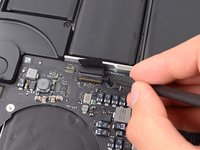
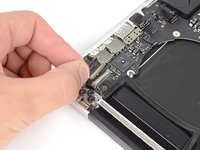
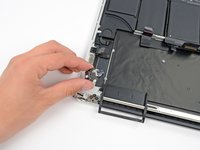
    • Use the tip of a spudger to push the camera cable's plug toward the fan and out of its socket on the logic board.

    • The plug in the photo has six connections, but some models have twelve connections. The process of removing the plug from its socket is the same for both.

    • If the camera cable's plug won't come easily out of its socket on the logic board, fold back the rubber cover over the fan to gain access to the cable, then gently pull on the cable while using the spudger to gently push the plug out of its socket.

    • Be sure to push parallel to the board, first on one side, then the other, to slowly "walk" the plug out of its socket. Do not pry up, or you will damage the socket.

  7. MacBook Pro 15" Retina Display Mid 2012 Upper Case Assembly Replacement: step 7, image 1 of 3 MacBook Pro 15" Retina Display Mid 2012 Upper Case Assembly Replacement: step 7, image 2 of 3 MacBook Pro 15" Retina Display Mid 2012 Upper Case Assembly Replacement: step 7, image 3 of 3
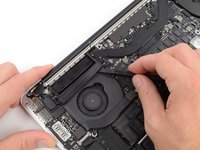
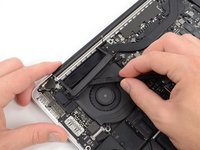
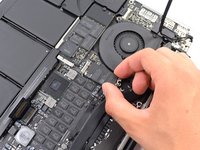
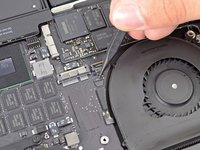
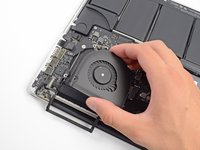
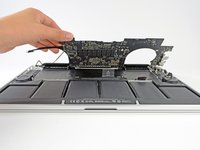
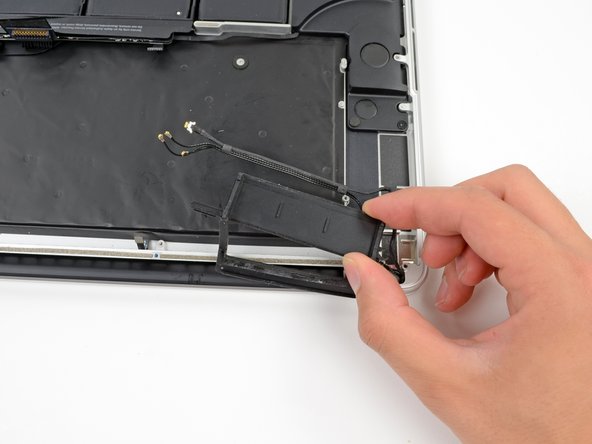
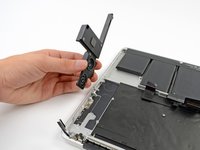
    • Insert the flat end of a spudger underneath the rubber heat sink cover on the right fan.

    • Slide the spudger underneath the length of the cover, releasing the adhesive.

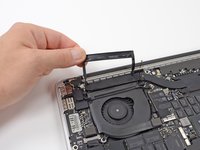
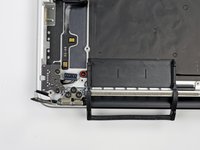
    • Lift the cover and flip it back so that you can access the cables underneath.

  8. MacBook Pro 15" Retina Display Mid 2012 Upper Case Assembly Replacement: step 8, image 1 of 3 MacBook Pro 15" Retina Display Mid 2012 Upper Case Assembly Replacement: step 8, image 2 of 3 MacBook Pro 15" Retina Display Mid 2012 Upper Case Assembly Replacement: step 8, image 3 of 3
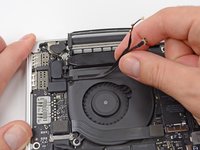
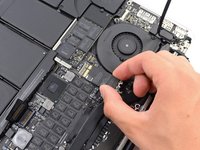
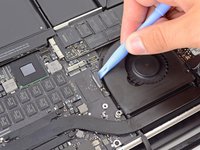
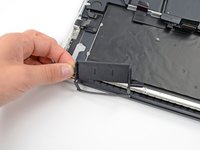
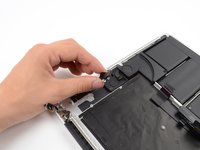
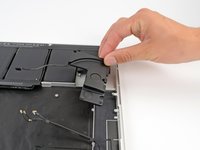
    • Use your fingers to pull the AirPort/Camera cables up off the fan.

    • The cables are adhered to the fan, so peel them up carefully to avoid damaging them.

    • Carefully de-route the cables from the plastic cable guide.

  9. MacBook Pro 15" Retina Display Mid 2012 Upper Case Assembly Replacement, Rubber Hinge Covers: step 9, image 1 of 2 MacBook Pro 15" Retina Display Mid 2012 Upper Case Assembly Replacement, Rubber Hinge Covers: step 9, image 2 of 2
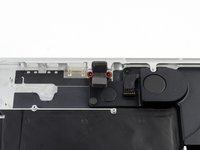
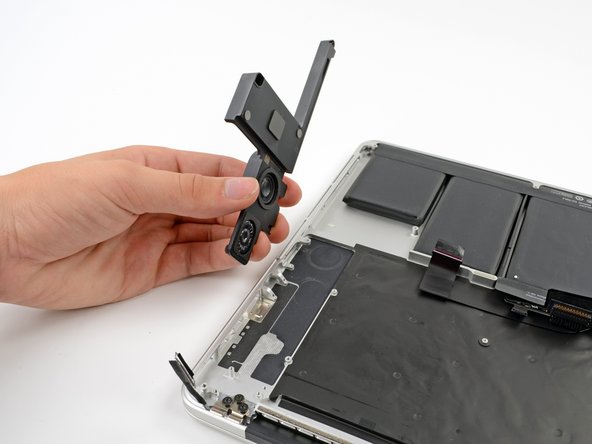
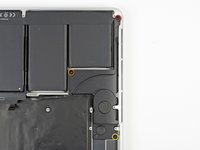
    • Use the flat end of a spudger to pry the rubber hinge covers up off the left and right hinges.

  10. MacBook Pro 15" Retina Display Mid 2012 Upper Case Assembly Replacement, Display Assembly Screws: step 10, image 1 of 2 MacBook Pro 15" Retina Display Mid 2012 Upper Case Assembly Replacement, Display Assembly Screws: step 10, image 2 of 2
    • Remove the two 3.1 mm T5 Torx screws securing the aluminum hinge covers to the upper case.

    • Remove the two aluminum hinge brackets from the MacBook Pro.

  11. MacBook Pro 15" Retina Display Mid 2012 Upper Case Assembly Replacement, I/O Board Cable: step 11, image 1 of 3 MacBook Pro 15" Retina Display Mid 2012 Upper Case Assembly Replacement, I/O Board Cable: step 11, image 2 of 3 MacBook Pro 15" Retina Display Mid 2012 Upper Case Assembly Replacement, I/O Board Cable: step 11, image 3 of 3
    • If your I/O Board cable's connectors have notches in the padding, you will need to release a locking lever underneath the notch in order to remove the cable. If this is the case, don't pry up on the connector until the levers are unlatched.

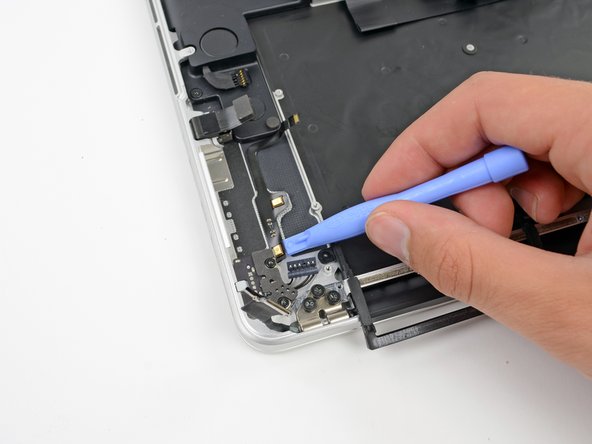
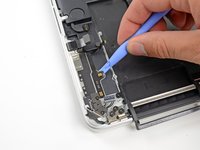
    • Using the flat end of a spudger, pry the I/O Board connector straight up out of its socket on the logic board.

    • During reassembly, connect this end first, as it does not flex.

    • In a similar fashion, remove the I/O Board cable connector from its socket on the I/O Board.

    • Remove the I/O Board cable from the MacBook Pro.

  12. MacBook Pro 15" Retina Display Mid 2012 Upper Case Assembly Replacement, Airport Card: step 12, image 1 of 1
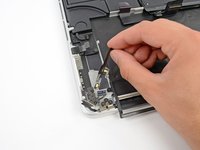
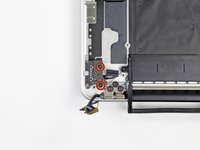
    • Remove the single 2.9 mm T5 Torx screw securing the AirPort card to the logic board.

  13. MacBook Pro 15" Retina Display Mid 2012 Upper Case Assembly Replacement: step 13, image 1 of 2 MacBook Pro 15" Retina Display Mid 2012 Upper Case Assembly Replacement: step 13, image 2 of 2
    • Grasp the sides of the AirPort card and lift it up to a shallow angle (5-10Ëš) to separate the light adhesive adhering it to the logic board.

    • Pull the AirPort card parallel out of its connector on the logic board to remove it.

  14. MacBook Pro 15" Retina Display Mid 2012 Upper Case Assembly Replacement: step 14, image 1 of 2 MacBook Pro 15" Retina Display Mid 2012 Upper Case Assembly Replacement: step 14, image 2 of 2
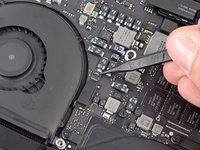
    • Use the tip of a spudger to flip up the retaining flap on the right fan ribbon cable ZIF socket.

    • Be sure you are prying up on the hinged retaining flap, not the socket itself.

    • Starting at the top of the cable, slide a plastic opening tool under the right fan cable to free it from the logic board.

    • Use caution when freeing the cable, as it is strongly adhered to the logic board.

  15. MacBook Pro 15" Retina Display Mid 2012 Upper Case Assembly Replacement: step 15, image 1 of 1
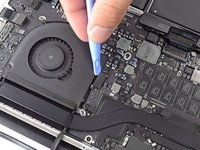
    • Remove the following three screws securing the right fan to the logic board:

    • One 4.4 mm T5 Torx screw

    • One 3.9 mm T5 Wide Head Torx screw

    • One 5.0 mm T5 Torx screw with 2 mm collar

  16. MacBook Pro 15" Retina Display Mid 2012 Upper Case Assembly Replacement: step 16, image 1 of 1
    • Lift and remove the right fan out from the MacBook Pro.

    • When reinstalling the fan, it's easiest connect the fan ribbon cable as you drop the fan in place, rather than after you've installed the three fan screws.

  17. MacBook Pro 15" Retina Display Mid 2012 Upper Case Assembly Replacement, Left Fan: step 17, image 1 of 1
    • Use the flat end of a spudger to lift the rubber heat sink cover up off the left fan.

  18. MacBook Pro 15" Retina Display Mid 2012 Upper Case Assembly Replacement: step 18, image 1 of 1
    • Remove the following three screws securing the left fan to the logic board:

    • One 4.4 mm T5 Torx screw with 2 mm collar

    • One 5.0 mm T5 Torx screw with 2 mm collar

    • One 3.9 mm T5 Wide Head Torx screw

    • When reinstalling the fan and its screws, don't fully torque the screws until you've first installed all of them loosely, so that the fan can move a little and position itself properly as you insert the screws into their threaded standoffs.

  19. MacBook Pro 15" Retina Display Mid 2012 Upper Case Assembly Replacement: step 19, image 1 of 3 MacBook Pro 15" Retina Display Mid 2012 Upper Case Assembly Replacement: step 19, image 2 of 3 MacBook Pro 15" Retina Display Mid 2012 Upper Case Assembly Replacement: step 19, image 3 of 3
    • Use the tip of a spudger to flip up the retaining flap on the left fan ribbon cable ZIF socket.

    • Be sure you are prying up on the hinged retaining flap, not the socket itself.

    • Starting at the top of the cable, slide a plastic opening tool under the left fan cable to free it from the logic board.

    • Use caution when freeing the cable, as it is strongly adhered to the logic board. If necessary, use an iOpener or hair dryer to heat the cable in order to soften the adhesive and make it easier to remove.

    • Lift the left fan out of the device.

    • When reinstalling the fan, it's easier to connect the fan ribbon cable as you drop the fan in place, rather than after you've installed the three fan screws.

  20. MacBook Pro 15" Retina Display Mid 2012 Upper Case Assembly Replacement, SSD: step 20, image 1 of 1
    • Remove the single 3.1 mm T5 Torx screw securing the SSD to the logic board.

  21. MacBook Pro 15" Retina Display Mid 2012 Upper Case Assembly Replacement: step 21, image 1 of 2 MacBook Pro 15" Retina Display Mid 2012 Upper Case Assembly Replacement: step 21, image 2 of 2
    • Slightly lift the rightmost side of the SSD and firmly slide it straight away out of its socket on the logic board.

  22. MacBook Pro 15" Retina Display Mid 2012 Upper Case Assembly Replacement, I/O Board: step 22, image 1 of 2 MacBook Pro 15" Retina Display Mid 2012 Upper Case Assembly Replacement, I/O Board: step 22, image 2 of 2
    • Use the tip of a spudger to flip up the I/O board data cable lock and rotate it toward the battery side of the computer.

    • Use the flat end of a spudger to slide the I/O board data cable straight out of its socket on the logic board.

    • Do not lift up on the I/O board data cable, as its socket is very fragile. Pull the cable parallel to the face of the logic board.

  23. MacBook Pro 15" Retina Display Mid 2012 Upper Case Assembly Replacement: step 23, image 1 of 3 MacBook Pro 15" Retina Display Mid 2012 Upper Case Assembly Replacement: step 23, image 2 of 3 MacBook Pro 15" Retina Display Mid 2012 Upper Case Assembly Replacement: step 23, image 3 of 3
    • Remove the two 3.1 mm T5 Torx screws securing the I/O board to the logic board.

    • On some models, also removing the silver 3.5 mm T5 Torx screw from the heatsink can aid in I/O board removal.

    • Carefully lift the I/O board and remove it from the lower case.

  24. MacBook Pro 15" Retina Display Mid 2012 Upper Case Assembly Replacement, Logic Board Assembly: step 24, image 1 of 1
    • Use the flat end of a spudger to pry the headphone jack connector up from its socket on the logic board.

  25. MacBook Pro 15" Retina Display Mid 2012 Upper Case Assembly Replacement: step 25, image 1 of 2 MacBook Pro 15" Retina Display Mid 2012 Upper Case Assembly Replacement: step 25, image 2 of 2
    • Use the flat end of a spudger to pry the left speaker connector up and out of its socket on the logic board.

    • Use the tip of a spudger to pry the right speaker connector up and out of its socket on the logic board

    • Be sure to pry on the cable head, and not on the socket itself. Prying on the socket may cause it to separate from the logic board.

  26. MacBook Pro 15" Retina Display Mid 2012 Upper Case Assembly Replacement: step 26, image 1 of 1
    • Peel back any tape covering the keyboard ribbon cable connector.

  27. MacBook Pro 15" Retina Display Mid 2012 Upper Case Assembly Replacement: step 27, image 1 of 3 MacBook Pro 15" Retina Display Mid 2012 Upper Case Assembly Replacement: step 27, image 2 of 3 MacBook Pro 15" Retina Display Mid 2012 Upper Case Assembly Replacement: step 27, image 3 of 3
    • Use the flat end of a spudger to flip up the retaining flap on the keyboard ribbon cable ZIF socket.

    • Pry only under the hinged retaining flap, not the socket itself, or you may break it off the board.

    • Use the flat end of a spudger to gently back the keyboard ribbon cable out of its socket by pushing first at one side, then the other.

  28. MacBook Pro 15" Retina Display Mid 2012 Upper Case Assembly Replacement: step 28, image 1 of 1
    • Use the flat end of a spudger to pry the trackpad ribbon cable connector up from its socket on the logic board.

  29. MacBook Pro 15" Retina Display Mid 2012 Upper Case Assembly Replacement: step 29, image 1 of 1
    • Use the flat end of a spudger to pry the keyboard backlight connector up from its socket on the logic board.

  30. MacBook Pro 15" Retina Display Mid 2012 Upper Case Assembly Replacement: step 30, image 1 of 1
    • Use the tip of a spudger or your fingernail to flip up the retaining flap on the microphone ribbon cable ZIF socket.

    • Be sure you are prying up on the hinged retaining flap, not the socket itself.

    • Pull the microphone ribbon cable out of its socket.

  31. MacBook Pro 15" Retina Display Mid 2012 Upper Case Assembly Replacement: step 31, image 1 of 2 MacBook Pro 15" Retina Display Mid 2012 Upper Case Assembly Replacement: step 31, image 2 of 2
    • Use the tip of a spudger to pry the display data cable lock and rotate it toward the DC-In side of the computer.

    • Pull the display data cable straight out of its socket on the logic board.

    • Do not lift up on the display data cable, as its socket is very fragile. Pull the cable parallel to the face of the logic board.

  32. MacBook Pro 15" Retina Display Mid 2012 Upper Case Assembly Replacement: step 32, image 1 of 1
    • Use the flat end of a spudger to carefully pry off the rubber screw cap on the raised screw head near to the MagSafe 2 connector.

  33. MacBook Pro 15" Retina Display Mid 2012 Upper Case Assembly Replacement: step 33, image 1 of 1
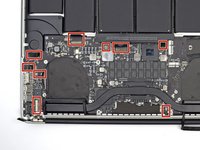
    • Remove the following six screws securing the logic board to to the upper case:

    • One 2.6 mm T5 Torx screw

    • Two 5.8 mm T5 Torx screws

    • One 3.8 mm T5 Torx screw

    • One 5.2 mm Raised Head T5 Torx screw

    • One 3.5 mm Silver T5 Torx screw

  34. MacBook Pro 15" Retina Display Mid 2012 Upper Case Assembly Replacement: step 34, image 1 of 3 MacBook Pro 15" Retina Display Mid 2012 Upper Case Assembly Replacement: step 34, image 2 of 3 MacBook Pro 15" Retina Display Mid 2012 Upper Case Assembly Replacement: step 34, image 3 of 3
    • Lifting from the side nearest the battery, rotate the logic board toward the top of the MacBook Pro.

    • Using the flat end of a spudger, carefully push the MagSafe 2 connector out of its socket on the bottom of the logic board.

    • When reinstalling the logic board, check the cables at the marked locations to make sure they don't get pinned underneath the logic board.

    • Clockwise from top: keyboard, trackpad, battery, right speaker, keyboard backlight, display, microphone, headphone jack, left speaker.

  35. MacBook Pro 15" Retina Display Mid 2012 Upper Case Assembly Replacement: step 35, image 1 of 1
    • Remove the logic board assembly from the MacBook Pro.

  36. MacBook Pro 15" Retina Display Mid 2012 Upper Case Assembly Replacement, Upper Case Assembly: step 36, image 1 of 3 MacBook Pro 15" Retina Display Mid 2012 Upper Case Assembly Replacement, Upper Case Assembly: step 36, image 2 of 3 MacBook Pro 15" Retina Display Mid 2012 Upper Case Assembly Replacement, Upper Case Assembly: step 36, image 3 of 3
    • Remove the single 2.6 mm T5 Torx screw securing the left rubber hinge cover in place.

    • Slide the hinge cover out of its bezel, then lift it up and out of the device.

    • The screw in the right hinge cover should already have been removed.

    • Slide the right cover out of its bezel, then lift it out of the device.

  37. MacBook Pro 15" Retina Display Mid 2012 Upper Case Assembly Replacement: step 37, image 1 of 3 MacBook Pro 15" Retina Display Mid 2012 Upper Case Assembly Replacement: step 37, image 2 of 3 MacBook Pro 15" Retina Display Mid 2012 Upper Case Assembly Replacement: step 37, image 3 of 3
    • Insert the edge of a plastic opening tool underneath the upper microphone.

    • Slide the blade of a plastic opening tool along the bottom of the upper microphone, releasing the adhesive.

    • Be careful when releasing the adhesive holding the cable down, as these cables have been known to tear easily.

    • In a similar manner, release the adhesive underneath the lower microphone.

    • Lift the cable out of the device.

  38. MacBook Pro 15" Retina Display Mid 2012 Upper Case Assembly Replacement: step 38, image 1 of 2 MacBook Pro 15" Retina Display Mid 2012 Upper Case Assembly Replacement: step 38, image 2 of 2
    • Remove the two 4.0 mm T5 Torx screws securing the MagSafe DC-In board to the upper case.

    • Slide the MagSafe DC-In board towards the right free it from its recess within the upper case.

    • Lift and remove the MagSafe DC-In board out of the upper case assembly.

  39. MacBook Pro 15" Retina Display Mid 2012 Upper Case Assembly Replacement: step 39, image 1 of 2 MacBook Pro 15" Retina Display Mid 2012 Upper Case Assembly Replacement: step 39, image 2 of 2
    • Remove the two 3.6 mm T5 Torx screws securing the headphone jack to the upper case assembly.

    • Slide the headphone jack away from the upper case.

    • Lift and remove the headphone jack out from its recess in the upper case.

  40. MacBook Pro 15" Retina Display Mid 2012 Upper Case Assembly Replacement: step 40, image 1 of 2 MacBook Pro 15" Retina Display Mid 2012 Upper Case Assembly Replacement: step 40, image 2 of 2
    • Remove the following three screws securing the left speaker to the upper case:

    • One 5.6 mm T5 Torx screw

    • One 6.9 mm T5 Torx screw

    • One 2.6 mm T5 Torx screw

    • Lift the left speaker out of the upper case and set it aside.

  41. MacBook Pro 15" Retina Display Mid 2012 Upper Case Assembly Replacement: step 41, image 1 of 2 MacBook Pro 15" Retina Display Mid 2012 Upper Case Assembly Replacement: step 41, image 2 of 2
    • Remove the following three screws securing the right speaker to the upper case:

    • One 5.6 mm T5 Torx screw

    • One 6.9 mm T5 Torx screw

    • One 2.6 mm T5 Torx screw

    • Remove the right speaker from the MacBook Pro.

  42. MacBook Pro 15" Retina Display Mid 2012 Upper Case Assembly Replacement: step 42, image 1 of 1
    • Remove four out of the six 5.3 mm T8 Torx screws securing the display to the upper case.

    • We purposely have you leave two screws attaching the display to the upper case to aid in future steps.

  43. MacBook Pro 15" Retina Display Mid 2012 Upper Case Assembly Replacement: step 43, image 1 of 2 MacBook Pro 15" Retina Display Mid 2012 Upper Case Assembly Replacement: step 43, image 2 of 2
    • Open the device between 90 and 100 degrees, then rest it on its side.

    • While supporting both halves of the device with one hand, unscrew the upper 5.3 mm T8 Torx screw.

    • Repeat the same process for the identical bottom screw.

    • Be sure to hold the display and upper case together with one hand. Failure to do so may cause the freed display/upper case to fall, potentially damaging each component.

  44. MacBook Pro 15" Retina Display Mid 2012 Upper Case Assembly Replacement: step 44, image 1 of 2 MacBook Pro 15" Retina Display Mid 2012 Upper Case Assembly Replacement: step 44, image 2 of 2
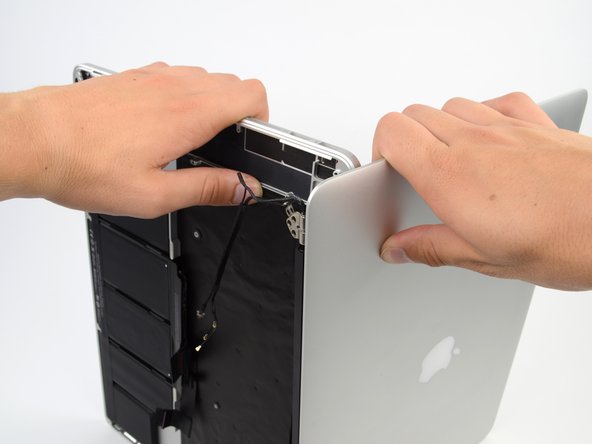
    • Grip both halves of the device. Firmly put one hand on the top center of the upper case (left) and one in the same place on the display assembly (right).

    • While holding the display assembly in place, slowly push forward on the upper case, releasing it from the display assembly.

  45. MacBook Pro 15" Retina Display Mid 2012 Upper Case Assembly Replacement: step 45, image 1 of 1
    • Upper case remains.

Conclusion

To reassemble your device, follow these instructions in reverse order.

50 other people completed this guide.

Jake Devincenzi

Member since: 04/18/11

117,207 Reputation

57 Guides authored

9 Comments

How Can I clean a coffee spill on the retina macbook pro? which alcohol to use to clean the logic board and I/O board? Will I get all the necessary tools to open it in Home Tech toolkit?

Neeraj Saini - Reply

Please note a T8 Torx Screwdriver is needed in this guide for the display screws.

rfoppen - Reply

-It would be cool a 3rd party battery manufacturer to make a spare battery without the glue.

-Ony needed to remove the glued one (no prob. if damage it.. it is no good anyway, anymore) and put in place a new one with no glue held in place just by the lack of space inside the case, or some tiny spongy strips to help remove any play.

-The thing is who would manufacture a spare like this.

-Even Apple could supply spares like this.

crus - Reply

I have always turned to iFixIt for repair guides. This particular repair, listed as "difficult," was one that I was apprehensive about undertaking. But I was successful!

I have a brief blog post about it here:

http://www.hightechdad.com/2014/12/22/ho...

And, for those who are going through this guide, I have a LONG (30 minute) video that walks through the repair using the iFixIt guide:

https://www.youtube.com/watch?v=2ODfFSMs...

Hope it helps!

-HTD

HighTechDad - Reply

== The good ==

Very clear instructions, well done.

== The warning ==

There is one major problem though ... I purchased the Upper Case Assembly as mentioned, although from a local retailer in Australia. When I got to the final step, I realised it didn't have the battery or touchpad. If you purchase the case assembly from elsewhere, make sure it comes with the battery/touchpad as these are impossible to move from one unit to another.

carl - Reply

Add Comment

View Statistics:

Past 24 Hours: 0

Past 7 Days: 4

Past 30 Days: 46

All Time: 67,296