Introduction
Replacing a defective fan is pretty easy and will keep your laptop running cool.
What you need
-
-
Use your fingers to push both battery release tabs away from the battery, and lift the battery out of the computer.
-
-
-
Remove the three identical 2mm Phillips screws from the memory door.
-
Lift the memory door up enough to grip it and slide it toward you, pulling it away from the casing.
-
-
-
Remove the two 2.8 mm Phillips screws in the battery compartment near the latch.
-
-
-
-
Lift up at the rear of the case and work your fingers along the sides, freeing the case as you go. Once you have freed the sides, you may need to rock the case up and down to free the front of the upper case.
-
There are four plastic clips above the DVD slot, and another above and to the left of the IR sensor. These clips can be very difficult to disengage without prying. They can also be difficult to re-engage during reassembly.
-
-
-
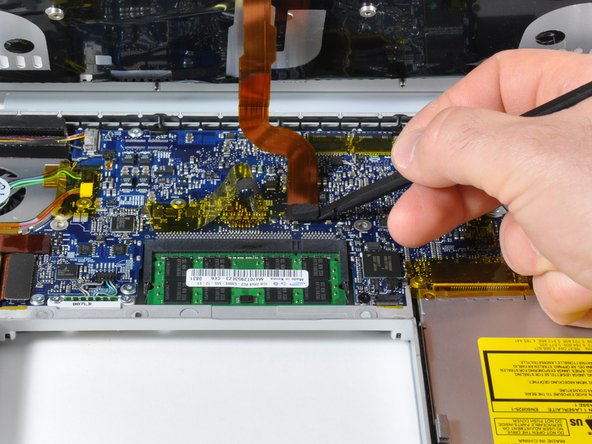
Use a spudger to disconnect the iSight cable from the logic board by sliding the cable to the left and out of its connector.
-
To reassemble your device, follow these instructions in reverse order.
To reassemble your device, follow these instructions in reverse order.
Cancel: I did not complete this guide.
186 other people completed this guide.
6 Comments
I used this to take the fan out and blow it out with compressed air, and it solved my fan noise problem!
Followed the instructions and it was all fairly straightforward, but my right speaker now appears to not be working. I haven't had the motivation to crack the case again and see if I can find what is wrong with that. At least the grinding fan noise is gone, so I can live with it for now.
I had no problems replacing the left fan as per instructions. Even though I did buy the spudger, the only hitch for me was the isight cable which I didn't end up disconnecting. I was able to gently remove the fan anyway.
Just organise your screws properly as you go along & they will all go back into place !
Very happy !
I didn't see the reason for step 10, I did not disconnect the iSight cable and had no problem getting the fan out and in. The black tape lifted from the fan assemblies does not stick well on reassembly so I added a piece of tape over the original tape. Photos from my experience: https://www.flickr.com/photos/jmschneid/...
I wanna thank OP for this article. I used it to replace a rattly left fan in my 17" macbook, honestly in pretty easy fashion. Again, your thoroughness is very appreciated!!


