
MacBook Pro 13" Unibody Mid 2010 Key Cap Removal

  1. MacBook Pro 13" Unibody Mid 2010 Key Cap Removal, Identify the Keyboard Key: step 1, image 1 of 1
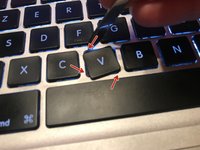
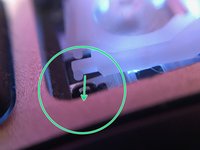
    • The small lug that holds the button's hinge pin is clearly visible in the circled area, and the other half of the pair is pointed to by the arrow.

    • The video demonstrates how to insert the blade of a knife carefully behind the lug and push it in far enough for the pin to clear the lug.

    • Depending on the tool you use, be careful not to damage the plastic of the keys or the key's hinge mechanism.

  2. MacBook Pro 13" Unibody Mid 2010 Key Cap Removal, Remove the Key: step 3, image 1 of 2 MacBook Pro 13" Unibody Mid 2010 Key Cap Removal, Remove the Key: step 3, image 2 of 2
    • Once the key is freed from the left side mechanism, it is still connected on the right side.

    • Release the key by rotating it counterclockwise with a tool or your fingers.

  3. MacBook Pro 13" Unibody Mid 2010 Key Cap Removal: step 4, image 1 of 1
    • Unclip the lever arm by carefully inserting a spatula or a knife (be careful, the metal can damage the fingerboard).

    • Detach the white part of the key. Take this opportunity to clean any dust or debris from the key or the hinge mechanism.

  4. MacBook Pro 13" Unibody Mid 2010 Key Cap Removal, Reassembling the Hinge Mechanism: step 5, image 1 of 3 MacBook Pro 13" Unibody Mid 2010 Key Cap Removal, Reassembling the Hinge Mechanism: step 5, image 2 of 3 MacBook Pro 13" Unibody Mid 2010 Key Cap Removal, Reassembling the Hinge Mechanism: step 5, image 3 of 3
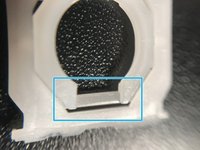
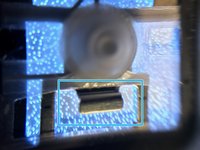
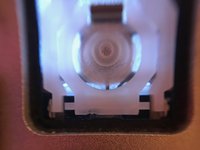
    • Insert the hinge (framed in the photo) into the metal slot in the keyboard as shown in the second photo.

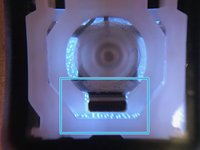
    • The third photo shows the hinge mechanism properly in place.

  5. MacBook Pro 13" Unibody Mid 2010 Key Cap Removal, Insert the Hinge Pins: step 6, image 1 of 2 MacBook Pro 13" Unibody Mid 2010 Key Cap Removal, Insert the Hinge Pins: step 6, image 2 of 2
    • As shown in the photo, reinsert the hinge's pin into the metal lug on both sides.

  6. MacBook Pro 13" Unibody Mid 2010 Key Cap Removal: step 7, image 1 of 1
    • The final step is to place the key on the hinge mechanism and press hard on it so that the key clicks into place; the sound of the clips locking will be perceptible. There are four clips holding the key cap.

Conclusion

Congratulations; you can now remove and replace most any key on the keyboard.

4 other people completed this guide.

Special thanks to these translators:

fr en

100%

These translators are helping us fix the world! Want to contribute?
Start translating ›

Alexandra Lem

Member since: 03/11/20

423 Reputation

1 Guide authored

0 Comments

Add Comment

View Statistics:

Past 24 Hours: 7

Past 7 Days: 98

Past 30 Days: 386

All Time: 3,145