
MacBook Pro 13" Unibody Early 2011 Display Replacement

What you need

  1. MacBook Pro 13" Unibody Early 2011 Display Replacement, Lower Case: step 1, image 1 of 1
    • Remove the following ten screws:

    • Three 14.4 mm Phillips #00 screws

    • Three 3.5 mm Phillips #00 screws

    • Four 3.5 mm shouldered Phillips #00 screws

    • When replacing the small screws, align them perpendicular to the slight curvature of the case (they don't go straight down).

  2. MacBook Pro 13" Unibody Early 2011 Display Replacement: step 2, image 1 of 2 MacBook Pro 13" Unibody Early 2011 Display Replacement: step 2, image 2 of 2
    • Use your fingers to pry the lower case away from the body of the MacBook near the vent.

    • Remove the lower case.

  3. MacBook Pro 13" Unibody Early 2011 Display Replacement, Battery Connection: step 3, image 1 of 2 MacBook Pro 13" Unibody Early 2011 Display Replacement, Battery Connection: step 3, image 2 of 2
    • Use the edge of a spudger to pry the battery connector upwards from its socket on the logic board.

    • It is useful to pry upward on both short sides of the connector to "walk" it out of its socket. Be careful with the corners of the connectors, they can be easily broken off.

  4. MacBook Pro 13" Unibody Early 2011 Display Replacement: step 4, image 1 of 1
    • Bend the battery cable slightly away from its socket on the logic board so it does not accidentally connect itself while you work.

  5. MacBook Pro 13" Unibody Early 2011 Display Replacement, AirPort/Bluetooth Assembly: step 5, image 1 of 1
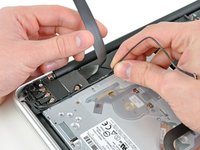
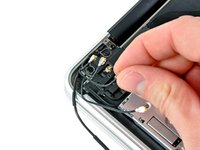
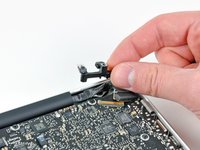
    • Use the flat end of a spudger to pry the AirPort/Bluetooth ribbon cable connector up from its socket on the logic board.

  6. MacBook Pro 13" Unibody Early 2011 Display Replacement: step 6, image 1 of 1
    • Carefully pull the camera cable out of its socket on the logic board.

    • Pull the cable parallel to the face of the logic board. Pulling it upward may damage the logic board or the cable itself.

  7. MacBook Pro 13" Unibody Early 2011 Display Replacement: step 7, image 1 of 2 MacBook Pro 13" Unibody Early 2011 Display Replacement: step 7, image 2 of 2
    • Carefully move the AirPort/Bluetooth ribbon cable out of the way as you peel the camera cable off the adhesive securing it to the subwoofer and the AirPort/Bluetooth bracket.

    • De-route the camera cable out from under the retaining finger molded into the AirPort/Bluetooth bracket.

  8. MacBook Pro 13" Unibody Early 2011 Display Replacement: step 8, image 1 of 2 MacBook Pro 13" Unibody Early 2011 Display Replacement: step 8, image 2 of 2
    • Use the tip of a spudger to pry the antenna connector closest to the logic board up from its socket on the AirPort/Bluetooth board.

    • De-route the antenna cable from under the finger molded into the AirPort/Bluetooth bracket.

  9. MacBook Pro 13" Unibody Early 2011 Display Replacement: step 9, image 1 of 2 MacBook Pro 13" Unibody Early 2011 Display Replacement: step 9, image 2 of 2
    • Using the method described in the last step, disconnect the remaining three antenna connectors.

    • De-route their cables from the slots cut in the AirPort/Bluetooth bracket.

  10. MacBook Pro 13" Unibody Early 2011 Display Replacement: step 10, image 1 of 1
    • Remove the following five screws:

    • Two 10.3 mm Phillips screws

    • Two 3.1 mm Phillips screws

    • One 5 mm Phillips screw

  11. MacBook Pro 13" Unibody Early 2011 Display Replacement: step 11, image 1 of 1
    • Pull the AirPort/Bluetooth assembly and the Subwoofer upward near the center of the side of the optical drive until they clear each other.

  12. MacBook Pro 13" Unibody Early 2011 Display Replacement: step 12, image 1 of 1
    • Remove the AirPort/Bluetooth assembly, minding the fragile antenna contact near the corner of the upper case.

  13. MacBook Pro 13" Unibody Early 2011 Display Replacement, Display: step 13, image 1 of 1
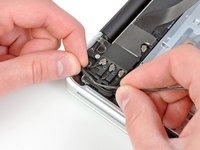
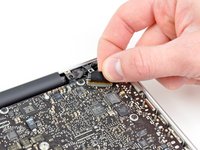
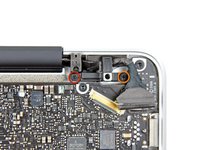
    • Remove two of the three 6 mm T8 Torx screws securing the right side of the display to the upper case.

    • We purposely have you leave one screw attaching the display to the upper case to aid in future steps.

  14. MacBook Pro 13" Unibody Early 2011 Display Replacement: step 14, image 1 of 3 MacBook Pro 13" Unibody Early 2011 Display Replacement: step 14, image 2 of 3 MacBook Pro 13" Unibody Early 2011 Display Replacement: step 14, image 3 of 3
    • Grab the plastic pull tab secured to the display data cable lock and rotate it toward the DC-In side of the computer.

    • Pull the display data cable straight out of its socket on the logic board.

    • Do not lift up on the display data cable, as its socket is very fragile. Pull the cable parallel to the face of the logic board.

  15. MacBook Pro 13" Unibody Early 2011 Display Replacement: step 15, image 1 of 2 MacBook Pro 13" Unibody Early 2011 Display Replacement: step 15, image 2 of 2
    • Remove the following two screws:

    • One 8.6 mm Phillips screw

    • One 5.5 mm Phillips screw

    • Remove the display data cable retainer from the upper case.

  16. MacBook Pro 13" Unibody Early 2011 Display Replacement: step 16, image 1 of 1
    • Remove the piece of foam tape covering the display screws near the MagSafe DC-In board.

  17. MacBook Pro 13" Unibody Early 2011 Display Replacement: step 17, image 1 of 1
    • Remove two of the three 6 mm T8 Torx screws securing the left side of the display to the upper case.

    • We purposely have you leave one screw attaching the display to the upper case to aid in future steps.

  18. MacBook Pro 13" Unibody Early 2011 Display Replacement: step 18, image 1 of 1
    • Open your MacBook Pro so the display is perpendicular to the upper case.

    • Place your opened MacBook Pro on a table as pictured.

    • While holding the display and upper case together with your left hand, remove the remaining T8 Torx screw from the lower display bracket.

  19. MacBook Pro 13" Unibody Early 2011 Display Replacement: step 19, image 1 of 1
    • Be sure to hold the display and upper case together with your left hand. Failure to do so may cause the freed display/upper case to fall, potentially damaging each component.

    • Remove the last remaining T8 Torx screw securing the display to the upper case.

  20. MacBook Pro 13" Unibody Early 2011 Display Replacement: step 20, image 1 of 3 MacBook Pro 13" Unibody Early 2011 Display Replacement: step 20, image 2 of 3 MacBook Pro 13" Unibody Early 2011 Display Replacement: step 20, image 3 of 3
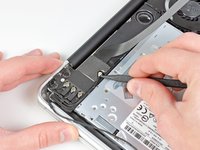
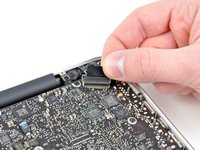
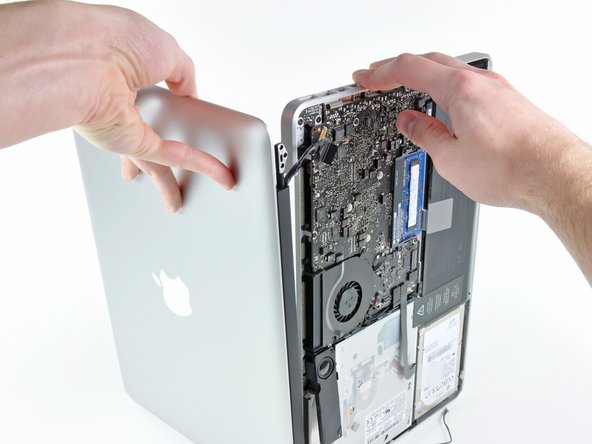
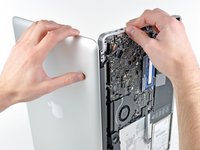
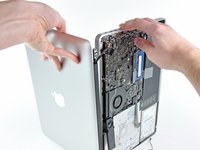
    • Grab the upper case with your right hand and rotate it slightly toward the top of the display so the upper display bracket clears the edge of the upper case.

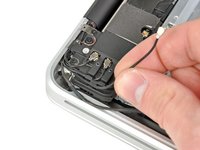
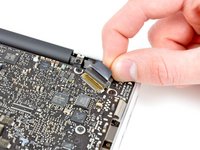
    • Rotate the display slightly away from the upper case.

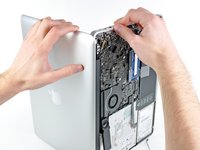
    • Lift the display up and away from the upper case, minding any brackets or cables that may get caught.

Conclusion

To reassemble your device, follow these instructions in reverse order.

145 other people completed this guide.

15 Comments

Note that the 2011 version differs from previous models at the connectors on the antenna end opposite to the display cable. Do not attempt to buy a complete display from prior models.

khull - Reply

Although this guide a difficulty rating I wasn't sure how long it would take a fairly adept novice to complete the R&R of the display. I took my time and did the tear down in 1 hour. I separated the fasteners by placing each section on a loop of tape above the work. The replacement of the new display took me about 2 hours. As the guide says it was just the tear down in reverse. Things that added to the replacement were getting the first 2 screws aligned and in place; re-routing the antenna and camera cables and making sure the camera cable socket connector was in correctly. The good news is it worked on the first power-up. Great guide.

Bob G - Reply

Can I use a 2011 Display with a 2009 (mid) MacBook pro?

Simon - Reply

Unfortunately no, they are not interchangeable.

Sam Omiotek -

Does the display come with the back cover included. I don't know the correct name for the part. I just mean the silver cover with the apple thingy in it.

Andrea Beck - Reply

Add Comment

View Statistics:

Past 24 Hours: 10

Past 7 Days: 55

Past 30 Days: 306

All Time: 196,922