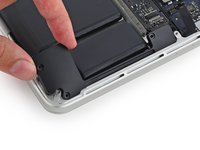
MacBook Pro 13" Retina Display Early 2015 Left Speaker Replacement

What you need

  1. MacBook Pro 13" Retina Display Early 2015 Left Speaker Replacement, Lower Case: step 1, image 1 of 1
    Tool used on this step:
    Magnetic Project Mat
    $19.95
    Buy
    • Remove the following ten screws securing the lower case to the upper case:

    • Two 2.3 mm P5 Pentalobe screws

    • Eight 3.0 mm P5 Pentalobe screws

    • Throughout this repair, keep track of each screw and make sure it goes back exactly where it came from to avoid damaging your device.

  2. MacBook Pro 13" Retina Display Early 2015 Left Speaker Replacement: step 2, image 1 of 1
    • Wedge your fingers between the upper case and the lower case.

    • Gently pull the lower case away from the upper case to remove it.

  3. MacBook Pro 13" Retina Display Early 2015 Left Speaker Replacement: step 3, image 1 of 2 MacBook Pro 13" Retina Display Early 2015 Left Speaker Replacement: step 3, image 2 of 2
    • The lower case is connected to the upper case with two plastic clips near its center.

    • During reassembly, gently push down the center of the lower case to reattach the two plastic clips.

  4. MacBook Pro 13" Retina Display Early 2015 Left Speaker Replacement, Battery Connector: step 4, image 1 of 1
    • If necessary, remove the plastic cover adhered to the battery contact board.

  5. MacBook Pro 13" Retina Display Early 2015 Left Speaker Replacement: step 5, image 1 of 2 MacBook Pro 13" Retina Display Early 2015 Left Speaker Replacement: step 5, image 2 of 2
    • Use the flat end of a spudger to lift the battery connector straight up out of its socket on the logic board.

    • Be sure you lift up only on the connector itself, not the socket, or you risk permanent damage to the logic board.

  6. MacBook Pro 13" Retina Display Early 2015 Left Speaker Replacement: step 6, image 1 of 1
    • Bend the battery connector up out of the way to prevent accidental contact with its socket during your repair.

  7. MacBook Pro 13" Retina Display Early 2015 Left Speaker Replacement, Left Speaker: step 7, image 1 of 2 MacBook Pro 13" Retina Display Early 2015 Left Speaker Replacement, Left Speaker: step 7, image 2 of 2
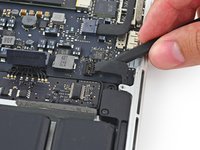
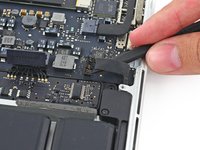
    • Insert the tip of a spudger under the left speaker cable near the connector and lift it up out of its socket on the logic board.

  8. MacBook Pro 13" Retina Display Early 2015 Left Speaker Replacement: step 8, image 1 of 1
    • Remove the following screws securing the left speaker to the upper case:

    • One 5.7 mm T5 Torx screw

    • One 6.5 mm T5 Torx screw

    • One 3.8 mm T5 Torx screw

  9. MacBook Pro 13" Retina Display Early 2015 Left Speaker Replacement: step 9, image 1 of 3 MacBook Pro 13" Retina Display Early 2015 Left Speaker Replacement: step 9, image 2 of 3 MacBook Pro 13" Retina Display Early 2015 Left Speaker Replacement: step 9, image 3 of 3
    • Lift the corner of the left speaker up and slide it out around the battery to remove it from the upper case.

    • Be careful not to snag the speaker cable on the screw hole post in the side of the case.

Conclusion

To reassemble your device, follow these instructions in reverse order.

52 other people completed this guide.

Andrew Optimus Goldheart

Member since: 10/17/09

502,275 Reputation

407 Guides authored

Team

iFixit Member of iFixit

Staff

136 Members

16,562 Guides authored

4 Comments

Does anyone know the RMS/wattage of the speaker?

mannankhanna14 - Reply

Excellent clear instructions. On my MacBook the cover screws were marked on the threads with white for the long ones and blue for the short. Since I couldn’t source a replacement speaker I repaired the existing one using contact glue as described by Earl Maliki on YouTube…it works; no more rattles. The sound is now lo-fi for the left speaker but good enough for speech and I never listen to music without a Bluetooth speaker. Total cost: 24 Swiss francs for a screwdriver set with a P5 pentalobe head. Much better than the 167 fr and 2 weeks in the shop I was quoted locally for repair.

Andrew Matus - Reply

Hi there,

thank you for the detailed instruction. Used it to replace rattling speakers in a “customer” laptop (I work in the Repaircafé in Bern, so not a commercial operation).

Cheers, J.

Jochen Bergmann - Reply

Very easy to follow instructions, the screw ID's were the biggest help, since Apple loves to rummage in their toolbox for a different one for each hole. Had a bit of trouble re-installing the speaker due to speaker cable being 'new', but with a bit of patience I got it to lie flat.

Kaitengare - Reply

Add Comment

View Statistics:

Past 24 Hours: 19

Past 7 Days: 108

Past 30 Days: 534

All Time: 38,488