Introduction
Der Austausch der RAM in diesem Computer ist sehr einfach und erfordert nur wenige Handgriffe.
What you need
-
-
Entferne die zehn Schrauben, die das obere und das untere Gehäuse zusammenhalten.
-
Drei 13,5 mm (14,1 mm) Kreuzschlitzschrauben.
-
Sieben 3 mm Kreuzschlitzschrauben.
-
-
-
-
Benutze die Kante eines Spudgers, um den Akkustecker nach oben aus seinem Anschluss zu hebeln.
-
-
-
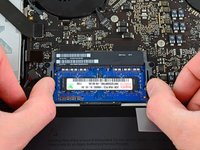
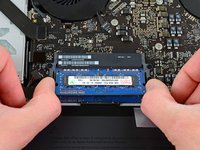
Öffne die Klammern auf beiden Seiten des RAM-Moduls, indem du sie gleichzeitig nach außen drückst.
-
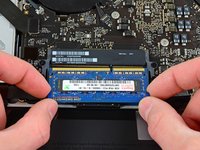
Wenn das RAM nach oben geklappt ist, ziehe es gerade aus seinem Sockel heraus.
-


Folge den Schritten in umgekehrter Reihenfolge, um dein Gerät wieder zusammen zu bauen.
Cancel: I did not complete this guide.
216 other people completed this guide.
Special thanks to these translators:
100%


These translators are helping us fix the world! Want to contribute?
Start translating ›

3 Guide Comments
Hi,
thanks for the guide, I plan to upgrade my 15” early 2011 2.3 GHz MBP today. I am changing my 750GB HDD to a Firecuda 2TB SSHD (can’t afford the SSD I wish I could get into currently), and I plan to upgrade my RAM from the 8GB to 16GB as well to give my 2011 a little sprucing up. I have performed a full time machine backup to my 2TB WD passport pro external HD (It’s set up as a RAID 0 device and has a thunderbolt 1 interface, which I was glad for bc a USB 2.0 interface would have taken like 3 days or blown up my computer.
My questions are:
1. Is there a preferred order to switch out the internal hard drive and memory? Do I need to switch out one first then boot up and shutdown, or can you safely upgrade the HD and RAM at the same time?
2. Is there anything else I need to do before upgrading the HD besides a time machine backup? Do I need a “bootable OS?” Whatever that is? Thanks!