Introduction
Verbessere die Leistung deines MacBook Pro (13 Zoll, Ende 2011, Unibody) mit neuem RAM.
What you need
-
-
Entferne die folgenden zehn Schrauben:
-
Drei 14,4 mm Kreuzschlitz #00 Schrauben
-
Drei 3,5 mm Kreuzschlitz #00 Schrauben
-
Vier 3,5 mm Kreuzschlitz #00 Ansatzschrauben
-
-
-
-
Löse mit der Kante eines Spudgers den Akkuanschluss nach oben, weg vom Sockel auf dem Logic Board.
-
-
-
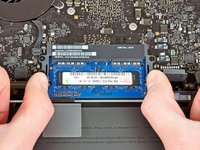
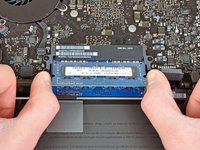
Drücke die beiden Klammern, die den RAM in der Halterung befestigen, nach außen.
-


Arbeite die Schritte in umgekehrter Reihenfolge ab, um dein Gerät wieder zusammenzubauen.
Cancel: I did not complete this guide.
228 other people completed this guide.
Special thanks to these translators:
100%


These translators are helping us fix the world! Want to contribute?
Start translating ›

27 Guide Comments
I should have two 4GB memory or 8GB?
You can max out your RAM on any MacBook just about because of the quality of design. I added two sticks of 8 GB of RAM for a total of 16 GB. Apple say my MacBook Pro late 2011 can only support 8GB.
Hello,
I just changed RAM from 4GB to 16GB in a MacBook Pro 13" Unibody Late 2011. Followed all the steps here, nothing broke. I was very careful on the instruction "the edge of a spudger to pry the battery connector upwards from its socket on the logic board", and also to connect it again.
What happens is that my computer works fine except for the battery. On the upper side (next to clock) says that there are no batteries available. It only works with AC adapter connected.
Please, Help me!!!
Saw your post on my original comment. Easy to replace battery, their is a link via I-Fixit battery guide on MacBook Pro 2011. Apple got sued in EU court for not allowing third party batteries. I do not know if you still have MacBook Pro 2011, hope it helps. Sadly, Apple put “end of shelf life” with this machine and High Sierra will NOT upgrade due to Apples “2015” or later MacBook requirement. This is stupid and forced “end of shelf life” so you buy a new machine, even though you meet hardware requirements. I smell another lawsuit.