Free Shipping on Domestic Orders $75+

MacBook Neo Trackpad Installation

Prerequisite Only
This is a prerequisite-only guide! This guide is part of another procedure and isn’t meant to be used alone.
    1. MacBook Neo Trackpad Installation, Install the trackpad: step 1, image 1 of 3 MacBook Neo Trackpad Installation, Install the trackpad: step 1, image 2 of 3 MacBook Neo Trackpad Installation, Install the trackpad: step 1, image 3 of 3
      • Hold the new trackpad from the center to slide it beneath its cable and set it into the frame.

      Ask FixBot

      Add Comment

    2. MacBook Neo Trackpad Installation, Install the trackpad screws: step 2, image 1 of 1
      • Use a Torx Plus 8IP driver to install the four 5.0 mm‑long silver screws securing the trackpad.

      Ask FixBot

      Add Comment

    3. MacBook Neo Trackpad Installation, Install the trackpad base plate: step 3, image 1 of 2 MacBook Neo Trackpad Installation, Install the trackpad base plate: step 3, image 2 of 2
      • Align the trackpad base plate with its screw holes, making sure the notch on its long edge is facing the battery.

      • Set the trackpad base plate into place.

      Ask FixBot

      Add Comment

    4. MacBook Neo Trackpad Installation, Install the trackpad base plate screws: step 4, image 1 of 1
      • Use a Torx Plus 8IP driver to install the four 5.3 mm‑long black screws securing the trackpad base plate.

      Ask FixBot

      Add Comment

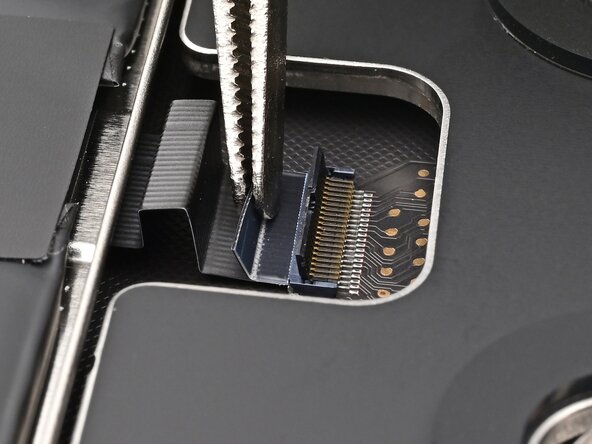
    5. MacBook Neo Trackpad Installation, Connect the trackpad: step 5, image 1 of 3 MacBook Neo Trackpad Installation, Connect the trackpad: step 5, image 2 of 3 MacBook Neo Trackpad Installation, Connect the trackpad: step 5, image 3 of 3
      • Make sure the locking flap is flipped up and gently insert the trackpad cable into its socket.

      • Flip the locking flap down to secure the cable.

      Ask FixBot

      Add Comment

    6. MacBook Neo Trackpad Installation, Loosen the trackpad screws: step 6, image 1 of 2 MacBook Neo Trackpad Installation, Loosen the trackpad screws: step 6, image 2 of 2
      • Use a Torx Plus 8IP driver to loosen (not remove) the four 5.0 mm‑long silver screws securing the trackpad.

      Ask FixBot

      Add Comment

    7. MacBook Neo Trackpad Installation, Align the trackpad: step 7, image 1 of 3 MacBook Neo Trackpad Installation, Align the trackpad: step 7, image 2 of 3 MacBook Neo Trackpad Installation, Align the trackpad: step 7, image 3 of 3
      • Cut a stack of two sticky notes horizontally in half, then vertically into four equally‑sized pieces.

      • Slide the non-sticky side of each piece into the gap between the trackpad and the frame, centrally on each edge.

      • Fold each piece down and adhere it to the laptop.

      Ask FixBot

      Add Comment

    8. MacBook Neo Trackpad Installation, Tighten the trackpad screws: step 8, image 1 of 3 MacBook Neo Trackpad Installation, Tighten the trackpad screws: step 8, image 2 of 3 MacBook Neo Trackpad Installation, Tighten the trackpad screws: step 8, image 3 of 3
      • Close the laptop, flip it upside down, and use a Torx Plus 8IP driver to tighten the four 5.0 mm‑long silver screws securing the trackpad.

      • Reopen the laptop, remove the sticky notes, and inspect it to ensure it's centered. If it isn't, loosen the screws from the last bullet and hold it in the correct position while you tighten them.

      • Carefully close the laptop.

      Ask FixBot

      Add Comment

Finish Line

Cancel: I did not complete this guide.

Nick Schultz

Member since: 03/24/24

65,697 Reputation

343 Guides authored

0 Guide Comments

Add Comment

View Statistics:

Past 24 Hours: 0

Past 7 Days: 0

Past 30 Days: 0

All Time: 15