Introduction
Use this guide to replace your Air's trackpad.
What you need
-
Tool used on this step:P5 Pentalobe Screwdriver Retina MacBook Pro and Air$5.99
-
Use a P5 Pentalobe driver to remove ten screws securing the lower case, of the following lengths:
-
Two 9 mm screws
-
Eight 2.6 mm screws
 Ask FixBot
-
-
-
Wedge your fingers between the display and the lower case and pull upward to pop the lower case off the Air.
-
Remove the lower case and set it aside.
-
-
-
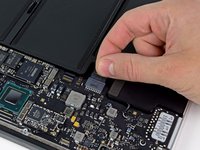
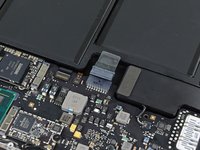
Grab the clear plastic pull tab attached to the battery connector and pull it toward the front edge of the Air to disconnect the battery from the logic board.
-
-
-
Remove the following five screws securing the battery to the upper case:
-
Three 6.3 mm T5 Torx screws
-
Two 2.4 mm T5 Torx screws
-
-
-
-
Lift the battery from its edge nearest the logic board and remove it from the upper case.
-
Charge it to 100%, and then keep charging it for at least 2 more hours. Then, unplug and use it normally to drain the battery. When you see the low battery warning, save your work, and keep your laptop on until it goes to sleep due to low battery. Wait at least 5 hours, then charge your laptop uninterrupted to 100%.
-
If you notice any unusual behavior or problems after installing your new battery, you may need to reset your MacBook's SMC.
-
-
-
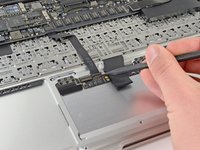
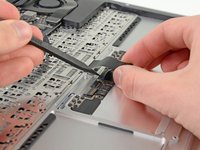
Use the tip of a spudger or your fingernail to flip up the retaining flap on the trackpad ribbon cable ZIF socket.
-
Pull the trackpad ribbon cable straight out of its socket toward the rear edge of the Air.
-
-
-
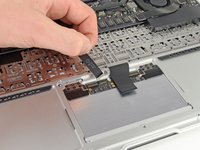
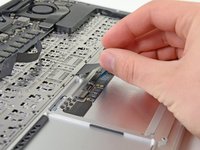
While carefully lifting the keyboard ribbon cable with one hand, use the tip of a spudger or your fingernail to flip up the retaining flap on the keyboard ribbon cable ZIF socket.
-
Pull the keyboard ribbon cable straight out of its socket toward the front edge of the Air.
-
-
-
Remove the following twelve screws:
-
Six 1.6 mm Phillips screws securing the trackpad to the upper case.
-
Six 1.6 mm Phillips screws securing the trackpad brackets to the trackpad.
-
A Phillips #000 should be sufficient, but a JIS #000 may also work as well.
-
-
-
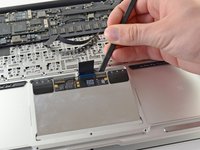
Remove the 1.4 mm T5 Torx set screw from its tapped hole near the front edge of the upper case.
-
-
-
Use the flat edge of a spudger to carefully lift the edge of the trackpad closest to the keyboard from its recess in the upper case by lifting it away from the brackets attached to the upper case.
-
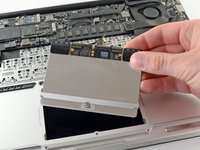
Remove the trackpad from the upper case.
-


To reassemble your device, follow these instructions in reverse order.
Cancel: I did not complete this guide.
47 other people completed this guide.


7 Guide Comments
Hey guys,
just repaired my "old" 2012 Air's touchpad and thanks to your great instruction it took me exactly 30 Mins and was super easy...
Thanks for your great work!
@peter: yes, it needs a bit fiddling with the cables - just keep an eye on the flaps (they are closed on the new TP). Then it helped me to press the cable slightly in place with one hand and carefully pushing it in (moving it slightly left and right) with the other.
Great guide!! recently repaired two mb air of my office, great parts!!! great guide
step 10 is not needed, in my second repair of this model I didn't remove it, this screw is only for calibration
Right. Step 10 is not only not needed but should definitely not be done! This is a pure adjustment screw for the clickpoint. Only readjust there, in case clicking does not feel okay after a change of the trackpad. Usually no adjusment is necessary.