
MacBook Air 13" Mid 2012 Battery Replacement

What you need

  1. MacBook Air 13" Mid 2012 Battery Replacement, Lower Case: step 1, image 1 of 1
    Tool used on this step:
    P5 Pentalobe Screwdriver Retina MacBook Pro and Air
    $5.99
    Buy
    • Before proceeding, power down your MacBook. Close the display and lay it on a soft surface, top-side down.

    • Use a P5 Pentalobe driver to remove ten screws securing the lower case, of the following lengths:

    • Two 9 mm screws

    • Eight 2.6 mm screws

  2. MacBook Air 13" Mid 2012 Battery Replacement: step 2, image 1 of 1
    • Wedge your fingers between the display and the lower case and pull upward to pop the lower case off the Air.

    • Remove the lower case and set it aside.

  3. MacBook Air 13" Mid 2012 Battery Replacement, Battery: step 3, image 1 of 2 MacBook Air 13" Mid 2012 Battery Replacement, Battery: step 3, image 2 of 2
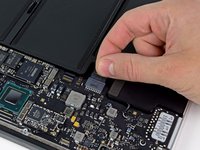
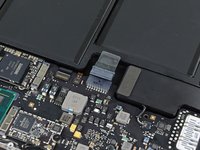
    • Grab the clear plastic pull tab attached to the battery connector and pull it toward the front edge of the Air to disconnect the battery from the logic board.

    • Do not lift upward on the connector as you disconnect it.

    • When reinstalling a new battery, it may be helpful to temporarily reconnect the battery before placing it in the frame. Make sure that the connector lays flat to the board.

  4. MacBook Air 13" Mid 2012 Battery Replacement: step 4, image 1 of 1
    • Remove the following five screws securing the battery to the upper case:

    • Three 6.3 mm T5 Torx screws

    • Two 2.4 mm T5 Torx screws

  5. MacBook Air 13" Mid 2012 Battery Replacement: step 5, image 1 of 1
    • When handling the battery, avoid squeezing or touching the four exposed lithium polymer cells.

    • Lift the battery from its edge nearest the logic board and remove it from the upper case.

    • When installing the new battery, if there is a thin plastic film on your replacement battery, do not attempt to remove it. It is glued on and protects the battery pack while it is inside the MacBook.

    • If you're installing a new battery, you should calibrate it after installation:

    • Charge it to 100%, and then keep charging it for at least 2 more hours. Then, unplug and use it normally to drain the battery. When you see the low battery warning, save your work, and keep your laptop on until it goes to sleep due to low battery. Wait at least 5 hours, then charge your laptop uninterrupted to 100%.

    • If you notice any unusual behavior or problems after installing your new battery, you may need to reset your MacBook's SMC.

Conclusion

To reassemble your device, follow these instructions in reverse order.

598 other people completed this guide.

Andrew Optimus Goldheart

Member since: 10/17/09

502,109 Reputation

407 Guides authored

Team

iFixit Member of iFixit

Staff

135 Members

16,476 Guides authored

92 Comments

My Mid 2012 doesn't have any plastic on the battery connector. Near to impossible to remove it.

marcus - Reply

Mine did. ¯\_(ツ)_/¯

Arlen Abraham -

Worked flawlessly on my MBA. Installed in 5 minutes. Coconut Battery now reports 6801 mAh on a design capacity of 6700 mah. That's an improvement as my old battery was clocking a meager 61% of design capacity (i.e., 4087) after 371 cycles.

Easy. Perfect replacement.

ldm - Reply

I tried to opened it and I failed. The screw doesn't work well. Worst idea ever!

etiennelafrance7 - Reply

Very easy. I bought the "A-Stock" battery. It came at a max charge of 6300mAh (max of 6700) -- decent. But within 2 weeks dropped down to a max of around 4,000 mAh. I'm thinking that I should have spent the extra $10 and bought the new battery. (I am using the Coconut Battery App.)

gvr4 - Reply

Add Comment

View Statistics:

Past 24 Hours: 28

Past 7 Days: 215

Past 30 Days: 1,292

All Time: 381,165