MacBook Air 13" Mid 2011 Heat Sink Replacement

What you need

  1. MacBook Air 13" Mid 2011 Heat Sink Replacement, Lower Case: step 1, image 1 of 1
    Tool used on this step:
    P5 Pentalobe Screwdriver Retina MacBook Pro and Air
    $5.99
    Buy
    • Before proceeding, power down your MacBook. Close the display and lay it on a soft surface, top-side down.

    • Use a P5 Pentalobe driver to remove ten screws securing the lower case, of the following lengths:

    • Two 9 mm screws

    • Eight 2.6 mm screws

  2. MacBook Air 13" Mid 2011 Heat Sink Replacement: step 2, image 1 of 1
    • Wedge your fingers between the display and the lower case and pull upward to pop the lower case off the Air.

    • Remove the lower case and set it aside.

  3. MacBook Air 13" Mid 2011 Heat Sink Replacement, Battery Connector: step 3, image 1 of 2 MacBook Air 13" Mid 2011 Heat Sink Replacement, Battery Connector: step 3, image 2 of 2
    • As a precaution against accidental discharge or shock, disconnect the battery connector from the logic board.

    • Grab the clear plastic pull tab attached to the battery connector and pull it toward the front edge of the Air to disconnect the battery from the logic board.

    • Be sure to pull the connector horizontally toward the battery, and not straight up from the Air, or you may damage the socket on the logic board.

  4. MacBook Air 13" Mid 2011 Heat Sink Replacement, I/O Board Cable: step 4, image 1 of 1
    • Use the flat end of a spudger to pry the I/O board cable connector upward out of its socket on the I/O board.

  5. MacBook Air 13" Mid 2011 Heat Sink Replacement: step 5, image 1 of 1
    • Carefully peel the I/O board cable from the top of the fan.

  6. MacBook Air 13" Mid 2011 Heat Sink Replacement: step 6, image 1 of 2 MacBook Air 13" Mid 2011 Heat Sink Replacement: step 6, image 2 of 2
    • The following connector has an especially deep socket. Use care when disconnecting it.

    • While gently pulling the I/O board cable upward near its connection to the logic board, use the tip of a spudger to pry upward on alternating sides of the connector to help "walk" it out of its socket.

    • Remove the I/O board cable.

  7. MacBook Air 13" Mid 2011 Heat Sink Replacement, Fan: step 7, image 1 of 1
    • Use the tip of a spudger to carefully flip up the retaining flap on the fan cable ZIF socket.

    • Be sure you are prying up on the hinged retaining flap, not the socket itself.

  8. MacBook Air 13" Mid 2011 Heat Sink Replacement: step 8, image 1 of 1
    • Peel the rubber gasket off the adhesive on the top of the fan.

  9. MacBook Air 13" Mid 2011 Heat Sink Replacement: step 9, image 1 of 1
    • Remove the following three screws securing the fan to the upper case:

    • One 3.6 mm T5 Torx screw

    • One 2.7 mm T5 Torx screw

    • One 3.6 mm T5 Torx screw with a short head

  10. MacBook Air 13" Mid 2011 Heat Sink Replacement: step 10, image 1 of 1
    • Lift the fan out of the upper case and carefully pull the fan ribbon cable out of its socket as you remove it from the Air.

  11. MacBook Air 13" Mid 2011 Heat Sink Replacement, I/O Board: step 11, image 1 of 1
    • Disconnect the I/O board by pulling the power cable away from its socket on the logic board.

    • Pull the cable parallel to the face of the logic board toward the right edge of the Air.

  12. MacBook Air 13" Mid 2011 Heat Sink Replacement: step 12, image 1 of 1
    • Pull the camera cable parallel to the face of the I/O board toward the corner of the Air to disconnect it from its socket, using the tip of a spudger to help push the connector out of its socket.

    • Do not lift upward on this cable as you disconnect it, as its socket may break off the logic board.

  13. MacBook Air 13" Mid 2011 Heat Sink Replacement: step 13, image 1 of 2 MacBook Air 13" Mid 2011 Heat Sink Replacement: step 13, image 2 of 2
    • Use the flat end of a spudger to pry the left speaker cable connector up and out of its socket on the I/O board.

    • Pry up from beneath the wires.

    • De-route the left speaker cable from its retainer on the I/O board.

  14. MacBook Air 13" Mid 2011 Heat Sink Replacement: step 14, image 1 of 1
    • Use the flat end of a spudger to pry the microphone cable connector up and out of its socket on the I/O board.

    • Pry up from beneath the wires.

  15. MacBook Air 13" Mid 2011 Heat Sink Replacement: step 15, image 1 of 1
    • Remove the single 3.6 mm T5 Torx screw securing the I/O board to the upper case.

  16. MacBook Air 13" Mid 2011 Heat Sink Replacement: step 16, image 1 of 1
    • Carefully lift the I/O board from its edge nearest the logic board and remove it from the upper case.

  17. MacBook Air 13" Mid 2011 Heat Sink Replacement, Heat Sink: step 17, image 1 of 1
    • Remove the two 4.9 mm T8 Torx screws securing the antenna cable retainer on the left display hinge to the upper case.

  18. MacBook Air 13" Mid 2011 Heat Sink Replacement: step 18, image 1 of 1
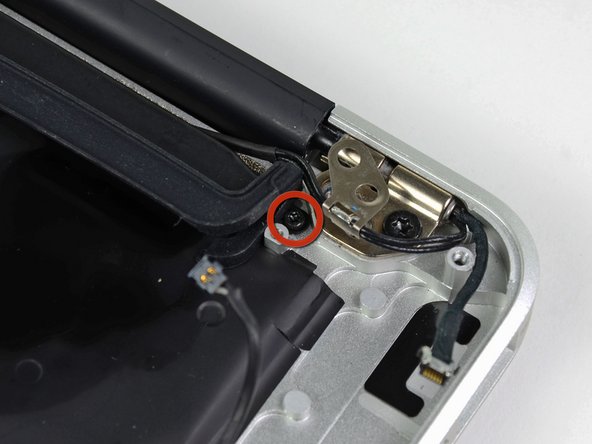
    • Push the antenna cable retainer out of the way and remove the 3 mm T5 Torx screw securing the end of the heat sink to the upper case.

  19. MacBook Air 13" Mid 2011 Heat Sink Replacement: step 19, image 1 of 1
    • Remove the four 2.5 mm T5 Torx screws securing the heat sink to the logic board.

  20. MacBook Air 13" Mid 2011 Heat Sink Replacement: step 20, image 1 of 1
    • If the heat sink seems to be stuck to the logic board after removing all five screws, use a spudger to carefully separate the heat sink from the faces of the CPU and GPU.

    • Remove the heat sink from the logic board.

    • When reinstalling the heat sink, be sure to apply a new layer of thermal paste. If you have never applied thermal paste before, we have a guide that makes it easy.

  21. MacBook Air 13" Mid 2011 Heat Sink Replacement: step 21, image 1 of 2 MacBook Air 13" Mid 2011 Heat Sink Replacement: step 21, image 2 of 2
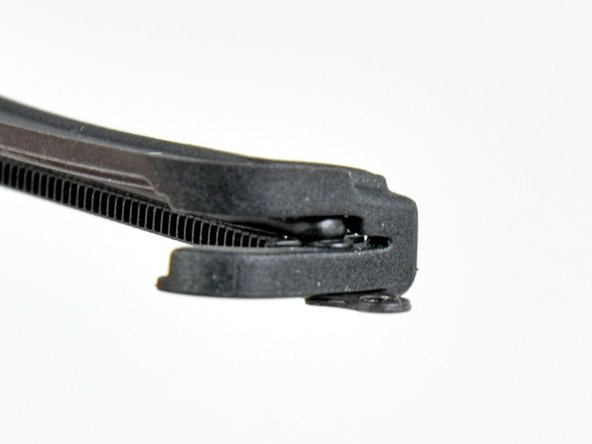
    • These shots show how the rubber fan gasket should be installed during reassembly. Be sure not to install the gasket underneath the ear where the end of the heatsink is screwed down to the upper case.

    • Additionally, be sure the small post molded into the rubber gasket mates with the hole cut into the upper right corner of the logic board.

Finish Line

30 other people completed this guide.

4 Comments

Excellent instructions / guide. Replaced both heat sink and fan without a hitch. Thank you!

Robert Makar - Reply

I wanted to bring my old 2011 MBA back to life since its still running strong, so I followed this with a new thermal paste, good cleaning and a new battery, its like a brand new computer now. Glad I got the ifixit kit as well when I ordered the battery. Hope to keep this MBS going another year or two before I upgrade. Now I need to do the same with my MBP 2010 for fun.

John Ficchi - Reply

I have a mid-2011 MacBook Air identical to the model in the instructions, and it frequently gets up to 80C when running under a heavier load. I am planning to disassemble it entirely and repaste the machine, and fully blow out the inside. I will post on here when I get it done and see how it runs! Thanks for the guide!

Sam - Reply

thanks alot.. I followed the procedure to replace the thermal paste and it was great.but i didn’t realise a difference in heat and sound of fan.

Ahmed Fadly - Reply

Add Comment

View Statistics:

Past 24 Hours: 1

Past 7 Days: 18

Past 30 Days: 74

All Time: 29,061