Introduction
Use this guide to upgrade or replace the solid-state drive in a MacBook Air 11” Early 2014. This MacBook Air uses a proprietary storage drive connector, and is therefore not compatible with common M.2 drives without the use of an adapter.
Before you perform this repair, if at all possible, back up your existing SSD. Then, either familiarize yourself with internet recovery or create a bootable external drive so you’ll be ready to install macOS onto your new drive and migrate your data to the new SSD.
Finally, we strongly recommend installing macOS 10.13 High Sierra (or a later macOS) before replacing the original SSD from your MacBook Air. Most new SSDs require updated storage drivers not found in versions of macOS prior to High Sierra.
What you need
-
Tool used on this step:P5 Pentalobe Screwdriver Retina MacBook Pro and Air$5.99
-
Remove the following ten screws:
-
Two 8 mm 5-point Pentalobe screws
-
Eight 2.5 mm 5-point Pentalobe screws
-
-
-
-
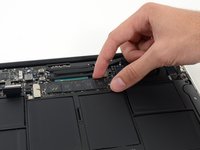
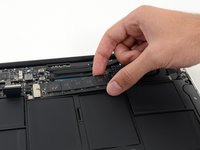
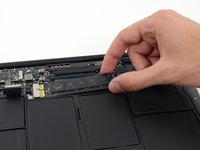
Use the flat end of a spudger to pry both short sides of the battery connector upward to disconnect it from its socket on the logic board.
-
Bend the battery cable slightly away from the logic board so the connector will not accidentally bend back and make contact with its socket.
-


To reassemble your device, follow these instructions in reverse order.
Cancel: I did not complete this guide.
47 other people completed this guide.


7 Guide Comments
can I use my HD SSD from MB Air 2011MID / 13" to this one, EARLY2014 / 11" ??
Agree with Daniel on OS installation and transfer of files from old disk. This last step needs to be in this guide for sure, otherwise it is an incomplete fix.
Z
The repair itself went smoothly; the advice to make sure the replacement SSD was properly seated was appropriate.
However, the essential step of transferring the OS from backup was challenging. The replacement SSD (OWC Aura Pro) requires that the computer run High Sierra (macOS 10.13) because of needed firmware, but my computer was running Sierra (macOS 10.12). I installed 10.13 on the SSD that I was about to replace, but this was not sufficient. The replacement SSD was not recognized. The backup from which the system is to be restored also has to run 10.13. I resolved this impasse by booting the computer in target disk mode with a new machine that is running 10.13 and cloning the system from that machine.
The instructions that came with the OWC Aura Pro SSD say, “MacOS 10.13 High Sierra … must be installed on the host computer before installing the OWC Aura Pro SSD.“ This information, along with the fact that the backup must also run High Sierra, should be on this website.
excellent set of instructions. thank u