Free Shipping on Domestic Orders $75+

Mac mini Mid 2011 Logic Board Replacement

Prerequisite Only
This is a prerequisite-only guide! This guide is part of another procedure and isn’t meant to be used alone.

What you need

    1. Mac mini Mid 2011 Logic Board Replacement, Logic Board: step 1, image 1 of 2 Mac mini Mid 2011 Logic Board Replacement, Logic Board: step 1, image 2 of 2
      • Use the flat end of a spudger to pry the hard drive connector up from its socket on the logic board.

      Ask FixBot

      Add Comment

    2. Mac mini Mid 2011 Logic Board Replacement: step 2, image 1 of 1
      • Use the tip of a spudger to lift the IR sensor connector up and out of its socket on the logic board.

      • Make sure to pry up from beneath the wires and not underneath the socket.

      Ask FixBot

      Add Comment

    3. Mac mini Mid 2011 Logic Board Replacement: step 3, image 1 of 1
      • Remove the following three screws:

      • One 5.0 mm T8 Torx or 2.0 mm Hex screw (either screwdriver will work)

      • One 16.2 mm T6 Torx screw

      • One 26 mm T6 Torx standoff

      Ask FixBot

      Add Comment

    4. Mac mini Mid 2011 Logic Board Replacement: step 4, image 1 of 3 Mac mini Mid 2011 Logic Board Replacement: step 4, image 2 of 3 Mac mini Mid 2011 Logic Board Replacement: step 4, image 3 of 3
      Tool used on this step:
      Mac mini Logic Board Removal Tool
      $4.99
      Buy
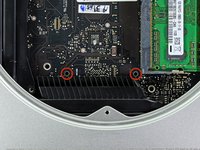
      • To remove the logic board, the two cylindrical rods of the Mac mini Logic Board Removal Tool must be inserted into the holes highlighted in red. Inserting instruments into any logic board holes other than the ones highlighted in red may destroy the logic board.

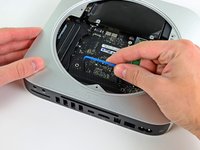
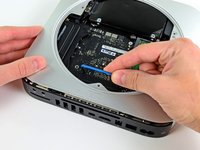
      • Insert the Mac mini Logic Board Removal Tool into the two holes highlighted in red. Be sure it makes contact with the top side of outer case below the logic board before proceeding.

      • Carefully pull the tool toward the I/O board. The logic board and I/O board assembly should slightly slide out of the outer case.

      • Cease prying when the I/O board is visibly separated from the outer case.

      • Remove the Mac mini Logic Board Removal tool.

      Ask FixBot

      Add Comment

    5. Mac mini Mid 2011 Logic Board Replacement: step 5, image 1 of 1
      • Pull the I/O board/logic board assembly out of the outer case enough to access the power connector.

      • Use your fingers to disconnect the DC-In cable from the logic board.

      • Pull the power cable connector toward the front side of the mini.

      Ask FixBot

      Add Comment

    6. Mac mini Mid 2011 Logic Board Replacement: step 6, image 1 of 1
      • Carefully slide the logic board assembly out of the mini, minding any cables that may get caught.

      Ask FixBot

      Add Comment

Finish Line

Cancel: I did not complete this guide.

One other person completed this guide.

0 Guide Comments

Add Comment

View Statistics:

Past 24 Hours: 1

Past 7 Days: 7

Past 30 Days: 33

All Time: 1,856