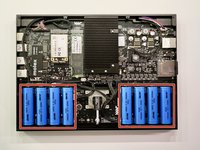
MNT Reform Heatsink Replacement

What you need

  1. MNT Reform Heatsink Replacement, Remove Bottom Plate Screws: step 1, image 1 of 1
    • Remove the following screws securing the transparent acrylic bottom plate to the main box:

    • Ten M2×6mm silver Phillips screws

  2. MNT Reform Heatsink Replacement, Remove Bottom Plate: step 2, image 1 of 1
    • Lift the bottom plate and set it aside.

    • Before servicing anything on the inside, make sure to remove all battery cells.

  3. MNT Reform Heatsink Replacement, Remove Battery Cells: step 3, image 1 of 2 MNT Reform Heatsink Replacement, Remove Battery Cells: step 3, image 2 of 2
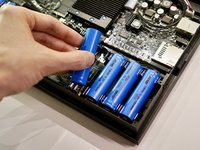
    • Pull out the eight battery cells one by one, and set them aside safely.

    • Do not use a metal tool to remove the batteries. You may accidentally short-circuit the metal pins of the battery holders.

    • When replacing the batteries, pay attention to the polarity! Inserting a cell the wrong way in will damage your device.

    • The circuit board indicates the + and - orientation for each cell.

  4. MNT Reform Heatsink Replacement, Remove Heatsink Screws: step 4, image 1 of 1
    • Remove the following screws securing the heatsink:

    • Four M2×12 Philips screws

  5. MNT Reform Heatsink Replacement, Remove the Heatsink: step 5, image 1 of 1
    Tool used on this step:
    Tweezers
    $4.99
    Buy
    • Gently pull the heatsink up.

    • Take care not to lose the four cylindrical plastic spacers supporting the heatsink.

    • When replacing the heatsink, remember to place the spacers over the screw holes before screwing down the heatsink. It may be helpful to use tweezers to align the spacers if placing the heatsink on top shifted them.

    • When replacing the heatsink into the laptop, you will need to apply new thermal paste. We have a thermal paste guide that makes replacing the thermal compound easy.

    • If you need to remove the heatsink frequently, it is possible to replace the thermal paste with a 0.5mm thermal pad instead.

Conclusion

To reassemble your device, re-apply new thermal paste and follow these instructions in reverse order.

Ensure that no cables are squeezed when replacing the bottom plate. Don’t overtighten screws.

One other person completed this guide.

Neelfyn

Member since: 05/13/14

972 Reputation

9 Guides authored

0 Comments

Add Comment

View Statistics:

Past 24 Hours: 1

Past 7 Days: 3

Past 30 Days: 13

All Time: 118