Introduction
I've had the problem for a long time that the mouse wheel on my Logitech VX Nano doesn't work properly. This is particularly annoying in EGO shooters when the weapons suddenly switch back and forth in the middle of a fight or nothing happens at all.
So it was time to take a closer look at the matter.
What you need
-
-
First carefully remove the "sliders". With a little patience, these can be solved without violence.
-
At this point, loosen the Phillips head screws with PH00
-
-
-
After removing the screws described in step 1, the upper part can be easily separated from the lower part, exposing the "innards" of the mouse
-
-
-
-
separate the 3 screws with PH00 and then first lift the bracket and then remove the transparent "cage" with the mouse wheel.
-
-
-
Carefully loosen the two screws (only one can be seen in the picture, the other is directly opposite) with PH00.
-
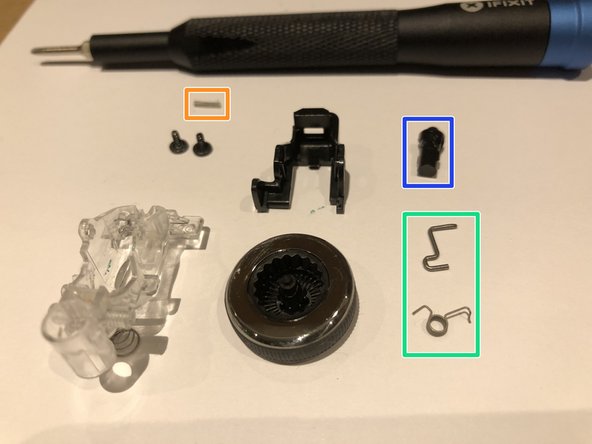
This small spring is on the closed side of the mouse wheel and is used for "mobility" between the transparent and black plastic part.
-
This spring mechanism is used to "catch" the mouse wheel. When closed, the spring clicks on the internal teeth of the mouse wheel, while when open it has no contact points.
-
This part must be installed with the nose pointing upwards in the appropriate opening in the transparent cage and works in a similar way to a ballpoint pen's refill.
-
-
-
Unscrew the screws with PH00.
-
After that, the mouse buttons can be separated from the upper shell.
-
Loosen the screws with PH00, then the middle button can be removed.
-
-
-
After all parts have been cleaned, reassemble the mouse backwards in the same order and enjoy the mouse wheel that works again :-)
-


Work the steps in reverse order to reassemble your device.
Work the steps in reverse order to reassemble your device.
Cancel: I did not complete this guide.
One other person completed this guide.
Special thanks to these translators:
100%

HelloMacOS is helping us fix the world! Want to contribute?
Start translating ›