What you need
-
-
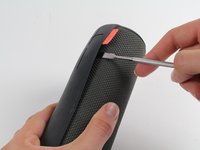
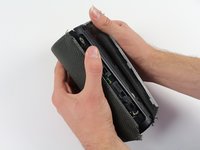
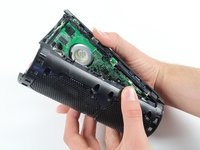
Turn the device over. The D-ring will be on the left face of the speaker when viewing the device from this orientation.
 Ask FixBot
-
-
-
Holding the speaker upright, wedge the metal spudger in between the casing and the speaker. Gently pry open the tabs as they are easily broken.
-
-
-
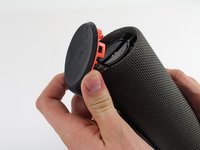
Find the part of the casing that covers the volume controls. Wedge the metal spudger under this and pry open all of the tabs as in the previous step.
-
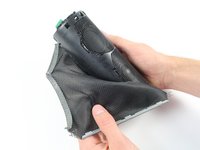
Repeat for the bottom of the speaker and pry the casing open with your fingers.
-
-
-
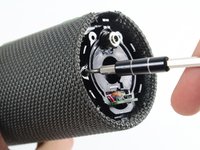
Using the Phillips J0 head screwdriver, unscrew the four silver 9 mm screws.
-
Do the same for the two black 7 mm screws.
-
-
-
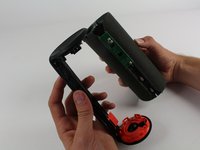
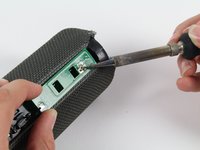
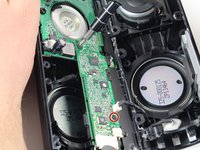
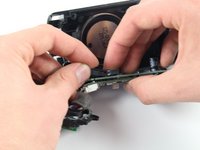
Using a soldering iron, de-solder the two ends of the switch plate. Desolder the two terminals on headphone jack side first, as the middle connection is notched and should be slid out when molten.
-
-
-
-
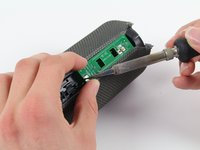
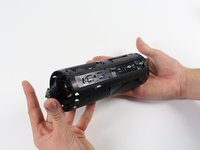
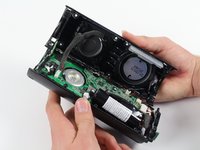
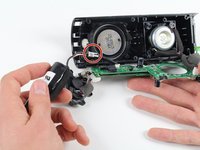
With the switch plate disconnected, remove it and your device should now look like this.
-
-
-
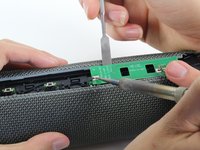
With a metal spudger, pry open the tabs on the speaker sleeve along the length of the speaker.
-
-
-
Use a plastic opening tool to pry the sleeve off from the bottom of the speaker.
-
-
-
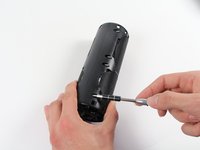
Use a Phillips 1 screwdriver to unscrew the eight black 14 mm screws along the length of the casing.
-
-
-
With the screws removed, pry open the casing to be able to get to the components inside.
-
-
-
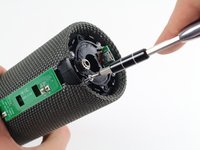
With a Phillips #00 screwdriver, unscrew two 5.6 mm screws from the rectangular shaped circuit board.
-
-
-
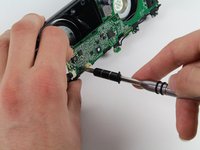
With the Phillips #2 screwdriver, unscrew the 9.9 mm screw from the larger circuit board surrounding the speaker.
-
-
-
Once all of the screws are gone, you should be able to remove the circuit boards and find the battery.
-
-
-
Remove the battery by pulling it from the terminal as marked in the picture.
-


To reassemble your device, follow these instructions in reverse order.
Cancel: I did not complete this guide.
34 other people completed this guide.
Team

Cal Poly, Team 4-1, Maness Fall 2015 Member of Cal Poly, Team 4-1, Maness Fall 2015
CPSU-MANESS-F15S4G1
4 Members
22 Guides authored
30 Guide Comments
What battery is required?
You've got to be joking - so you spend £100 on a speaker and then need a degree in electrical engineering to replace the battery - what a load of s***e
exactly, I agree
I replaced the battery in mine. It took about an hour and it was easy, while the instructions appear complicated, undoing a few screws and folding back some tabs took only a few seconds. Before I replaced the battery my Boom had failed completely. Nothing I tried kicked the dead battery into working again, so I had two choices. Try replacing the battery or chucking it in the bin. So I bought a battery and had a go. I read up and had the right tools, and as luck favours the prepared, I was successful. The only warning I can think of is that out of the box the Boom is water resistant I believe, but post repair, I doubt it’s water resistant now.
Don't pry open the entire thing. Open the side with the d-ring, there should be 4 screws like in the pic above and access to battery directly under that. There's instructions for changing battery in the box.