Introduction
The MX2 suffers a similar fate to the first MX series of ghost clicks after a year or 2 of usage. This is due to a faulty microswitch that needs replacement.
I found Omron D2FC-F-7N(10M) switches inside and decided to replace the left one only for now.
This forum post was very useful in understanding the Omron switch naming convention. I am attaching a pdf print-out of the post in this guide, in case the post/forum vanishes.
I replaced my fault switch with an Omron D2F=01F made in Japan. Living in India, I managed to order it on tanotis.com.
What you need
-
-
There are 4 screws hidden behind the pads. Using a blade or a small flat screwdriver, gently peel away each pad and using a phlips #1 screwdriver to remove each screw.
-
-
-
Once the mouse is opened, you need to disconnect the battery, the small white clip at the top of the photo.
-
remove the 3 screws holding the battery (circled in blue on the photo) using a philips #0 screwdriver.
-
you can the lift the battery out.
-
-
-
-
Start by removing the 2 screws holding the plastic bridge, circled in blue in the first photo.
-
remove the lone screw on the front of the wheel (circled in yellow on the 2nd photo)
-
You can now lift the wheel assembly out, making sure you also take the front black plastic screw guide with it.
-
NOTEL there is also a spring attached below the wheel assembly.
-
-
-
There are 2 more screws holding the circuit board in place (circled in blue)
-
-
Tool used on this step:Desoldering Pump$3.99
-
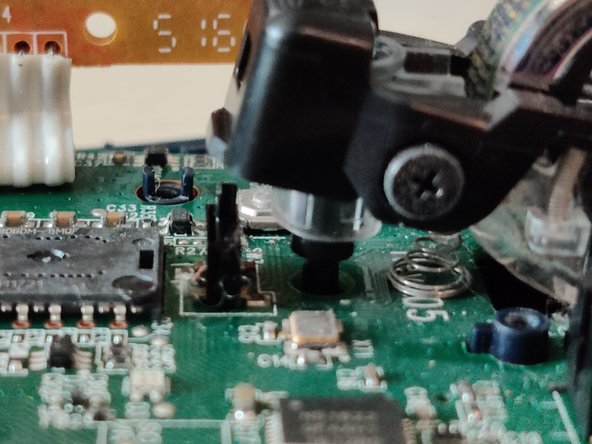
The click switch as 3 pins (boxed in red). I replaced the left button mouse switch only as the right one is still working.
-
I had to prime the solder, by adding some fresh solder to each pin in order to get the circuit solder to melt and loosen the pins.
-
I clamped the board and used a small flat screwdriver as a lever below the switch to gently pry it away while I heated each pin.
-
I used a desoldering pump to clean the circuit holes
-
the original Omron switch is made in China, and I managed to find one made in Japan, hoping for better life-time.
-
-
-
Follow the steps 1 to 5 in reverse order to reassemble the mouse.
-
Take care when placing the wheel assembly to insert the from screw guide (the small black piece) first.
-
align the rear so that the wheel switch sits on top of its mount.
-


I compiled this guide with my fixed mouse which works like a charm again. The MX Anywhere is a great mouse for travelling and I hope to get many more years of service from it.
Cancel: I did not complete this guide.
12 other people completed this guide.
Attached Documents

3 Guide Comments
Thanks for the fine guide. Jakob and I created a Video-Guide as well: https://youtu.be/gVMdoBJmllA
Thanks for the guide, it worked great for my MX Anywhere 2S. I also had D2FC-F-7N(10M) switches inside, and I wasn't sure the Japanese D2F-01F would feel the same, so I bought both. I ended up installing with the Japanese switch, as it fit perfectly even though the plunger it is a tiny bit taller, and felt pretty much the same.
Spare Micro Switches on Amazon