What you need
-
-
Pry open the battery cover on the back of the device using either your hand or a spudger.
-
Use a spudger to remove the first battery.
-
Slide the 2nd battery out of the slot.
 Ask FixBot
-
-
-
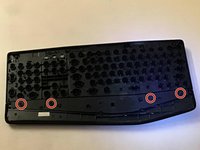
Unscrew the highlighted red screws using a Phillips 000 screwdriver.
-
-
-
Insert a spudger into the seam between the black side (front) and the white side (back).
-
Pry the two halves apart, making your way around the keyboard.
-
-
-
-
Flip the black side (front) over so the keys face downwards.
-
Remove the red highlighted screws, then remove the palm rest.
-
-
-
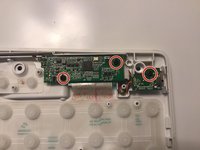
Unscrew the circuit boards using a Phillips 000 screwdriver.
-
-
Tool used on this step:Tweezers$4.99
-
Use a pair of tweezers to bring the metal rods under and over the plastic hooks.
-
-
-
Unplug the ribbon cable connecting the two boards and remove the power switch daughter board.
-
Unplug the ribbon cable connecting the membrane to the main circuit board.
-


The Logitech K850 keyboard is quite complex, though it is somewhat easy to fix. However, with a ton of fragile components that need to be pried on, repairs can be difficult.
Cancel: I did not complete this guide.
4 other people completed this guide.

3 Guide Comments
How do I fix the incredibly tiny plastic piece where the foot/stand fits into? Are the side wholes enough to get two new feet without having to worry about that plastic part or does it need ot hook into that?
?
It is difficult for key plucker to remove keys from.mk850 . Is there a easy way to remove keys from it?
my space is ghost typing (automatically working) i opened and cleaned but still issue persist. any help would be appreciated.