Free Shipping on Domestic Orders $75+

This translation was generated by a machine and has not been reviewed by a person yet. Speak this language? Review it.

Replacing the Motherboard on the Why! NK50SZ

Views: 289

View statistics:

Past 24 Hours:
2
Past 7 Days:
9
Past 30 Days:
48
All Time:
289
Comments: 2

2 comments on steps.

Completed: 0

No one has marked this guide "completed." Will you be the first?

Favorites: 0

No one has favorited (and subscribed to) this guide. Will you be the first?

Time Required: 45 minutes
Difficulty: Easy
Community-Contributed Guide

An awesome member of our community made this guide. It was not created by iFixit staff.

Replacing the Motherboard on the Why! NK50SZ

Introduction

Go to step 1 ↓

This guide shows you how to replace the motherboard of a why! NK50SZ, after disconnecting the cables and removing the screws that hold it in place.

What you need

    1. Replacing the Motherboard on the Why! NK50SZ, Battery 1: step 1, image 1 of 3 Replacing the Motherboard on the Why! NK50SZ, Battery 1: step 1, image 2 of 3 Replacing the Motherboard on the Why! NK50SZ, Battery 1: step 1, image 3 of 3
      • Unlock the right latch and hold the left latch unlocked with your finger.

      Ask FixBot

      Add Comment

    2. Replacing the Motherboard on the Why! NK50SZ, Battery 2: step 2, image 1 of 2 Replacing the Motherboard on the Why! NK50SZ, Battery 2: step 2, image 2 of 2
      • Hold the left latch.

      • Lift the battery from the slot under the right latch.

      Ask FixBot

      Add Comment

    1. Replacing the Motherboard on the Why! NK50SZ, Cover: step 3, image 1 of 3 Replacing the Motherboard on the Why! NK50SZ, Cover: step 3, image 2 of 3 Replacing the Motherboard on the Why! NK50SZ, Cover: step 3, image 3 of 3
      • Unscrew the 6 screws, then lift the cover.

      Ask FixBot

      Add Comment

    1. Replacing the Motherboard on the Why! NK50SZ, Keyboard (1): step 4, image 1 of 3 Replacing the Motherboard on the Why! NK50SZ, Keyboard (1): step 4, image 2 of 3 Replacing the Motherboard on the Why! NK50SZ, Keyboard (1): step 4, image 3 of 3
      • Unscrew the 2 screws, then take a paperclip.

      • Straighten it so that you can slide it into the slot with the corresponding icon.

      Ask FixBot

      Add Comment

    2. Replacing the Motherboard on the Why! NK50SZ, Keyboard (2): step 5, image 1 of 3 Replacing the Motherboard on the Why! NK50SZ, Keyboard (2): step 5, image 2 of 3 Replacing the Motherboard on the Why! NK50SZ, Keyboard (2): step 5, image 3 of 3
      • Insert the paperclip into the orifice to release the keyboard preparatory to removing it in the next step.

      Ask FixBot

      Add Comment

    3. Replacing the Motherboard on the Why! NK50SZ, Keyboard (3): step 6, image 1 of 3 Replacing the Motherboard on the Why! NK50SZ, Keyboard (3): step 6, image 2 of 3 Replacing the Motherboard on the Why! NK50SZ, Keyboard (3): step 6, image 3 of 3
      • Lift the keyboard, without removing it.

      • Locate the cable attaching it to the motherboard.

      • Open the latch and remove the cable.

      • Now you can remove the keyboard.

      Ask FixBot

      Add Comment

    4. Replacing the Motherboard on the Why! NK50SZ, Keyboard (4): step 7, image 1 of 1
      • If you are replacing the original keyboard with a backlit one, you need to remove the adhesive strip and connect the second narrow flex-cable to the jack ( red circle).

      Ask FixBot

      Add Comment

    1. Replacing the Motherboard on the Why! NK50SZ, Heatsink/Fan Assembly: step 8, image 1 of 3 Replacing the Motherboard on the Why! NK50SZ, Heatsink/Fan Assembly: step 8, image 2 of 3 Replacing the Motherboard on the Why! NK50SZ, Heatsink/Fan Assembly: step 8, image 3 of 3
      • You must unscrew the six screws (red circles).

      • Disconnect remove the fan lead.

      • The assembly can now be carefully lifted out.

      Ask FixBot

      Add Comment

    1. Replacing the Motherboard on the Why! NK50SZ, Bottom Cover/Case (1): step 9, image 1 of 3 Replacing the Motherboard on the Why! NK50SZ, Bottom Cover/Case (1): step 9, image 2 of 3 Replacing the Motherboard on the Why! NK50SZ, Bottom Cover/Case (1): step 9, image 3 of 3
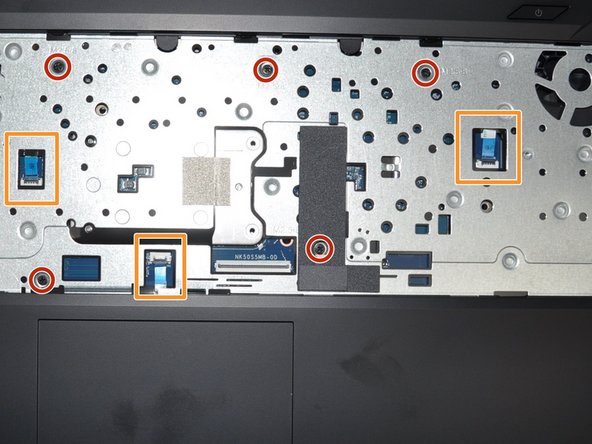
      • Disconnect the three ribbon cables (orange rectangles)

      • Remove the five screws (red circles)

      • Insert a pick between the edges of the upper and lower case and slide it as depicted.

      Ask FixBot

      Add Comment

    2. Replacing the Motherboard on the Why! NK50SZ, Bottom Cover/Case (2): step 10, image 1 of 3 Replacing the Motherboard on the Why! NK50SZ, Bottom Cover/Case (2): step 10, image 2 of 3 Replacing the Motherboard on the Why! NK50SZ, Bottom Cover/Case (2): step 10, image 3 of 3
      • Continue with the pick to disengage the plastic 'clips' along both sides.

      • Remove the Bottom cover.

      Ask FixBot

      Add Comment

    1. Replacing the Motherboard on the Why! NK50SZ, Motherboard (1): step 11, image 1 of 3 Replacing the Motherboard on the Why! NK50SZ, Motherboard (1): step 11, image 2 of 3 Replacing the Motherboard on the Why! NK50SZ, Motherboard (1): step 11, image 3 of 3
      • Position the device keyboard down and peel off the adhesive strip (orange square).

      • Release the cables (orange square).

      • Unscrew the three screws (red circles).

      • You must also disconnect the antenna leads from the Wifi card (green circle) if it hasn't already been removed. It isn't necessary to remove the WiFi card to remove the motherboard.

      Ask FixBot

      Add Comment

    2. Replacing the Motherboard on the Why! NK50SZ, Motherboard (2): step 12, image 1 of 1
      • The motherboard can now be removed.

      Ask FixBot

      Add Comment

Conclusion

To reassemble your device, follow the instructions in reverse order.

Cancel: I did not complete this guide.

Special thanks to these translators:

fr en

100%

Juan Garcia is helping us fix the world! Want to contribute?
Start translating ›

Felice Suglia

Member since: 06/15/13

33,634 Reputation

283 Guides authored

0 Guide Comments

Add Comment

View Statistics:

Past 24 Hours: 2

Past 7 Days: 9

Past 30 Days: 48

All Time: 289