Introduction
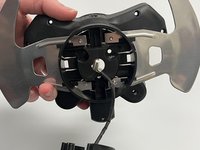
This guide is to show how to replace the two force-feedback motors on the Logitech G29 Driving Force. The Force-feedback motors are what put the resistance on the steering wheel based on what is happening in the game. If these motors go out it can cause the steering wheel to not register the steering inputs that you are putting in.
What you need
-
-
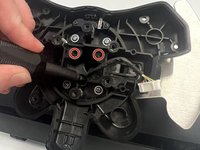
Remove the six 32 mm hex screws from the faceplate of the steering wheel.
-
-


To reassemble your device, follow these instructions in reverse order.
Cancel: I did not complete this guide.
7 other people completed this guide.
Team

Western Carolina University, Team 1-5, Virtue Fall 2022 Member of Western Carolina University, Team 1-5, Virtue Fall 2022
WCU-VIRTUE-F22S1G5
4 Members
13 Guides authored
4 Guide Comments
how much is this part
where do u get repayment parts ?
Where can we find some replacments parts ?
I’d like to disconnect those two motors because at night, when my family is sleeping, they make a lot of noise and I really don’t want to wake anyone up.
Is it possible to open up the G29, cut or unplug those motor cables, and still have everything else work properly?