Free Shipping on Domestic Orders $75+

Lenovo Yoga 910-13IKB Wi-Fi Card Replacement

What you need

    1. Lenovo Yoga 910-13IKB Wi-Fi Card Replacement, Back Panel: step 1, image 1 of 2 Lenovo Yoga 910-13IKB Wi-Fi Card Replacement, Back Panel: step 1, image 2 of 2
      • Turn the laptop over and remove the ten Torx T5 screws along the perimeter of the bottom panel using the T5 Torx Screwdriver.

      • Remove the back panel from the device exposing the components.

      Ask FixBot

      Add Comment

    1. Lenovo Yoga 910-13IKB Wi-Fi Card Replacement, Battery: step 2, image 1 of 1
      • Remove the four 3 mm Phillips #0 screws holding the battery in place.

      Ask FixBot

      Add Comment

    2. Lenovo Yoga 910-13IKB Wi-Fi Card Replacement: step 3, image 1 of 3 Lenovo Yoga 910-13IKB Wi-Fi Card Replacement: step 3, image 2 of 3 Lenovo Yoga 910-13IKB Wi-Fi Card Replacement: step 3, image 3 of 3
      • Disconnect the battery cable from its motherboard socket by gently pulling it towards the battery. The spudger tool may be needed to lift the flap seal.

      • Pull parallel to the battery, not straight up.

      • Pull evenly on the width of the cable so that no individual wire is overly strained.

      • Lift the battery out.

      Ask FixBot

      Add Comment

    1. Lenovo Yoga 910-13IKB Wi-Fi Card Replacement, Wi-Fi Card: step 4, image 1 of 1
      • Remove the single 1 mm screw at left of Wi-Fi card with a Phillips #0 screwdriver.

      Ask FixBot

      Add Comment

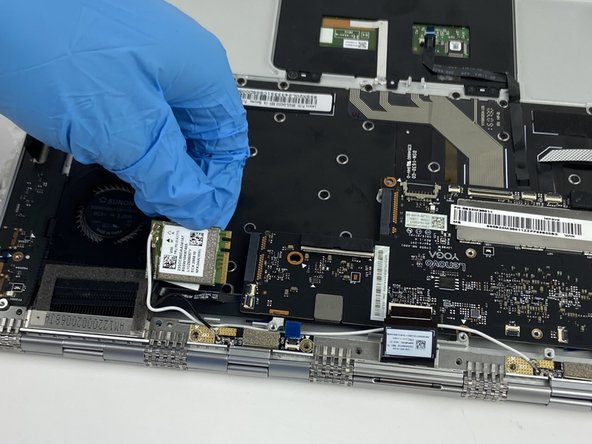
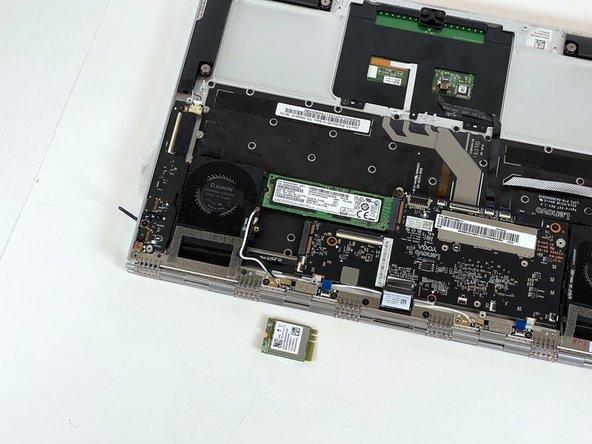
    2. Lenovo Yoga 910-13IKB Wi-Fi Card Replacement: step 5, image 1 of 2 Lenovo Yoga 910-13IKB Wi-Fi Card Replacement: step 5, image 2 of 2
      • Pull the Wi-Fi card out of the slot on the motherboard.

      • It is still connected to the coaxial cables so don't yank it out or those connections will break.

      Ask FixBot

      Add Comment

    3. Lenovo Yoga 910-13IKB Wi-Fi Card Replacement: step 6, image 1 of 3 Lenovo Yoga 910-13IKB Wi-Fi Card Replacement: step 6, image 2 of 3 Lenovo Yoga 910-13IKB Wi-Fi Card Replacement: step 6, image 3 of 3
      • Detach the white wire that is connected to the Wi-Fi card by applying gentle pressure.

      • Detach the black wire by applying gentle pressure.

      Ask FixBot

      Add Comment

Conclusion

To reassemble your device, follow these instructions in reverse order.

Cancel: I did not complete this guide.

One other person completed this guide.

0 Guide Comments

Add Comment

View Statistics:

Past 24 Hours: 2

Past 7 Days: 8

Past 30 Days: 41

All Time: 1,131