
Lenovo Yoga 720-13IKB Fan Replacement

What you need

  1. Lenovo Yoga 720-13IKB Fan Replacement, Bottom Cover: step 1, image 1 of 3 Lenovo Yoga 720-13IKB Fan Replacement, Bottom Cover: step 1, image 2 of 3 Lenovo Yoga 720-13IKB Fan Replacement, Bottom Cover: step 1, image 3 of 3
    Tool used on this step:
    T5 Torx Screwdriver
    $5.49
    Buy
    • Before you begin, be sure to turn off your laptop and discharge the battery down to 25%.

    • Start by flipping the device over so that you see the screws.

    • Remove seven Torx T5 short screws.

    • Remove three Torx T5 long screws.

  2. Lenovo Yoga 720-13IKB Fan Replacement: step 2, image 1 of 3 Lenovo Yoga 720-13IKB Fan Replacement: step 2, image 2 of 3 Lenovo Yoga 720-13IKB Fan Replacement: step 2, image 3 of 3
    Tool used on this step:
    iFixit Opening Tool
    $1.99
    Buy
    • Starting from the USB port, use your opening tool to gently pry up the case.

    • Make sure you are prying on the cover itself, not the metal shield around the USB port.

    • Pry along the laptop in the order shown by the arrows.

    • Do NOT pry along the top side, or you risk damaging the casing. Stay with the arrows.

  3. Lenovo Yoga 720-13IKB Fan Replacement: step 3, image 1 of 3 Lenovo Yoga 720-13IKB Fan Replacement: step 3, image 2 of 3 Lenovo Yoga 720-13IKB Fan Replacement: step 3, image 3 of 3
    • Lift the case from the bottom side. NOT the side with the hinges.

    • When you feel resistance, do NOT keep lifting or you will damage the housing.

    • Once you feel resistance, gently pull the case towards you. (away from the hinges.)

    • Remove the case.

  4. Lenovo Yoga 720-13IKB Fan Replacement, Fan: step 4, image 1 of 2 Lenovo Yoga 720-13IKB Fan Replacement, Fan: step 4, image 2 of 2
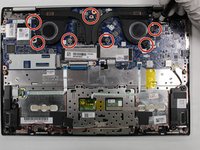
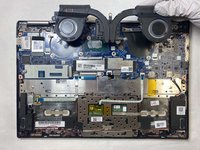
    • Use a JIS #000 screwdriver to unscrew and remove the seven 2.5mm screws that secure the fan to the motherboard.

    • Remove the fan from the laptop.

    • Follow the instructions found here to reapply new thermal paste. If your replacement heat sink and fan assembly has thermal paste pre-applied, you'll simply need to remove the old thermal paste from the laptop.

Conclusion

To reassemble your device, follow these instructions in reverse order.

0 Comments

Add Comment

View Statistics:

Past 24 Hours: 0

Past 7 Days: 3

Past 30 Days: 23

All Time: 871