
Lenovo Yoga 500-15IBD Power Switch Repair/Replacement

  1. Lenovo Yoga 500-15IBD Power Switch Repair/Replacement, Tools: step 1, image 1 of 1
    Tool used on this step:
    Pro Tech Toolkit
    $74.95
    Buy
    • Most of the necessary tools are part of the toolkit IFIXIT Pro Tech Toolkit

    • additionally is needed

    • soldering tools and materials (soldering pasta, soldering iron, soldering flux etc)

    • magnifying glass if necessary

  2. Lenovo Yoga 500-15IBD Power Switch Repair/Replacement: step 2, image 1 of 1
  3. Lenovo Yoga 500-15IBD Power Switch Repair/Replacement, Disassembling of HDD: step 3, image 1 of 3 Lenovo Yoga 500-15IBD Power Switch Repair/Replacement, Disassembling of HDD: step 3, image 2 of 3 Lenovo Yoga 500-15IBD Power Switch Repair/Replacement, Disassembling of HDD: step 3, image 3 of 3
    • Remove the screws from HDD

    • Disconnect the flat cable from Motherboard

    • Attention: The cable is is connected in a kind of clamp connector! Open the connector to remove the cable

  4. Lenovo Yoga 500-15IBD Power Switch Repair/Replacement, Disassembling of battery: step 4, image 1 of 2 Lenovo Yoga 500-15IBD Power Switch Repair/Replacement, Disassembling of battery: step 4, image 2 of 2
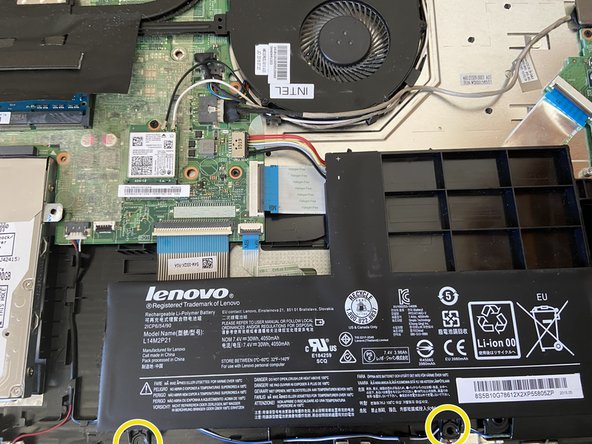
    • Disconnect the battery

    • Remove the screws

    • Remove the battery

  5. Lenovo Yoga 500-15IBD Power Switch Repair/Replacement, Disassembling of fan: step 5, image 1 of 1
    • Remove the screws

    • Remove the fan

    • Clean the Fan with compressed air if necessary

  6. Lenovo Yoga 500-15IBD Power Switch Repair/Replacement, Disconnect all cables from motherboard: step 6, image 1 of 1
    • Disconnect all the flat from motherboard in the same way as the HDD flat cable has been disconnected

    • Fan cable need to be disconnected too

  7. Lenovo Yoga 500-15IBD Power Switch Repair/Replacement, Motherboard disasembling: step 7, image 1 of 1
    • Remove the screws of motherboard

    • Lift slightly the motherboard and remove it from pc

    • Turn the motherboard upside down

    • on the bottom side (which is now on the top) is the placed the power switch

  8. Lenovo Yoga 500-15IBD Power Switch Repair/Replacement, Soldering of power switch: step 8, image 1 of 3 Lenovo Yoga 500-15IBD Power Switch Repair/Replacement, Soldering of power switch: step 8, image 2 of 3 Lenovo Yoga 500-15IBD Power Switch Repair/Replacement, Soldering of power switch: step 8, image 3 of 3
    • At least now the ESD-Protection Kit should be used for all following steps

    • Use suitable flux for soldering

    • place and solder the power switch on the motherboard

    • residues of solder should be removed by desoldering stranded wire

    • residues of flux should be removed too

  9. Lenovo Yoga 500-15IBD Power Switch Repair/Replacement, Motherboard mounting: step 9, image 1 of 1
    • During reassembling of motherboard in housing is necessary to pay attention to the power switch. The outside button must be precisely placed on the power switch

Conclusion

Follow the steps backward to reassemby the gadget again.

One other person completed this guide.

Special thanks to these translators:

de en

100%

These translators are helping us fix the world! Want to contribute?
Start translating ›

Martin

Member since: 12/12/20

253 Reputation

1 Guide authored

0 Comments

Add Comment

View Statistics:

Past 24 Hours: 0

Past 7 Days: 2

Past 30 Days: 20

All Time: 226