Introduction
Follow this guide to replace the SSD in your Lenovo YOGA 730-15IKB. The SSD—like its older predecessor, the hard drive—is where files are stored on your computer. If your SSD is getting full, you could upgrade to a higher capacity drive for more storage space.
If your computer powers on and lights up but does not boot into an operating system (like Windows), you may need to replace a failed SSD.
It is always a good idea to make a backup of your data before removing your SSD.
What you need
-
-
Flip the laptop over so you can see the underside.
-
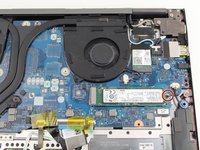
Remove the ten 7mm T5 Torx screws.
-
-


To reassemble your device, follow these instructions in reverse order.
Cancel: I did not complete this guide.
3 other people completed this guide.

Team

Cal Poly, Team S1-G6, White Winter 2020 Member of Cal Poly, Team S1-G6, White Winter 2020
CPSU-WHITE-W20S1G6
3 Members
27 Guides authored