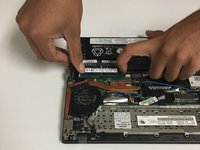
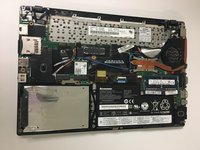
Lenovo Thinkpad X240 RAM Replacement

What you need

  1. Lenovo Thinkpad X240 RAM Replacement, RAM: step 1, image 1 of 1
    • Flip the laptop up side down as shown in the photo.

  2. Lenovo Thinkpad X240 RAM Replacement: step 2, image 1 of 2 Lenovo Thinkpad X240 RAM Replacement: step 2, image 2 of 2
    • Remove the 8 0.2mm Phillips screws connecting the back cover to the laptop.

  3. Lenovo Thinkpad X240 RAM Replacement: step 3, image 1 of 1
    • Remove the back cover using the opening tools.

    • Gently use the plastic opening tools to prevent scratching your device.

  4. Lenovo Thinkpad X240 RAM Replacement: step 4, image 1 of 2 Lenovo Thinkpad X240 RAM Replacement: step 4, image 2 of 2
    • Remove the RAM stick by carefully popping its holders out of place.

Conclusion

To reassemble your device, follow these instructions in reverse order.

6 other people completed this guide.

2 Comments

Does this Thinkpad really have only one RAM slot? Or is there another one on the back of the board (i.e. under the keyboard)?

Sebastian Swirski - Reply

Would I be able to add a 16gb ram stick in it? Even though the highest spec config that the laptop ships with is only 8gb?

Mahir Max - Reply

Add Comment

View Statistics:

Past 24 Hours: 1

Past 7 Days: 9

Past 30 Days: 34

All Time: 4,662