Introduction
This replacement guide will show users how to remove the back panel of your Lenovo ThinkPad X280. This guide will function as a prerequisite guide to all other replacement guides included, with the exception of the keyboard replacement. Once the user has properly removed the back panel of the device, they can move forward with the replacement process of the desired part.
What you need
-
-
-
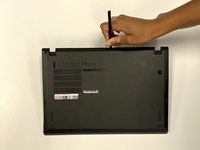
Use a Phillips #1 screwdriver to unscrew the five captive screws on the back panel until a small pop is heard.
-
-
-
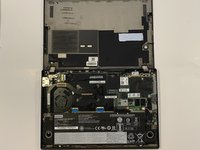
Gently wedge an opening tool or spudger under the back panel, and loosen the clips around the perimeter until the back panel comes off.
-
Remove the back cover.
-


To reassemble your device, follow these instructions in reverse order.
Cancel: I did not complete this guide.
3 other people completed this guide.
Team

University of Alabama, Team 1-3, Bedsole Fall 2021 Member of University of Alabama, Team 1-3, Bedsole Fall 2021
UA-BEDSOLE-F21S1G3
4 Members
8 Guides authored