
Lenovo ThinkPad X1 Yoga 2nd Generation Trackpad Replacement

What you need

  1. Lenovo ThinkPad X1 Yoga 2nd Generation Trackpad Replacement, Back Cover: step 1, image 1 of 1
    • Ensure the laptop is powered off and the charging cable is disconnected before opening the back cover.

    • Flip over the laptop to access the back cover.

  2. Lenovo ThinkPad X1 Yoga 2nd Generation Trackpad Replacement: step 2, image 1 of 2 Lenovo ThinkPad X1 Yoga 2nd Generation Trackpad Replacement: step 2, image 2 of 2
    • Use a Phillips #0 screwdriver to remove the eight 8 mm screws.

  3. Lenovo ThinkPad X1 Yoga 2nd Generation Trackpad Replacement: step 3, image 1 of 1
    • Remove the back cover.

    • A popping sound may occur when the back cover is removed.

  4. Lenovo ThinkPad X1 Yoga 2nd Generation Trackpad Replacement, Speakers: step 4, image 1 of 2 Lenovo ThinkPad X1 Yoga 2nd Generation Trackpad Replacement, Speakers: step 4, image 2 of 2
    • Follow the ribbon cable that runs from the left speaker to the motherboard.

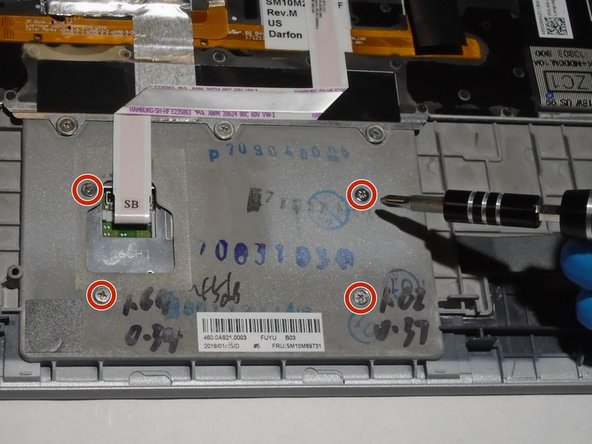
    • Pull the black connector up and release the cable wire by hand.

    • If needed, pull this connector up using the Pro/ESD/Angled tweezers.

  5. Lenovo ThinkPad X1 Yoga 2nd Generation Trackpad Replacement: step 5, image 1 of 2 Lenovo ThinkPad X1 Yoga 2nd Generation Trackpad Replacement: step 5, image 2 of 2
    • Remove two 6 mm Phillips #0 screws from each speaker.

  6. Lenovo ThinkPad X1 Yoga 2nd Generation Trackpad Replacement: step 6, image 1 of 2 Lenovo ThinkPad X1 Yoga 2nd Generation Trackpad Replacement: step 6, image 2 of 2
    • Use your fingers to remove the speakers from the device.

  7. Lenovo ThinkPad X1 Yoga 2nd Generation Trackpad Replacement, Battery: step 7, image 1 of 1
    • Use a spudger to pop the ribbon cable that runs from the upper-middle portion of the battery to the motherboard out of the motherboard.

    • Do not use a metal spudger as indicated in the photos. The metal spudger should only be used for serious prying power. If it's used on the internal components of a device, it may puncture or damage the components in your device.

  8. Lenovo ThinkPad X1 Yoga 2nd Generation Trackpad Replacement: step 8, image 1 of 1
    • Use a Phillips #0 screwdriver to remove one 6 mm screw from the bottom-middle portion of the battery.

  9. Lenovo ThinkPad X1 Yoga 2nd Generation Trackpad Replacement: step 9, image 1 of 1
    • Remove the battery.

  10. Lenovo ThinkPad X1 Yoga 2nd Generation Trackpad Replacement, Trackpad: step 10, image 1 of 2 Lenovo ThinkPad X1 Yoga 2nd Generation Trackpad Replacement, Trackpad: step 10, image 2 of 2
    • Using a Phillips #0 screwdriver, remove four 3 mm screws.

  11. Lenovo ThinkPad X1 Yoga 2nd Generation Trackpad Replacement: step 11, image 1 of 1
    • Lift up the laptop and remove the trackpad from the device.

    • When you lift up the bottom panel, the trackpad should fall from the device.

Conclusion

To reassemble your device, follow these instructions in reverse order.

0 Comments

Add Comment

View Statistics:

Past 24 Hours: 0

Past 7 Days: 2

Past 30 Days: 5

All Time: 493