Introduction
When a blue screen occurs on your Lenovo ThinkPad T495, an error code will appear somewhere on the screen, as well as a scannable QR code which can be used to diagnose what is wrong with your device. In the case of this guide, the lack of memory or faulty memory will be covered, and the stick of RAM will be replaced.
What you need
-
-
Use an iFixit opening tool to start prying under one of the hinges, between the baseplate and chassis, and work your way around the perimeter until the baseplate releases.
-
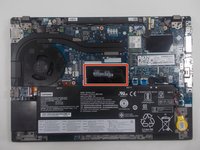
Lift off the baseplate.
-
-
-
-
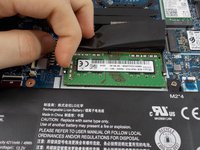
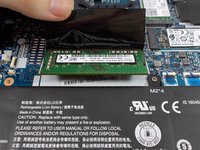
Use your fingers to gently pull the two arms on each side horizontally until the RAM springs up.
-
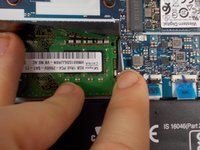
Grip the RAM between your fingers and pull it gently until it releases from the port.
-


To reassemble your device, follow these instructions in reverse order.
Cancel: I did not complete this guide.
5 other people completed this guide.

Team

UMass Dartmouth, Team 1-6, Petersen Spring 2022 Member of UMass Dartmouth, Team 1-6, Petersen Spring 2022
UMASSD-PETERSEN-S22S1G6
3 Members
8 Guides authored
2 Guide Comments
Hi, can we disable the onboard RAM from BIOS or any tool from the OS?
Big problem here. You cannot remove the RAM that comes with the laptop. The instructions above say "Use your fingers to gently pull the two arms on each side horizontally until the RAM springs up." No, the RAM does not spring up on my T495 because it is soldered! By the time I realized that, I had nearly broken one of the RAM-holding arms. The T495 comes with two RAM slots. On my laptop, one slot had an 8 GM RAM module that came with the laptop. After realizing it cannot be removed, I put in a new 16 GB RAM module on top of the old one. The new module is now held in place by only one of the arms. The other one is dislocated because of the fool I was in trying to pull the arm until the old RAM sprang up. It is soldered, as I learned the hard way.