Lenovo IdeaPad U310 Fan Replacement

What you need

  1. Lenovo IdeaPad U310 Fan Replacement, Battery: step 1, image 1 of 1
    • Flip the device over so the bottom panel is facing up.

    • Remove the rubber feet by pinching and pulling in an upward motion.

    • The rubber feet are missing from this photo, but will be located within the red markups.

  2. Lenovo IdeaPad U310 Fan Replacement: step 2, image 1 of 1
    • Remove the 4 screws securing the bottom panel to the device.

    • The screws are missing from this device and are not pictured. They will be located under the rubber feet within the red markups.

  3. Lenovo IdeaPad U310 Fan Replacement: step 3, image 1 of 2 Lenovo IdeaPad U310 Fan Replacement: step 3, image 2 of 2
    • Place the plastic opening tool between the bottom panel and device.

    • Pry around the device's outer edge until the bottom panel is no longer attached.

    • Lift the bottom panel up and away from device.

  4. Lenovo IdeaPad U310 Fan Replacement: step 4, image 1 of 2 Lenovo IdeaPad U310 Fan Replacement: step 4, image 2 of 2
    • Unplug the Battery from the circuit board by carefully prying the connector from its housing.

  5. Lenovo IdeaPad U310 Fan Replacement: step 5, image 1 of 2 Lenovo IdeaPad U310 Fan Replacement: step 5, image 2 of 2
    • Remove the 5.6 mm Screw with the PH1 screwdriver.

    • Remove the 4.6 mm screws with the PH1 screwdriver.

  6. Lenovo IdeaPad U310 Fan Replacement: step 6, image 1 of 2 Lenovo IdeaPad U310 Fan Replacement: step 6, image 2 of 2
    • Lift the strip tape away from the battery, being careful not to completely remove it.

  7. Lenovo IdeaPad U310 Fan Replacement: step 7, image 1 of 1
    • Remove the battery by lifting up and away from device.

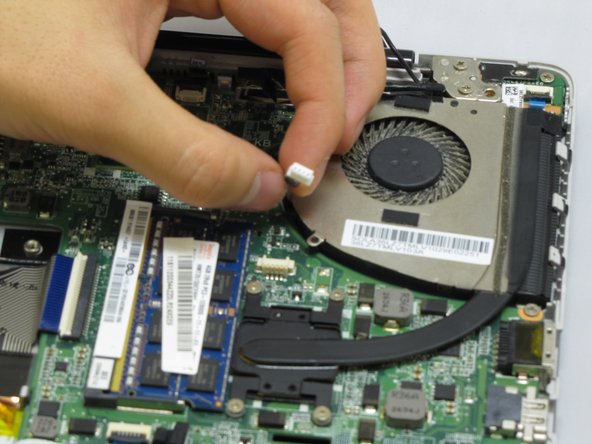
  8. Lenovo IdeaPad U310 Fan Replacement, Fan: step 8, image 1 of 2 Lenovo IdeaPad U310 Fan Replacement, Fan: step 8, image 2 of 2
    • Unplug fan by pinching the connector and pulling it away from its housing.

  9. Lenovo IdeaPad U310 Fan Replacement: step 9, image 1 of 2 Lenovo IdeaPad U310 Fan Replacement: step 9, image 2 of 2
    • Unscrew 5.1 mm screw using PH1.

    • Unscrew the four 3.6 mm screws using PH1.

    • Theses five screws are attached to the black plate with rubber stoppers. You will be able to loosen them from the circuit board, but they will stay attached.

  10. Lenovo IdeaPad U310 Fan Replacement: step 10, image 1 of 1
    • Remove fan by lifting up and away from device.

Conclusion

To reassemble your device, follow these instructions in reverse order.

2 other people completed this guide.

0 Comments

Add Comment

View Statistics:

Past 24 Hours: 0

Past 7 Days: 1

Past 30 Days: 3

All Time: 1,560