
Lenovo IdeaPad 330S-14IKB Fan Replacement

What you need

  1. Lenovo IdeaPad 330S-14IKB Fan Replacement, Fan: step 1, image 1 of 1
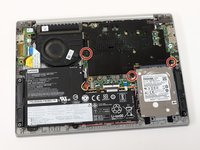
    • Place the laptop with its bottom facing up, so you can easily read the labels on the back.

  2. Lenovo IdeaPad 330S-14IKB Fan Replacement: step 2, image 1 of 1
    • Remove the 10 screws from the bottom of the laptop.

    • Keep these screws in a safe place, such as a magnetic pad, to prevent them from getting lost.

    • (Silver, 5.8mm Phillips #0)

  3. Lenovo IdeaPad 330S-14IKB Fan Replacement: step 3, image 1 of 1
    • Slowly and carefully remove the back panel from the laptop.

    • Use wedges if necessary to avoid damaging the panel.

  4. Lenovo IdeaPad 330S-14IKB Fan Replacement: step 4, image 1 of 1
    • Locate the fan in the top left corner of the laptop.

  5. Lenovo IdeaPad 330S-14IKB Fan Replacement: step 5, image 1 of 2 Lenovo IdeaPad 330S-14IKB Fan Replacement: step 5, image 2 of 2
    • Find the black panel in the top right and remove the three black screws.

    • Remove the black panel

    • Keep the black screws separate from the silver ones.

    • (Black, 5.83mm Philips #0)

  6. Lenovo IdeaPad 330S-14IKB Fan Replacement: step 6, image 1 of 1
    • Your fan will have one black screw connected to it on the left side. Remove this screw.

    • Keep the screw separate from the black screws in the previous step as it is a different size.

    • (Black, 3.47mm Phillips #0)

  7. Lenovo IdeaPad 330S-14IKB Fan Replacement: step 7, image 1 of 1
    • The fan is connected to a heat sink; leave the heat sink in place but remove the adhesive connecting the two pieces.

  8. Lenovo IdeaPad 330S-14IKB Fan Replacement: step 8, image 1 of 2 Lenovo IdeaPad 330S-14IKB Fan Replacement: step 8, image 2 of 2
    • Before removing the fan, locate a small set of yellow, red, blue, and black wires on the right side of the fan.

    • Gently remove them from the connector without pulling on the wires.

    • You can use a screwdriver or a similar tool to assist in this step.

  9. Lenovo IdeaPad 330S-14IKB Fan Replacement: step 9, image 1 of 2 Lenovo IdeaPad 330S-14IKB Fan Replacement: step 9, image 2 of 2
    • Disconnect the large black wire connected to the slot on the side of your fan.

    • Remove your fan.

Conclusion

To reassemble your device, follow these instructions in reverse order.

3 other people completed this guide.

0 Comments

Add Comment

View Statistics:

Past 24 Hours: 1

Past 7 Days: 5

Past 30 Days: 13

All Time: 139