
Learn to Sew a Straight Seam

What you need

  1. Learn to Sew a Straight Seam, Learn to Sew a Straight Seam: step 1, image 1 of 3 Learn to Sew a Straight Seam, Learn to Sew a Straight Seam: step 1, image 2 of 3 Learn to Sew a Straight Seam, Learn to Sew a Straight Seam: step 1, image 3 of 3
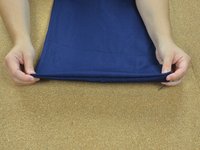
    • Lay the two pieces of fabric with the right sides together. Align the edges you would like to sew. Push out all the wrinkles and smooth the fabric flat.

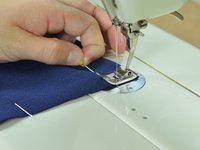
    • Starting at one end of the seam, match the corners and pin them together.

  2. Learn to Sew a Straight Seam: step 2, image 1 of 2 Learn to Sew a Straight Seam: step 2, image 2 of 2
    • Work your way down the edge to be sewn, pining the two pieces of fabric together.

    • The closer the pins are, the more stable the fabric will be. However, you will have to stop to remove each pin as you sew. If you're just getting started, use a pin every inch or two of fabric.

  3. Learn to Sew a Straight Seam: step 3, image 1 of 3 Learn to Sew a Straight Seam: step 3, image 2 of 3 Learn to Sew a Straight Seam: step 3, image 3 of 3
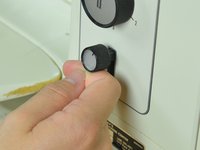
    • Make sure the settings on your sewing machine are set to sew a straight stitch.

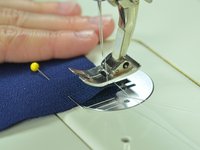
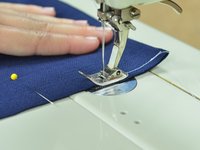
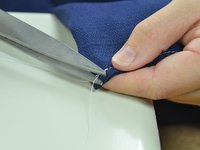
    • Slide the corner of your fabric into the sewing machine, directly under the hole in the presser foot.

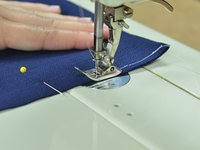
    • Align the edge of your fabric with the edge of the pressor foot.

    • This will act as a guide while you sew, and will help you keep you seam straight. In this case, it will leave a quarter-inch seam allowance. You can use a different guide if you would like.

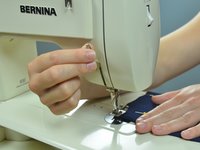
    • Lower the presser foot using the presser foot lever.

  4. Learn to Sew a Straight Seam: step 4, image 1 of 2 Learn to Sew a Straight Seam: step 4, image 2 of 2
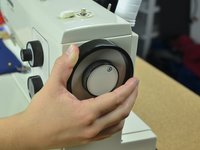
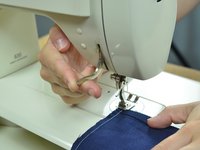
    • Use the balance wheel (also know as the hand wheel) to advance the sewing machine until the needle has sunk into the fabric.

    • The balance wheel should only be turned in the direction that advances the sewing machine. Usually, this means turning the wheel towards you. Turning the wheel in the opposite direction can ruin the tension on the sewing machine, causing it to jam. See your sewing machine manual for instructions specific to your machine.

  5. Learn to Sew a Straight Seam: step 5, image 1 of 2 Learn to Sew a Straight Seam: step 5, image 2 of 2
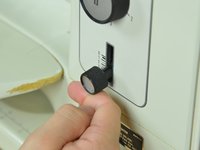
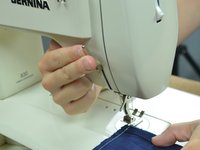
    • Engage your backstitch function.

    • Backstitch functions vary widely between machines and can come in the form of buttons, levers, and knobs. See your sewing machine manual for instructions on your backstitch function.

    • Depress the pedal slowly. This will start the sewing machine sewing backwards.

    • Sew two or three stitches backwards.

    • Release the pedal.

    • Release your backstitch function.

  6. Learn to Sew a Straight Seam: step 6, image 1 of 3 Learn to Sew a Straight Seam: step 6, image 2 of 3 Learn to Sew a Straight Seam: step 6, image 3 of 3
    • Depress the pedal and sew slowly forward, guiding the fabric with your hands as you go.

    • When guiding the fabric through a sewing machine you should not be pushing or pulling. The machine will feed the fabric in at the right speed. Your job is merely to guide the fabric so the seam remains straight.

    • Keep the fabric aligned to the edge of the presser foot as you sew.

    • Stop before you reach each pin. Pull the pins out, being careful not to misalign the fabric.

  7. Learn to Sew a Straight Seam: step 7, image 1 of 3 Learn to Sew a Straight Seam: step 7, image 2 of 3 Learn to Sew a Straight Seam: step 7, image 3 of 3
    • When you come to the end of your seam, engage the backstitch function.

    • Sew two or three stitches backwards.

    • Release the backstitch function and sew forward off the fabric.

    • Turn the balance wheel until the needle is up.

  8. Learn to Sew a Straight Seam: step 8, image 1 of 2 Learn to Sew a Straight Seam: step 8, image 2 of 2
    • Lift the presser foot up.

  9. Learn to Sew a Straight Seam: step 9, image 1 of 2 Learn to Sew a Straight Seam: step 9, image 2 of 2
    • Pull the fabric out of the sewing machine.

    • The threads are still attached to the sewing machine, so be careful not to pull too far or tangle the threads.

    • Clip the threads as close to the fabric as possible.

    • Turn your seam right side out, and admire your work.

Finish Line

9 other people completed this guide.

Brittany McCrigler

Member since: 03/05/12

88,901 Reputation

131 Guides authored

Team

iFixit Member of iFixit

Staff

135 Members

16,475 Guides authored

2 Comments

Thank You!!! This helped me so much <3

Cheryl LAM - Reply

I really mean it! Thank You! ʕ•ᴥ•ʔ

Cheryl LAM -

Add Comment

View Statistics:

Past 24 Hours: 3

Past 7 Days: 16

Past 30 Days: 49

All Time: 38,917