
LeapFrog LeapPad Ultimate Speaker Replacement

What you need

  1. LeapFrog LeapPad Ultimate Speaker Replacement, Back Panel: step 1, image 1 of 2 LeapFrog LeapPad Ultimate Speaker Replacement, Back Panel: step 1, image 2 of 2
    • Flip over the Pad to its back side to begin the removal of the back panel.

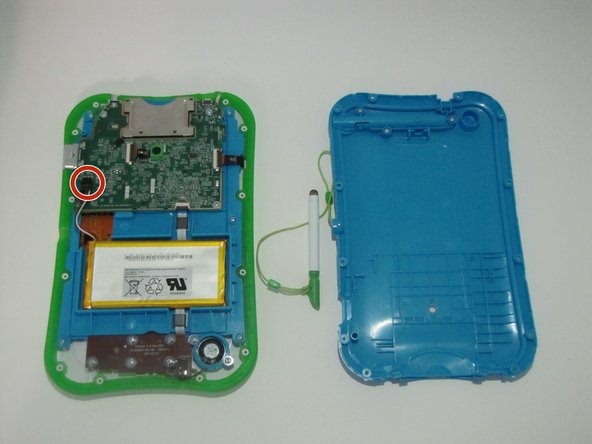
    • Begin by removing the blue rim along the edge of the device. It runs along the green silicone lining.

    • This is very difficult to remove , so do be patient. To help remove the seal, both a metal spudger and plastic opening tool may be used.

    • Remove the pen from its place before starting to avoid tangling.

  2. LeapFrog LeapPad Ultimate Speaker Replacement: step 2, image 1 of 2 LeapFrog LeapPad Ultimate Speaker Replacement: step 2, image 2 of 2
    • Once the blue rim is removed, the 12 screws will be visible.

    • Use the Phillips #1 screwdriver to unscrew all 12 screws.

  3. LeapFrog LeapPad Ultimate Speaker Replacement, Speaker: step 3, image 1 of 1
    • Remove the back panel of the device exposing the internal components of the device.

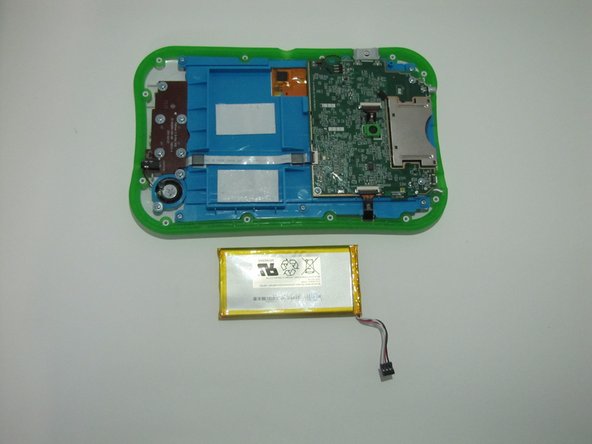
    • Once the internal components are exposed locate the point which connects the battery to the motherboard.

    • You will need to remove the battery to access the ribbon that connects the LeapPad speaker to the motherboard.

  4. LeapFrog LeapPad Ultimate Speaker Replacement: step 4, image 1 of 3 LeapFrog LeapPad Ultimate Speaker Replacement: step 4, image 2 of 3 LeapFrog LeapPad Ultimate Speaker Replacement: step 4, image 3 of 3
    • The point connecting the battery and motherboard is made up of three wires, red, white, and black.

    • The plastic portion on the motherboard's end will have a small notch on top. Pull the notch in the direction towards the battery with the curved tweezers. This will disconnect the wires from the motherboard.

  5. LeapFrog LeapPad Ultimate Speaker Replacement: step 5, image 1 of 2 LeapFrog LeapPad Ultimate Speaker Replacement: step 5, image 2 of 2
    • Carefully remove the battery from the LeapPad. Use an opening tool or a plastic spudger to gain leverage, if needed.

    • Do not bend or puncture the battery.

  6. LeapFrog LeapPad Ultimate Speaker Replacement: step 6, image 1 of 1
    • To begin removing the speaker, you must first disconnect it from the motherboard.

    • Flip up the black switch found on the small white connection site with the blue ribbon that is located on the motherboard.

  7. LeapFrog LeapPad Ultimate Speaker Replacement: step 7, image 1 of 3 LeapFrog LeapPad Ultimate Speaker Replacement: step 7, image 2 of 3 LeapFrog LeapPad Ultimate Speaker Replacement: step 7, image 3 of 3
    • Once the blue ribbon cable is disconnected from the motherboard, use tweezers to carefully pull the ribbon cable out of the slots.

  8. LeapFrog LeapPad Ultimate Speaker Replacement: step 8, image 1 of 3 LeapFrog LeapPad Ultimate Speaker Replacement: step 8, image 2 of 3 LeapFrog LeapPad Ultimate Speaker Replacement: step 8, image 3 of 3
    • Remove the circular plastic speaker and the 2 screws a Phillips #1 screwdriver. Gently lift the cover off of the device.

  9. LeapFrog LeapPad Ultimate Speaker Replacement: step 9, image 1 of 2 LeapFrog LeapPad Ultimate Speaker Replacement: step 9, image 2 of 2
    • On the brown speaker board, you will see 5 more screws. Remove all 5 of these screws with the same Phillips #1 screwdriver.

    • Gently lift the speaker board, speaker, and attached ribbon cable from the device as one piece.

Conclusion

To reassemble your device, follow these instructions in reverse order.

One Comment

the battery is very difficult to remove, there is too much adhesive tape on the back. I had to do an internal cleaning because my son put some fruit juice inside and because of that there was no sound coming from the LeapPad, after a deep cleaning with alcohol it worked fine again.

jobega - Reply

Add Comment

View Statistics:

Past 24 Hours: 2

Past 7 Days: 6

Past 30 Days: 16

All Time: 961