Free Shipping on Domestic Orders $75+

LG G3 Screen Replacement

Archived Guide
This guide is retained solely for historical purposes. Use the updated version of the guide to perform your repair.

What you need

    1. LG G3 Screen Replacement, Screen: step 1, image 1 of 2 LG G3 Screen Replacement, Screen: step 1, image 2 of 2
      • Remove the 13 Phillips #00 screws found on the back of the phone.

      • The screw circled in red is shorter than the other 12 screws. For an easier time when reassembling the phone, store it separately from the other screws.

      Ask FixBot

      Add Comment

    2. LG G3 Screen Replacement: step 2, image 1 of 2 LG G3 Screen Replacement: step 2, image 2 of 2
      • Locate the same gap used in the earlier step

      • Remove the bottom panel by gently lifting using your fingers

      Ask FixBot

      Add Comment

    3. LG G3 Screen Replacement: step 3, image 1 of 1
      • Remove the top panel by gently lifting with your finger

      • Do not pull up too forcefully, as there is a risk of the top panel breaking

      Ask FixBot

      Add Comment

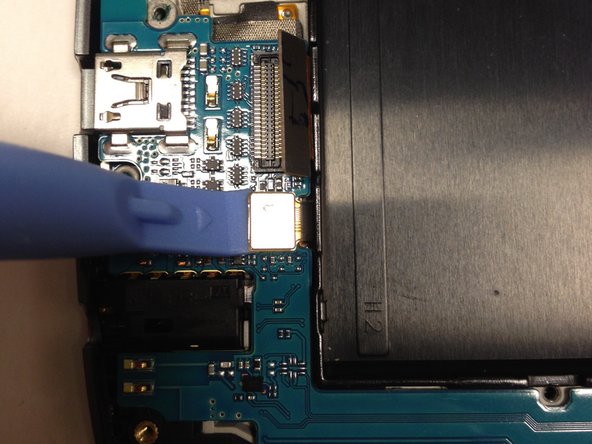
    4. LG G3 Screen Replacement: step 4, image 1 of 3 LG G3 Screen Replacement: step 4, image 2 of 3 LG G3 Screen Replacement: step 4, image 3 of 3
      • Take the plastic opening tool and gently wedge it under where the ribbon cable is connected

      • Gently lift up to disconnect the ribbon cable

      • Repeat until all four ribbon cables are disconnected

      Ask FixBot

      Add Comment

    5. LG G3 Screen Replacement: step 5, image 1 of 2 LG G3 Screen Replacement: step 5, image 2 of 2
      • Remove the motherboard by lifting gently

      • Take care not to damage the ribbon cables if the other components are functional. Damaging them may result in other components not working

      Ask FixBot

      Add Comment

    6. LG G3 Screen Replacement: step 6, image 1 of 2 LG G3 Screen Replacement: step 6, image 2 of 2
      • The following components are kept in place with an adhesive, so it may take some time and effort to get it out

      • Remove the headphone port

      • Remove the vibration motor

      • Remove the rear-facing camera

      • Remove the earpiece speaker

      • If you are going to be using a screen assembly with a pre-installed frame, you may stop here and follow the previous steps in reverse with your new screen assembly. Otherwise, you will now transfer the LCD bezel as well as the speaker grille.

      Ask FixBot

      Add Comment

Conclusion

To reassemble your device, follow these instructions in reverse order.

Cancel: I did not complete this guide.

Naoto

Member since: 10/16/14

4,763 Reputation

4 Guides authored

Team

UMass Dartmouth, Team 1-3, Duarte Fall 2014 Member of UMass Dartmouth, Team 1-3, Duarte Fall 2014

UMASSD-DUARTE-F14S1G3

4 Members

63 Guides authored

0 Guide Comments

Add Comment

View Statistics:

Past 24 Hours: 0

Past 7 Days: 2

Past 30 Days: 8

All Time: 105