
Kindle Fire HD Battery Replacement

What you need

  1. Kindle Fire HD Battery Replacement, Open the Kindle: step 1, image 1 of 3 Kindle Fire HD Battery Replacement, Open the Kindle: step 1, image 2 of 3 Kindle Fire HD Battery Replacement, Open the Kindle: step 1, image 3 of 3
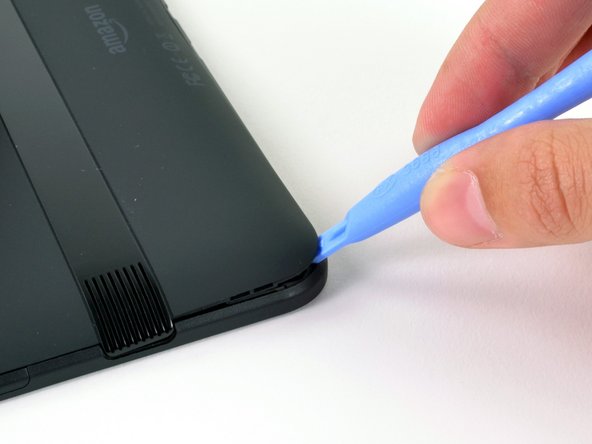
    • Wedge a plastic opening tool into the lower right corner of the Kindle Fire.

    • Lift up until you hear a slight popping noise.

    • Repeat along the perimeter of the device to release the clips securing the case halves to each other. Remove the back cover.

    • The Kindle Fire could possibly have tape on the inside. Check for tape before removing the back cover.

  2. Kindle Fire HD Battery Replacement: step 2, image 1 of 3 Kindle Fire HD Battery Replacement: step 2, image 2 of 3 Kindle Fire HD Battery Replacement: step 2, image 3 of 3
    • Using the plastic opening tool, start from one corner and go around the Kindle Fire using the tool in a down and up motion to continue to pop off the backing.

    • The Kindle Fire could possibly have tape on the inside, so take caution and look before attempting to remove the back.

    • After you lift all four corners and you check for tape, it is safe to proceed.

    • Once all the plastic clips holding the screen to the plastic back of the Kindle Fire are separated, the back should be safe to lift up completely.

  3. Kindle Fire HD Battery Replacement: step 3, image 1 of 1
    • Locate and unscrew the four 3 mm screws using the Phillips #00 screwdriver.

  4. Kindle Fire HD Battery Replacement: step 4, image 1 of 1
    • If your device has copper tape attached to the battery, carefully peel it off the battery.

  5. Kindle Fire HD Battery Replacement: step 5, image 1 of 2 Kindle Fire HD Battery Replacement: step 5, image 2 of 2
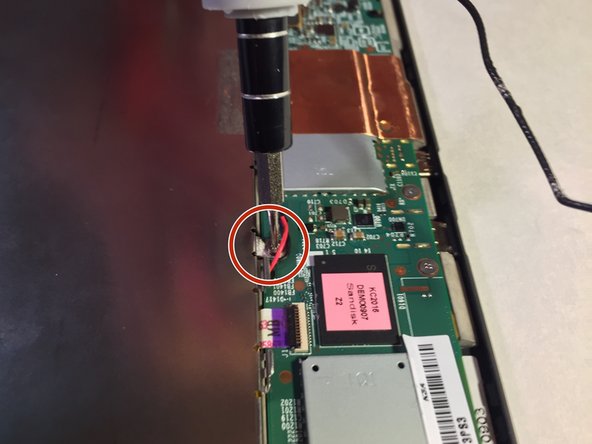
    • Locate the antenna cable connector which is easier to find if you look for the gold tipped black wire that surrounds the battery.

    • Lift and pull up the power connector cable that surrounds the battery

  6. Kindle Fire HD Battery Replacement, Remove Screws: step 6, image 1 of 3 Kindle Fire HD Battery Replacement, Remove Screws: step 6, image 2 of 3 Kindle Fire HD Battery Replacement, Remove Screws: step 6, image 3 of 3
    • Locate and unscrew the four 3 mm screws using the Phillips #00 screwdriver.

    • Unscrew the one T5 Torx screw using the special T5 Torx screwdriver head.

    • The 2 mm T5 Torx screw is located on the motherboard near the antenna clip.

    • If you aren't equipped with the T5 Torx screwdriver, you could try using your fingers, although it will be very difficult to remove it.

  7. Kindle Fire HD Battery Replacement, Detach Cable: step 7, image 1 of 2 Kindle Fire HD Battery Replacement, Detach Cable: step 7, image 2 of 2
    • Detach the plastic piece that connects the wires to the motherboard using the plastic opening tool.

  8. Kindle Fire HD Battery Replacement: step 8, image 1 of 1
    • Lift the battery out of the device with your finger or the plastic opening tool.

  9. Kindle Fire HD Battery Replacement: step 9, image 1 of 1
    • Pull the battery away from the silver backing.

Matthew Hodgdon

Member since: 03/03/15

1,366 Reputation

2 Guides authored

View Statistics:

Past 24 Hours: 10

Past 7 Days: 73

Past 30 Days: 332

All Time: 72,901