
Kindle Fire HD 8.9" Display Assembly Replacement

What you need

  1. Kindle Fire HD 8.9" Display Assembly Replacement, Screen: step 1, image 1 of 3 Kindle Fire HD 8.9" Display Assembly Replacement, Screen: step 1, image 2 of 3 Kindle Fire HD 8.9" Display Assembly Replacement, Screen: step 1, image 3 of 3
    • Remove the SIM card tray (if present in your model).

    • Insert a large plastic opening tool next to the Kindle's headphone jack.

    • Make sure the notch on the plastic opening tool is facing the back of the Kindle.

    • Move the plastic opening tool evenly around the Kindle, separating the two halves.

    • Be careful not to completely separate the rear cover. There are two delicate flex cables that connect the display assembly to the motherboard.

  2. Kindle Fire HD 8.9" Display Assembly Replacement: step 2, image 1 of 1
    • Set the Kindle down on the rear case.

    • Holding the display assembly near the camera, carefully open the display assembly up to about 90 degrees from the rear case.

    • These images show the Kindle laying flat. In order to prevent damage to the flex cables, keep the Kindle open at 90 degrees while disconnecting the display assembly.

  3. Kindle Fire HD 8.9" Display Assembly Replacement: step 3, image 1 of 3 Kindle Fire HD 8.9" Display Assembly Replacement: step 3, image 2 of 3 Kindle Fire HD 8.9" Display Assembly Replacement: step 3, image 3 of 3
    • Lift the retaining flap on the ZIF connector of the upper flex cable.

    • Gently pull the cable out of its socket.

    • This flex cable is delicate. Be careful not to crease or bend it while working.

  4. Kindle Fire HD 8.9" Display Assembly Replacement: step 4, image 1 of 2 Kindle Fire HD 8.9" Display Assembly Replacement: step 4, image 2 of 2
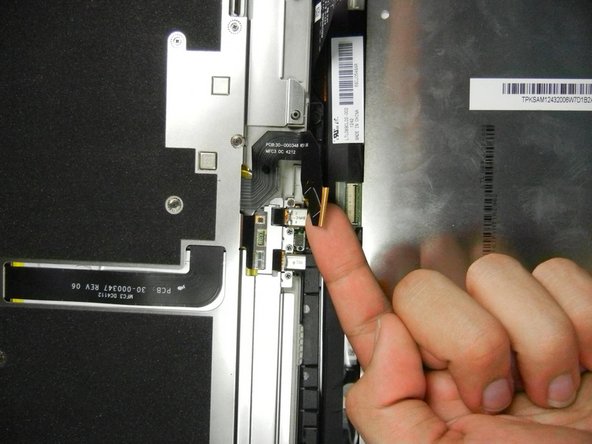
    • Lift the retaining flap on the ZIF connector of the lower flex cable.

    • Gently pull the flex cable from its socket.

    • This flex cable is delicate. Be careful not to crease or bend it while working.

  5. Kindle Fire HD 8.9" Display Assembly Replacement: step 5, image 1 of 1
    • Separate the display assembly from the rest of the device.

    • When reassembling the device, align the two halves of the case before connecting the flex cables.

Jesus Perez

Member since: 01/11/13

1,007 Reputation

2 Guides authored

Team

Cal Poly, Team 5-16, Forte Winter 2013 Member of Cal Poly, Team 5-16, Forte Winter 2013

CPSU-FORTE-W13S5G16

5 Members

14 Guides authored

View Statistics:

Past 24 Hours: 0

Past 7 Days: 4

Past 30 Days: 13

All Time: 43,677