
Keyboard

Prerequisite Only
This guide is only intended to be used as a prerequisite for other guides. It's incomplete by itself.

What you need

  1. Keyboard, key removal: step 1, image 1 of 3 Keyboard, key removal: step 1, image 2 of 3 Keyboard, key removal: step 1, image 3 of 3
    • To get to the screws beneath the keyboard you need to take some keys off. You can use either an opening tool or an opening pick. The first picture shows how it should look like with all the necessary keys off (12 in total).

    • The four longer keys from the fingerboard are to be handled from the left side to get them off.

    • The eight smaller keys need to be levered from the bottom up.

  2. Keyboard, removing scissors mechanisms: step 2, image 1 of 2 Keyboard, removing scissors mechanisms: step 2, image 2 of 2
    • The scissor mechanism of the eight small keys are obstructing the underlying screws.

    • By using again an opening tool or opening pick these can be snapped off easily.

    • When reassembling be sure to place them in with the correct side facing upwards.

  3. Keyboard, unscrew keyboard: step 3, image 1 of 3 Keyboard, unscrew keyboard: step 3, image 2 of 3 Keyboard, unscrew keyboard: step 3, image 3 of 3
    • Loosen those 12 screws with a Phillips #00 screwdriver.

    • Then just pull off the four rotary knobs and the volume knob.

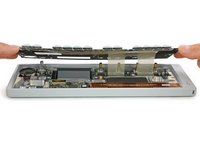
    • Now it is possible to slightly lift the keyboard and set it back.

Conclusion

To reassemble your device, follow these instructions in reverse order.

Tobias Isakeit

Member since: 03/31/14

117,296 Reputation

188 Guides authored

Team

Master Techs Member of Master Techs

Community

322 Members

2,521 Guides authored

0 Comments

Add Comment

View Statistics:

Past 24 Hours: 0

Past 7 Days: 0

Past 30 Days: 0

All Time: 662