
JBL Clip 3 Battery Replacement

What you need

  1. JBL Clip 3 Battery Replacement, Speaker Grill: step 1, image 1 of 2 JBL Clip 3 Battery Replacement, Speaker Grill: step 1, image 2 of 2
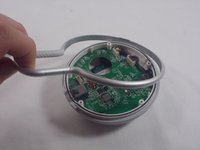
    • Insert the iFixit opening tool between the speaker grill and speaker housing and pry around the entire perimeter of the device until the grill releases.

    • A strong adhesive attaches the grill to the housing, and requires some time and patience to break. Use mild heat to loosen the adhesive if necessary.

  2. JBL Clip 3 Battery Replacement, Speaker Housing: step 2, image 1 of 2 JBL Clip 3 Battery Replacement, Speaker Housing: step 2, image 2 of 2
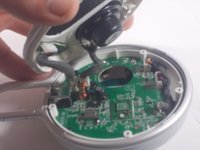
    • Use a Phillips #1 screwdriver to remove the five 6.3 mm screws around the perimeter.

  3. JBL Clip 3 Battery Replacement: step 3, image 1 of 1
    • Separate the speaker housing from the rest of the body.

    • This requires minimal force; they are not glued together.

  4. JBL Clip 3 Battery Replacement: step 4, image 1 of 2 JBL Clip 3 Battery Replacement: step 4, image 2 of 2
    • Use tweezers to remove the 2 pin and 4 pin connectors from the motherboard.

  5. JBL Clip 3 Battery Replacement, Carabiner Clip: step 5, image 1 of 2 JBL Clip 3 Battery Replacement, Carabiner Clip: step 5, image 2 of 2
    • Lift the metal carabiner clip from the speaker housing.

    • They are not glued together and should separate easily.

    • There are alignment tabs on the clip so the whole assembly will only reassemble in one orientation.

  6. JBL Clip 3 Battery Replacement, Speaker Battery: step 6, image 1 of 2 JBL Clip 3 Battery Replacement, Speaker Battery: step 6, image 2 of 2
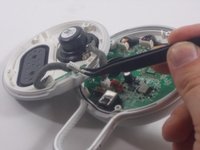
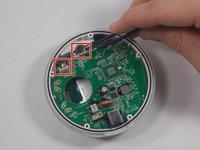
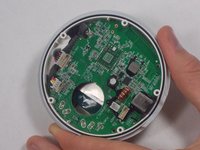
    • Use a pair of tweezers to lift the two cable connections from the motherboard.

    • The wires connecting to the battery are not very long, so be careful when removing them.

  7. JBL Clip 3 Battery Replacement: step 7, image 1 of 1
    • Use a Phillips #1 screwdriver to remove the four screws.

  8. JBL Clip 3 Battery Replacement: step 8, image 1 of 1
    • Gently lift the motherboard away from the speaker housing.

    • Be wary not to unseat the soldered connections when lifting the motherboard.

  9. JBL Clip 3 Battery Replacement: step 9, image 1 of 2 JBL Clip 3 Battery Replacement: step 9, image 2 of 2
    • Use the opening tool to carefully pry your way around the battery, slowly lifting it off of the epoxy until it fully releases.

    • Be mindful not to puncture the battery. It is a Lithium cell, so there is a bit of risk involved when completing this step. Be careful and patient, and there will not be any complications.

    • During reassembly, remember to superglue the new battery back into place.

Conclusion

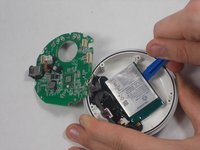
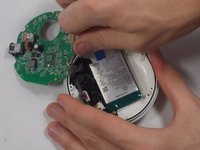
To reassemble your device, follow these instructions in reverse order.

3 other people completed this guide.

Kyle Montague

Member since: 03/28/22

238 Reputation

2 Guides authored

Team

2 Comments

Thanks, but unless I missed something I don't see the recommended battery to replace with (only that it's a 1000mAh). Under "what you need" there's no mention of battery.

B.Bender - Reply

Amazon and others sell them. Just Google "JBL Clip 3 battery for sale". Price varies widely.

CalTee -

Add Comment

View Statistics:

Past 24 Hours: 5

Past 7 Days: 52

Past 30 Days: 225

All Time: 4,855