Installing MacBook Pro 15" Unibody Mid 2009 Dual Hard Drive

What you need

  1. Installing MacBook Pro 15" Unibody Mid 2009 Dual Hard Drive, Lower Case: step 1, image 1 of 1
    • Remove the following ten screws securing the lower case to the upper case:

    • Seven 3 mm Phillips screws.

    • Three 13.5 mm Phillips screws.

  2. Installing MacBook Pro 15" Unibody Mid 2009 Dual Hard Drive: step 2, image 1 of 2 Installing MacBook Pro 15" Unibody Mid 2009 Dual Hard Drive: step 2, image 2 of 2
    • Using both hands, lift the lower case near the vent to pop it off two clips securing it to the upper case.

    • Remove the lower case and set it aside.

  3. Installing MacBook Pro 15" Unibody Mid 2009 Dual Hard Drive, Battery: step 3, image 1 of 1
    Tool used on this step:
    P6 Pentalobe Screwdriver 2009 15" MacBook Pro Battery
    $5.49
    Buy
    • Remove the two 5-Point Pentalobe screws along the top edge of the battery.

    • You do not necessarily have to follow steps 3-6 to remove the battery in order to replace the hard drive. However it is recommended to remove all power sources from electronics before working on them.

  4. Installing MacBook Pro 15" Unibody Mid 2009 Dual Hard Drive: step 4, image 1 of 1
    • Use the tip of a spudger to bend back the finger of the "Warning: Do not remove the battery" sticker while you remove third five-point Pentalobe screw hidden underneath.

  5. Installing MacBook Pro 15" Unibody Mid 2009 Dual Hard Drive: step 5, image 1 of 2 Installing MacBook Pro 15" Unibody Mid 2009 Dual Hard Drive: step 5, image 2 of 2
    • Lift the battery by its plastic pull tab and slide it away from the long edge of the upper case.

    • Do not try to completely remove the battery just yet.

  6. Installing MacBook Pro 15" Unibody Mid 2009 Dual Hard Drive: step 6, image 1 of 1
    • Tilt the battery back enough to access the battery cable connector.

    • Pull the battery cable connector away from its socket on the logic board and remove the battery from the upper case.

    • If you're installing a new battery, you should calibrate it after installation.

  7. Installing MacBook Pro 15" Unibody Mid 2009 Dual Hard Drive, Optical Drive: step 7, image 1 of 1
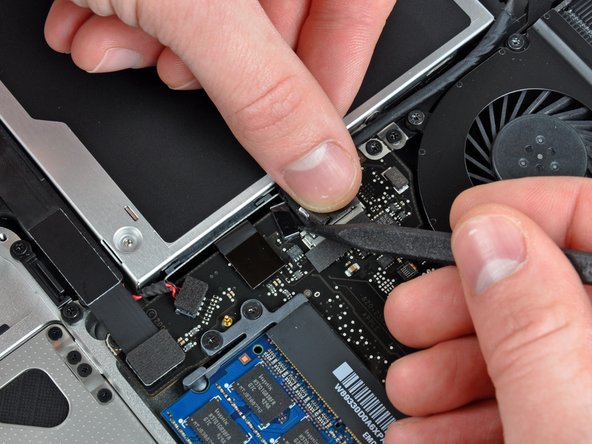
    • Apple sticks a small strip of clear plastic with adhesive applied to one side to the logic board behind the camera cable connector to keep it in its socket. When moving it out of the way, be sure not to break any surface-mount components off the logic board.

    • Hold the end of the cable retainer down with one finger while you use the tip of a spudger to slightly lift the other end and rotate it away from the camera cable connector.

  8. Installing MacBook Pro 15" Unibody Mid 2009 Dual Hard Drive: step 8, image 1 of 2 Installing MacBook Pro 15" Unibody Mid 2009 Dual Hard Drive: step 8, image 2 of 2
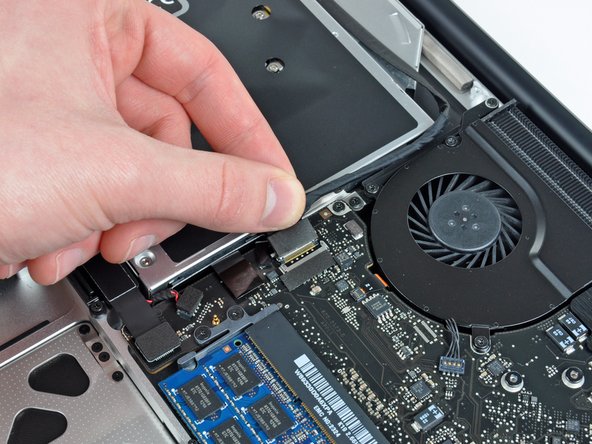
    • Disconnect the camera cable by pulling the male end straight away from its socket.

    • Pull the connector parallel to the face of the logic board, not straight up.

  9. Installing MacBook Pro 15" Unibody Mid 2009 Dual Hard Drive: step 9, image 1 of 1
    • Peel the camera cable off the adhesive securing it to the optical drive.

  10. Installing MacBook Pro 15" Unibody Mid 2009 Dual Hard Drive: step 10, image 1 of 2 Installing MacBook Pro 15" Unibody Mid 2009 Dual Hard Drive: step 10, image 2 of 2
    • This step is only required if you have an anti-glare display. If you have a glossy display, skip this step.

    • Disconnect the Bluetooth cable by pulling the male end straight away from its socket.

    • Pull the connector parallel to the face of the logic board, not straight up.

    • Use the flat end of a spudger to pry the Bluetooth antenna cable from its socket on the board.

  11. Installing MacBook Pro 15" Unibody Mid 2009 Dual Hard Drive: step 11, image 1 of 2 Installing MacBook Pro 15" Unibody Mid 2009 Dual Hard Drive: step 11, image 2 of 2
    • This step is only required if you have an anti-glare display.

    • Remove the two 8 mm Phillips screws securing the Bluetooth/camera cable retainer to the upper case.

    • One of the screws may remain captive in the Bluetooth/camera cable ground loop. If replacing the display, be sure to transfer this screw to the new unit.

    • Lift the Bluetooth board/cable retainer assembly out of the upper case.

  12. Installing MacBook Pro 15" Unibody Mid 2009 Dual Hard Drive: step 12, image 1 of 1
    • Use a spudger to pry the optical drive connector straight up off the logic board.

  13. Installing MacBook Pro 15" Unibody Mid 2009 Dual Hard Drive: step 13, image 1 of 1
    • Remove the single 3.5 mm Phillips screw securing the inner side of the optical drive to the upper case.

  14. Installing MacBook Pro 15" Unibody Mid 2009 Dual Hard Drive: step 14, image 1 of 1
    • Remove the two 3.5 mm Phillips screws securing the outer side of the optical drive to the upper case.

  15. Installing MacBook Pro 15" Unibody Mid 2009 Dual Hard Drive: step 15, image 1 of 1
    • Lift the optical drive from its left edge and pull it out of the upper case.

  16. Installing MacBook Pro 15" Unibody Mid 2009 Dual Hard Drive, Optical Drive: step 16, image 1 of 1
    • Remove the optical drive cable by pulling it straight away from the optical drive.

    • If you have a CD or any other object jammed in your optical drive, we have an optical drive repair guide.

  17. Installing MacBook Pro 15" Unibody Mid 2009 Dual Hard Drive: step 17, image 1 of 1
    • Remove the two black Phillips #0 screws securing the small metal mounting bracket. Transfer this bracket to your new optical drive or hard drive enclosure.

  18. Installing MacBook Pro 15" Unibody Mid 2009 Dual Hard Drive, Dual Hard Drive: step 18, image 1 of 2 Installing MacBook Pro 15" Unibody Mid 2009 Dual Hard Drive, Dual Hard Drive: step 18, image 2 of 2
    • Remove the plastic spacer from the optical bay hard drive enclosure by pressing in on one of the clips on either side and lifting it up and out of the enclosure.

  19. Installing MacBook Pro 15" Unibody Mid 2009 Dual Hard Drive: step 19, image 1 of 3 Installing MacBook Pro 15" Unibody Mid 2009 Dual Hard Drive: step 19, image 2 of 3 Installing MacBook Pro 15" Unibody Mid 2009 Dual Hard Drive: step 19, image 3 of 3
    • Make sure that the hard drive connectors are facing down before placing it into the enclosure.

    • Gently place the hard drive into the enclosure's hard drive slot.

    • While firmly holding the enclosure in place with one hand, use your other hand to press the hard drive into the enclosure connectors.

  20. Installing MacBook Pro 15" Unibody Mid 2009 Dual Hard Drive: step 20, image 1 of 2 Installing MacBook Pro 15" Unibody Mid 2009 Dual Hard Drive: step 20, image 2 of 2
    • Once the hard drive is snug, reinsert the plastic spacer while holding the hard drive against the bottom of the enclosure.

  21. Installing MacBook Pro 15" Unibody Mid 2009 Dual Hard Drive: step 21, image 1 of 2 Installing MacBook Pro 15" Unibody Mid 2009 Dual Hard Drive: step 21, image 2 of 2
    • Use two Phillips #1 screws to secure the drive to its enclosure.

  22. Installing MacBook Pro 15" Unibody Mid 2009 Dual Hard Drive: step 22, image 1 of 1
    • Attach the optical drive bracket to the new enclosure with two Phillips #0 screws.

    • Reconnect any cables you have removed from the original optical drive onto the optical bay enclosure.

  23. Installing MacBook Pro 15" Unibody Mid 2009 Dual Hard Drive: step 23, image 1 of 3 Installing MacBook Pro 15" Unibody Mid 2009 Dual Hard Drive: step 23, image 2 of 3 Installing MacBook Pro 15" Unibody Mid 2009 Dual Hard Drive: step 23, image 3 of 3
    • Don't ditch that drive! You can still use your optical drive externally with the help of our SATA Optical Drive USB Cable.

    • Align the cable's SATA connector with the drive's port and plug in securely.

    • Plug the USB connector into your laptop and your optical drive is ready for use.

Conclusion

To reassemble your device, follow these instructions in reverse order.

85 other people completed this guide.

Brittany McCrigler

Member since: 03/05/12

88,901 Reputation

131 Guides authored

Team

iFixit Member of iFixit

Staff

135 Members

16,476 Guides authored

6 Comments

FYI, according to an apple Genius, this modification prevents Apple from repairing the computer at all. And should you request a flat-rate repair, they would replace the super-drive. But I reckon it's worth it!

Vincent - Reply

I have just gotten my second hard drive up and running after a few false starts. The main piece of advice I'd give you if you are going to do the same is, format the new hard drive via USB BEFORE you install it!

Physically installing the second hard drive was no trouble at all. The problem I had was formatting it inside the computer. This gave me multiple failed attempts using Disk Utility. When I tried to erase or partition the drive, after a long hang, I always got the error: "File system formatter failed."

I thought something might be wrong with the hard drive, and was about to return it. But then I thought I'd take it out of the computer and plug it in using the Silicone 2.5" Hard Drive Enclosure with USB 2.0 Cable. I ran erase in Disk Utility again and it worked! Now it's showing up in finder and I can start storing files on it.

oliverbarrand - Reply

Also, I must say the customer support from ifixit is great. I messaged them about this and some other issues I was having and I got a detailed response from them within a couple of days. Thanks guys!

oliverbarrand -

After doing this for the first time and starting my computer it worked like a charm but after taking the drive back out to swap primary and secondary drives (so i could have my os installed on the bigger drive) it quit working. Now my secondary drive won't work at all. It won't show up in finder or DU. I'm fairly confident that i didn't break anything on the logic board. Any ideas?

jcbbnd - Reply

I am struggling with this on a 15 in. Have done this same thing on three 13 in MacBook pros and one iMac.

Fan running, camera gone and bluetooth and wifi not installed. Have done SMC reset and checked cables numerous times. Please provide guidance -

Craig Spofford - Reply

Add Comment

View Statistics:

Past 24 Hours: 0

Past 7 Days: 8

Past 30 Days: 32

All Time: 43,492