Introduction
If your computer has trouble reading discs and/or the disc drive is not working, it might need to be replaced. This guide will show you step by step how to replace the disc drive.
-
-
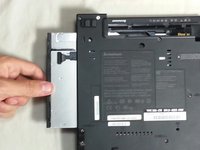
Place the computer on its side so that the disc drive is facing up.
-
Push in the release lever shown.
 Ask FixBot
-
-
-
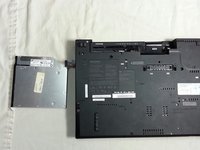
Once the tab pops out, pull it away from the computer to release the disc drive.
-
-


To reassemble your device, follow these instructions in reverse order.
Cancel: I did not complete this guide.
6 other people completed this guide.
Team

Cal Poly, Team 8-58, Johann Spring 2013 Member of Cal Poly, Team 8-58, Johann Spring 2013
CPSU-JOHANN-S13S8G58
4 Members
10 Guides authored