Free Shipping on Domestic Orders $75+

HyperX QuadCast S Pop Filter Replacement

    1. HyperX QuadCast S Pop Filter Replacement, Tap-To-Mute Sensor: step 1, image 1 of 3 HyperX QuadCast S Pop Filter Replacement, Tap-To-Mute Sensor: step 1, image 2 of 3 HyperX QuadCast S Pop Filter Replacement, Tap-To-Mute Sensor: step 1, image 3 of 3
      • Set the microphone on a flat surface.

      • Pull each of the support bands upwards and off of the notches to release the microphone from its base.

      • There are four support bands in total, but it does not matter which band you choose to take off first.

      Ask FixBot

      Add Comment

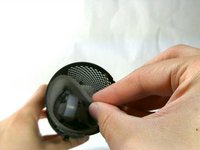
    2. HyperX QuadCast S Pop Filter Replacement: step 2, image 1 of 3 HyperX QuadCast S Pop Filter Replacement: step 2, image 2 of 3 HyperX QuadCast S Pop Filter Replacement: step 2, image 3 of 3
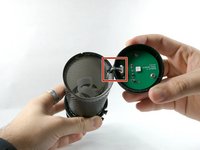
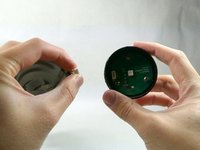
      • Grab ahold of the tap-to-mute Sensor and pull it upwards in a clockwise motion.

      • Be careful not to damage the cable as you remove the top.

      • Once the tap-to-mute sensor detaches from the microphone, you will hear a small "pop."

      Ask FixBot

      Add Comment

    3. HyperX QuadCast S Pop Filter Replacement: step 3, image 1 of 3 HyperX QuadCast S Pop Filter Replacement: step 3, image 2 of 3 HyperX QuadCast S Pop Filter Replacement: step 3, image 3 of 3
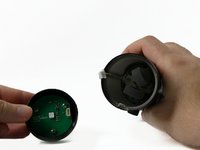
      • Gently unplug the cable, and remove the tap to the Tap-To-Mute sensor from the microphone.

      • The square indicates the location of the cable. This is cable is very small and will require a bit of force to be unplugged.

      Ask FixBot

      Add Comment

    1. HyperX QuadCast S Pop Filter Replacement, Pop Filter: step 4, image 1 of 1
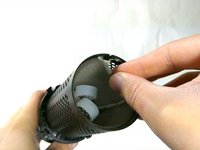
      • Once the Tap-To-Mute sensor has been removed, you will now have access to the pop filter.

      • The pop filter is just the grey foam surrounding the inside of the microphone.

      Ask FixBot

      Add Comment

    2. HyperX QuadCast S Pop Filter Replacement: step 5, image 1 of 1
      • The pop filter will be in a fixed position being glued to the wire. Remove glue residue before continuing to remove the pop filter.

      • When you replace the pop filter, remember that you will need to glue it back into place as before.

      Ask FixBot

      Add Comment

    3. HyperX QuadCast S Pop Filter Replacement: step 6, image 1 of 2 HyperX QuadCast S Pop Filter Replacement: step 6, image 2 of 2
      • Reach into the microphone and remove the pop filter.

      Ask FixBot

      Add Comment

Conclusion

To reassemble your device, follow these instructions in reverse order.

Cancel: I did not complete this guide.

One other person completed this guide.

Nathan Arruda

Member since: 10/25/22

765 Reputation

6 Guides authored

Team

UMass Dartmouth, Team 4-1, Sinclaire Fall 2022 Member of UMass Dartmouth, Team 4-1, Sinclaire Fall 2022

UMASSD-SINCLAIRE-F22S4G1

5 Members

15 Guides authored

3 Guide Comments

"Grab ahold of the tap-to-mute Sensor and pull it upwards in a clockwise motion."

This part is keyed. It literally cannot be pulled in any rotational motion...

Kyle Villalovos - Reply Share

Is there a place where you recomend i can get a replacement peice of foam for the pop filter. I cant find one anywhere online.

Liam Henesy - Reply Share

did you happen to find anything?

Kamen C-Swartz - Reply Share

Add Comment

View Statistics:

Past 24 Hours: 2

Past 7 Days: 30

Past 30 Days: 125

All Time: 4,555