
Huawei Ascend P6-U06 Screen/LCD Display Replacement

What you need

  1. Huawei Ascend P6-U06 Screen/LCD Display Replacement, SIM  Card: step 1, image 1 of 2 Huawei Ascend P6-U06 Screen/LCD Display Replacement, SIM  Card: step 1, image 2 of 2
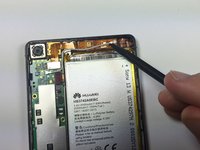
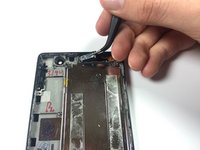
    • Pull and twist the pin near the bottom left-side of the phone to remove it from the headphone jack.

  2. Huawei Ascend P6-U06 Screen/LCD Display Replacement: step 2, image 1 of 2 Huawei Ascend P6-U06 Screen/LCD Display Replacement: step 2, image 2 of 2
    • Insert the pin into the SIM card opening located on the right-side of the phone.

    • Gently push in until the SIM card clicks, and then pull the pin and SIM card out.

    • Repeat this process for the additional SIM card.

  3. Huawei Ascend P6-U06 Screen/LCD Display Replacement, Back Panel: step 3, image 1 of 2 Huawei Ascend P6-U06 Screen/LCD Display Replacement, Back Panel: step 3, image 2 of 2
    • Firmly push down on the black plastic covering at the bottom of the phone, and pull down.

    • You may need a sharp thin object to get underneath the plastic.

  4. Huawei Ascend P6-U06 Screen/LCD Display Replacement: step 4, image 1 of 2 Huawei Ascend P6-U06 Screen/LCD Display Replacement: step 4, image 2 of 2
    • Rotate the phone 180 degrees so that the bottom of the phone is now facing up.

    • Firmly push up on the back panel with your thumbs.

    • Lift up the back panel from the top right corner and gently pull it away from the phone.

  5. Huawei Ascend P6-U06 Screen/LCD Display Replacement, Battery: step 5, image 1 of 3 Huawei Ascend P6-U06 Screen/LCD Display Replacement, Battery: step 5, image 2 of 3 Huawei Ascend P6-U06 Screen/LCD Display Replacement, Battery: step 5, image 3 of 3
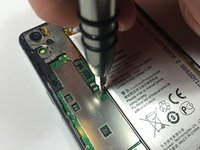
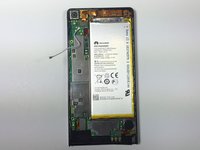
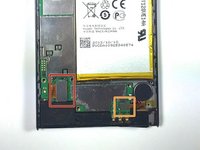
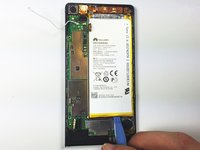
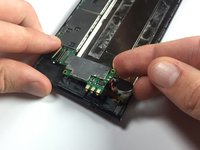
    • Remove the following screws securing the logic board to the main frame:

    • Five 2mm Phillips #000 screws

    • Two 2.5mm Phillips #000 screws

  6. Huawei Ascend P6-U06 Screen/LCD Display Replacement: step 6, image 1 of 2 Huawei Ascend P6-U06 Screen/LCD Display Replacement: step 6, image 2 of 2
    • Push down the yellow plastic lining at the top of the battery and remove the two 2.5mm Phillips #000 screws.

  7. Huawei Ascend P6-U06 Screen/LCD Display Replacement: step 7, image 1 of 3 Huawei Ascend P6-U06 Screen/LCD Display Replacement: step 7, image 2 of 3 Huawei Ascend P6-U06 Screen/LCD Display Replacement: step 7, image 3 of 3
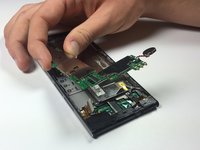
    • Use the flat end of a spudger to gently snap open the first clip located on the the right arm of the retaining plate.

    • Use the flat end of a spudger to gently snap the second clip located on the left arm of the retaining plate.

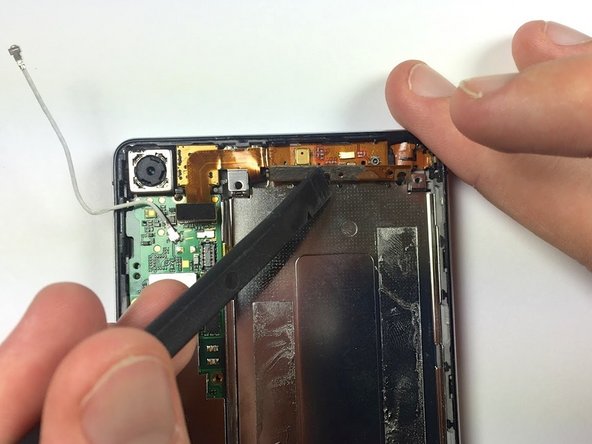
    • Use the flat end of a spudger to gently lift the upper retaining plate from the phone.

  8. Huawei Ascend P6-U06 Screen/LCD Display Replacement: step 8, image 1 of 3 Huawei Ascend P6-U06 Screen/LCD Display Replacement: step 8, image 2 of 3 Huawei Ascend P6-U06 Screen/LCD Display Replacement: step 8, image 3 of 3
    • Use the pointy end of a spudger to pry the antenna connector off of its socket.

    • Upon reassembly, you will hear a "click" that indicates the pin has been properly reconnected.

  9. Huawei Ascend P6-U06 Screen/LCD Display Replacement: step 9, image 1 of 3 Huawei Ascend P6-U06 Screen/LCD Display Replacement: step 9, image 2 of 3 Huawei Ascend P6-U06 Screen/LCD Display Replacement: step 9, image 3 of 3
    • Use the pointy end of a spudger to gently pry the following connectors out of their sockets:

    • silver LCD cable connector

    • silver Headphone jack cable connector

  10. Huawei Ascend P6-U06 Screen/LCD Display Replacement: step 10, image 1 of 3 Huawei Ascend P6-U06 Screen/LCD Display Replacement: step 10, image 2 of 3 Huawei Ascend P6-U06 Screen/LCD Display Replacement: step 10, image 3 of 3
    • Use the pointy end of a spudger to gently pry the following connectors out of their sockets.

    • Sliver Micro-USB cable connector

    • Copper battery cable connector

  11. Huawei Ascend P6-U06 Screen/LCD Display Replacement: step 11, image 1 of 2 Huawei Ascend P6-U06 Screen/LCD Display Replacement: step 11, image 2 of 2
    • Be careful not to bend, puncture, or crush the battery, even if it is being replaced. The battery can potentially release toxic and flammable chemicals.

    • Use a plastic opening tool to gently lift up the battery from the bottom end.

    • You may need to loosen the adhesive under the battery with slow sawing motions.

  12. Huawei Ascend P6-U06 Screen/LCD Display Replacement, Micro-USB Flex Cable: step 12, image 1 of 2 Huawei Ascend P6-U06 Screen/LCD Display Replacement, Micro-USB Flex Cable: step 12, image 2 of 2
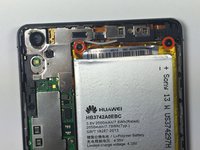
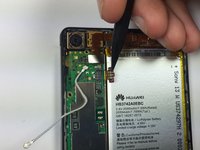
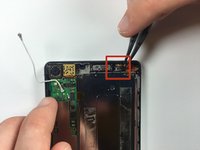
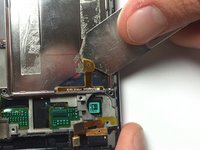
    • Remove the two 2mm Phillips #000 screws securing the copper flex cable to the silver metal tab.

    • The screw on the left has white paint on the top. Chipping the paint will void any warranty you have for your phone.

  13. Huawei Ascend P6-U06 Screen/LCD Display Replacement: step 13, image 1 of 3 Huawei Ascend P6-U06 Screen/LCD Display Replacement: step 13, image 2 of 3 Huawei Ascend P6-U06 Screen/LCD Display Replacement: step 13, image 3 of 3
    • Wedge the flat end of a spudger underneath the bottom left of the metal tab.

    • Run the spudger along the bottom edge of the metal tab and gently pry upward.

    • Adhesive under the metal tab will make lifting the tab slightly tedious. The adhesive will come off as long as you gently run the spudger along the bottom of the tab.

  14. Huawei Ascend P6-U06 Screen/LCD Display Replacement: step 14, image 1 of 1
    • Gently lift the flex cable from the top-right corner.

    • Do not use excessive force when removing the flex cable. Doing so may tear the cable.

  15. Huawei Ascend P6-U06 Screen/LCD Display Replacement: step 15, image 1 of 3 Huawei Ascend P6-U06 Screen/LCD Display Replacement: step 15, image 2 of 3 Huawei Ascend P6-U06 Screen/LCD Display Replacement: step 15, image 3 of 3
    • Use tweezers to lift the rubber alignment tab out of its frame.

  16. Huawei Ascend P6-U06 Screen/LCD Display Replacement, Motherboard: step 16, image 1 of 1
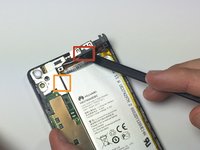
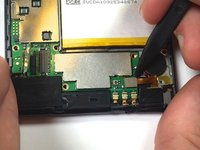
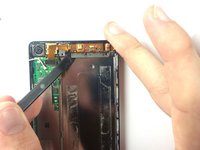
    • Use the pointy end of a spudger to wedge underneath the black circular vibrator motor near the bottom right of the phone.

    • Slowly lift up to separate the black circular vibrator motor from the adhesive.

    • The vibrator motor will remain connected to the motherboard by two red and black wires.

    • Be careful not to tear the red and black wires. If damaged, they will require soldering.

  17. Huawei Ascend P6-U06 Screen/LCD Display Replacement: step 17, image 1 of 2 Huawei Ascend P6-U06 Screen/LCD Display Replacement: step 17, image 2 of 2
    • Hold down the bottom left corner of the motherboard and slowly lift the right side out of the main frame.

    • Gently wiggle the logic board to release it from the phone.

  18. Huawei Ascend P6-U06 Screen/LCD Display Replacement, Earpiece Speaker: step 18, image 1 of 2 Huawei Ascend P6-U06 Screen/LCD Display Replacement, Earpiece Speaker: step 18, image 2 of 2
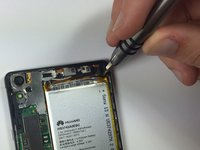
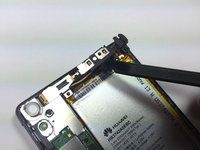
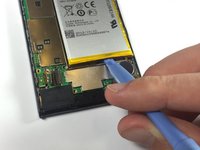
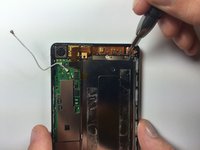
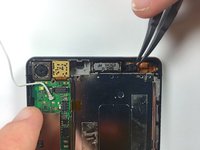
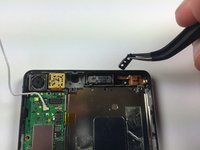
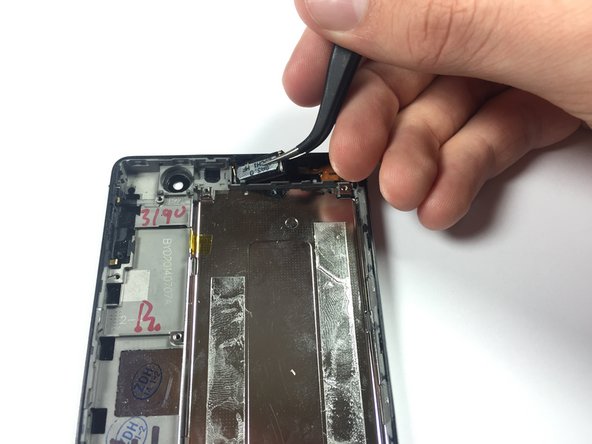
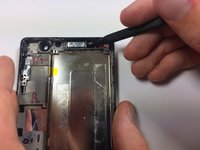
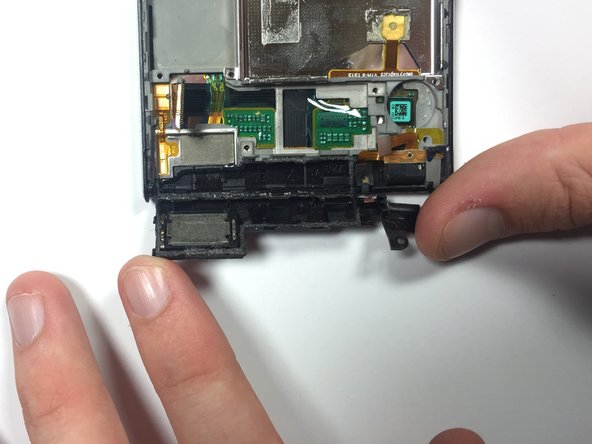
    • Use the pointy end of a spudger to wedge underneath the earpiece speaker, and gently pry upward.

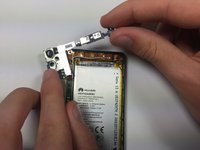
    • Use tweezers to remove the earpiece speaker from the frame.

    • There is adhesive holding down the earpiece speaker to the frame. If the earpiece speaker is not breaking free, gently wiggle it until it comes loose.

  19. Huawei Ascend P6-U06 Screen/LCD Display Replacement, Screen/LCD Display: step 19, image 1 of 2 Huawei Ascend P6-U06 Screen/LCD Display Replacement, Screen/LCD Display: step 19, image 2 of 2
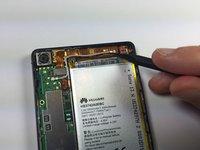
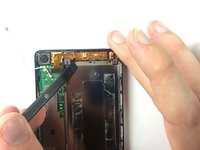
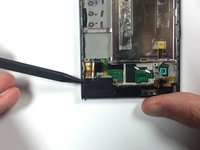
    • Use the pointy end of a spudger to peel back and fold down the black plastic cover near the bottom left of the phone.

  20. Huawei Ascend P6-U06 Screen/LCD Display Replacement: step 20, image 1 of 2 Huawei Ascend P6-U06 Screen/LCD Display Replacement: step 20, image 2 of 2
    • Use an iSesamo tool to separate the gold wire from the silver metal plate.

    • This piece will not come off completely, but it must be separated in order to remove the display.

    • Be careful not to slice or damage the wire. The wire is attached to the panel with a layer of adhesive, so it will take some effort to remove.

  21. Huawei Ascend P6-U06 Screen/LCD Display Replacement: step 21, image 1 of 1
    • Use a heat gun to loosen the adhesive between the display and frame.

    • Start with the heat gun far away from your hand. Then, slowly move your hand towards the heat gun until the air is warm, but not hot.

    • At this set distance, slowly warm the entire front of the phone.

    • The heat gun can be dangerous to you and to the phone. Avoid placing your hand too close to the end of the gun, as it can burn you. Also avoid heating the bottom plastic panel of the phone because it can melt when exposed to direct heat.

  22. Huawei Ascend P6-U06 Screen/LCD Display Replacement: step 22, image 1 of 2 Huawei Ascend P6-U06 Screen/LCD Display Replacement: step 22, image 2 of 2
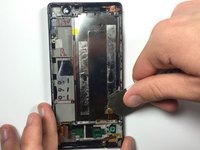
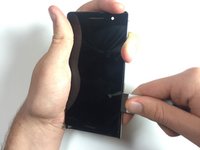
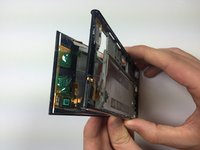
    • Use the iSeasmo tool to wedge between the screen and the plastic near the bottom right corner of the phone. You must wedge the iSeasmo underneath the white plastic part of the screen, and not just the glass.

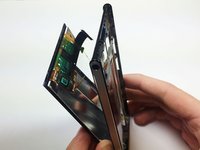
    • Run your iSeasmo tool slowly to the left and right to begin separating the display.

    • Run your iSeasmo tool along the right and left edges of the display.

    • Adhesive will be found throughout this process, so you must be patient with the separation. Check the back of the phone once in awhile to make sure you are not cutting any wires.

  23. Huawei Ascend P6-U06 Screen/LCD Display Replacement: step 23, image 1 of 2 Huawei Ascend P6-U06 Screen/LCD Display Replacement: step 23, image 2 of 2
    • Once the display is loose enough, gently begin separating it from the bottom of the phone. Work your way up until it is completely removed.

    • Some wires will need to be fed through holes in the plastic before the display can be fully removed.

    • Avoid forcing the screen from the plastic. This can damage the screen along with the internal wiring. Take this step very slowly, and go back to remove any extra adhesive if necessary.

Conclusion

To reassemble your device, follow these instructions in reverse order.

18 other people completed this guide.

Zachary Rose

Member since: 10/14/14

694 Reputation

1 Guide authored

Team

Cal Poly, Team 4-44, Amido Fall 2014 Member of Cal Poly, Team 4-44, Amido Fall 2014

CPSU-AMIDO-F14S4G44

5 Members

11 Guides authored

5 Comments

Where did you buy the replacement screen?

Felipe Forero Meola - Reply

To find the screen you are looking for just do a Google search, and you should no problem getting what you need.

satelliteguy08 - Reply

What is the purpose of the gold wire in step 20???

omega - Reply

is it possible to just replace the outer front glass? if yes, does it have any wires or just a piece of glass?

sabdou - Reply

After changing the ear piece, my phone refuse to display after putting it on, what could be wrong.

Julius olu - Reply

Add Comment

View Statistics:

Past 24 Hours: 0

Past 7 Days: 2

Past 30 Days: 7

All Time: 21,539