
How to find and read the Diagnostic LEDs

What you need

  1. How to find and read the Diagnostic LEDs, Display: step 1, image 1 of 1
    Tool used on this step:
    iMac Intel 27" Cardboard Service Wedge
    $4.99
    Buy
    • With the hinge free to move, the iMac will be unbalanced and hard to work on. Repairs can be completed with the iMac laying down, but are faster and easier with an iMac service wedge.

    • If you are using the iFixit cardboard service wedge, follow these assembly directions to put it together.
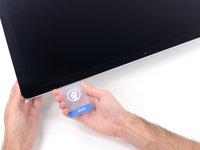
  2. How to find and read the Diagnostic LEDs: step 2, image 1 of 3 How to find and read the Diagnostic LEDs: step 2, image 2 of 3 How to find and read the Diagnostic LEDs: step 2, image 3 of 3
    • Starting on the left of the display, near the power button, insert the iMac Opening Tool into the gap between the glass panel and the rear case.

    • The hub on the iMac Opening Tool will keep you from pushing the wheel in too far. If using a different tool, insert no more than 3/8" (9.5 mm) into the display. You risk severing antenna cables and causing serious damage.

  3. How to find and read the Diagnostic LEDs: step 3, image 1 of 3 How to find and read the Diagnostic LEDs: step 3, image 2 of 3 How to find and read the Diagnostic LEDs: step 3, image 3 of 3
    • Use the tool like a pizza cutter—roll it along through the gap, and it will cut the foam adhesive through the center.

    • Be sure to always push with the handle behind the cutting wheel. If you pull, the wheel might get pulled out of the handle.

    • Run the tool up along the left side of the display.

  4. How to find and read the Diagnostic LEDs: step 4, image 1 of 3 How to find and read the Diagnostic LEDs: step 4, image 2 of 3 How to find and read the Diagnostic LEDs: step 4, image 3 of 3
    • Continue wheeling the tool up around the top left corner.

  5. How to find and read the Diagnostic LEDs: step 5, image 1 of 2 How to find and read the Diagnostic LEDs: step 5, image 2 of 2
    • Cut the adhesive along the top left of the display.

  6. How to find and read the Diagnostic LEDs: step 6, image 1 of 2 How to find and read the Diagnostic LEDs: step 6, image 2 of 2
    • Continue along the top of the display.

    • You may want to run the tool back and forth through what you've already cut a few times, to ensure you get as much of the adhesive separated as possible.

  7. How to find and read the Diagnostic LEDs: step 7, image 1 of 3 How to find and read the Diagnostic LEDs: step 7, image 2 of 3 How to find and read the Diagnostic LEDs: step 7, image 3 of 3
    • Push the tool around the top right corner of the display.

  8. How to find and read the Diagnostic LEDs: step 8, image 1 of 2 How to find and read the Diagnostic LEDs: step 8, image 2 of 2
    • Wheel the tool down along the right side of the display.

  9. How to find and read the Diagnostic LEDs: step 9, image 1 of 2 How to find and read the Diagnostic LEDs: step 9, image 2 of 2
    • Finish pushing the opening tool to the bottom of the right side of the display.

    • At this point, you'll want to run the tool back around the entire display, to ensure you cut as much adhesive as possible.

  10. How to find and read the Diagnostic LEDs: step 10, image 1 of 3 How to find and read the Diagnostic LEDs: step 10, image 2 of 3 How to find and read the Diagnostic LEDs: step 10, image 3 of 3
    Tool used on this step:
    Plastic Cards
    $2.99
    Buy
    • While the opening tool did the lion's share of the work, the display will still be slightly adhered to the case. A plastic card will be necessary to free up the last of this adhesive.

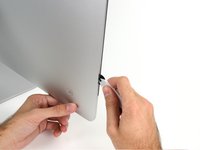
    • Set the iMac face-up on a table.

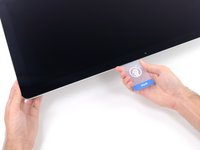
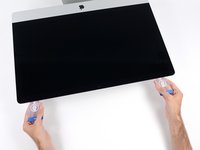
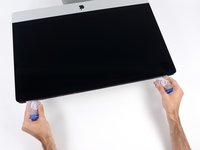
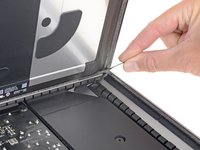
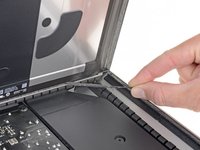
    • Starting from the top right corner of the iMac, insert a plastic card between the display and frame.

    • Be careful not to insert it more than 3/8" (9.5 mm), or you may damage internal components.

  11. How to find and read the Diagnostic LEDs: step 11, image 1 of 2 How to find and read the Diagnostic LEDs: step 11, image 2 of 2
    • Gently twist the plastic card to open the space between the display and frame, and cut any remaining adhesive near the corner.

    • Using too much force will crack the glass. Work carefully, and don't try to create a gap any larger than about 1/4" (6 mm).

  12. How to find and read the Diagnostic LEDs: step 12, image 1 of 3 How to find and read the Diagnostic LEDs: step 12, image 2 of 3 How to find and read the Diagnostic LEDs: step 12, image 3 of 3
    • Be sure to stop cutting before the iSight camera in this step, or you may damage it.

    • Slide the card toward the center of the display, to cut any remaining adhesive.

  13. How to find and read the Diagnostic LEDs: step 13, image 1 of 2 How to find and read the Diagnostic LEDs: step 13, image 2 of 2
    • Put the card into the corner again and let it stay there to keep the adhesive from resettling.

  14. How to find and read the Diagnostic LEDs: step 14, image 1 of 3 How to find and read the Diagnostic LEDs: step 14, image 2 of 3 How to find and read the Diagnostic LEDs: step 14, image 3 of 3
    • Insert a second card into the gap between the display and frame in the top left corner.

  15. How to find and read the Diagnostic LEDs: step 15, image 1 of 2 How to find and read the Diagnostic LEDs: step 15, image 2 of 2
    • Gently twist the card, slightly increasing the space between the display and frame.

    • As with the other side, move slowly to allow the adhesive to break, and be careful not to over-stress the display glass.

  16. How to find and read the Diagnostic LEDs: step 16, image 1 of 3 How to find and read the Diagnostic LEDs: step 16, image 2 of 3 How to find and read the Diagnostic LEDs: step 16, image 3 of 3
    • Slide the plastic card toward the center, again stopping just before the iSight camera.

  17. How to find and read the Diagnostic LEDs: step 17, image 1 of 2 How to find and read the Diagnostic LEDs: step 17, image 2 of 2
    • Insert the card back into the top left corner.

  18. How to find and read the Diagnostic LEDs: step 18, image 1 of 3 How to find and read the Diagnostic LEDs: step 18, image 2 of 3 How to find and read the Diagnostic LEDs: step 18, image 3 of 3
    • Only lift the display a few inches—it is still attached to the iMac by data and power cables.

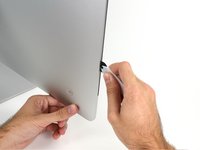
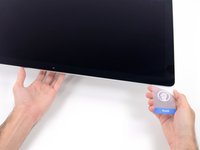
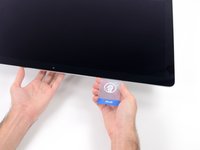
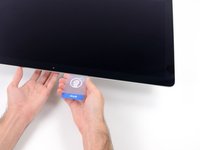
    • With the cards inserted as shown near the corners, gently twist the cards to increase the gap between display and case.

    • If there are any sections that seem to stick and won't separate, stop twisting and use one of the cards to cut the adhesive in the problem area.

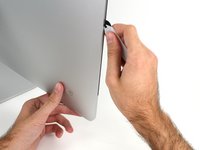
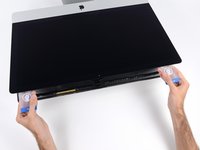
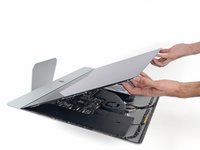
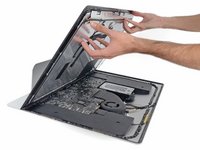
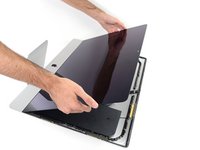
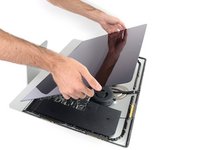
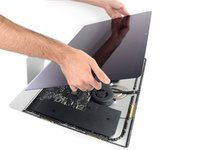
    • Begin to lift the top of the display up from the frame.

  19. How to find and read the Diagnostic LEDs: step 19, image 1 of 2 How to find and read the Diagnostic LEDs: step 19, image 2 of 2
    • While holding the display up with one hand, use the other to unplug the display power cable.

    • Lift the display up enough to have easy access to the connections, but not so much that you stretch the cables and stress their connections (about 8").

  20. How to find and read the Diagnostic LEDs: step 20, image 1 of 3 How to find and read the Diagnostic LEDs: step 20, image 2 of 3 How to find and read the Diagnostic LEDs: step 20, image 3 of 3
    • Flip up the metal retaining bracket on the display data cable.

    • Disconnect the display data cable.

    • This is a delicate connection that can easily be broken. Be sure to pull the display data cable connector straight out of its socket, toward the top of the iMac.

  21. How to find and read the Diagnostic LEDs: step 21, image 1 of 2 How to find and read the Diagnostic LEDs: step 21, image 2 of 2
    • Lift the display up to a near-vertical position.

    • At this point there is still a strip of adhesive along the bottom of the display, that will hold the display to the frame like a hinge. You can loosen this adhesive by working the display up and down a few times.

    • Remove as much of the adhesive as possible by grabbing it at the outer edges, and then pulling or rolling it towards the middle.

  22. How to find and read the Diagnostic LEDs: step 22, image 1 of 3 How to find and read the Diagnostic LEDs: step 22, image 2 of 3 How to find and read the Diagnostic LEDs: step 22, image 3 of 3
    • Be very careful not to touch the capacitor leads or any exposed solder joints on the back of the power supply (boxed in red).

    • If necessary, a plastic card can be used to cut any remaining sections of the bottom adhesive strip.

  23. How to find and read the Diagnostic LEDs: step 23, image 1 of 3 How to find and read the Diagnostic LEDs: step 23, image 2 of 3 How to find and read the Diagnostic LEDs: step 23, image 3 of 3
    • Be very careful handling the display—it's big, heavy, and made of glass. The display has fragile edges. Avoid lifting the display by the corners.

    • Lift the display up from the frame and remove it from the iMac. Lay the display face down on a flat, soft surface.

    • It may be necessary to slowly lift from one side, to peel against the remaining adhesive.

    • After the adhesive is cut, it cannot be used to re-seal the display in place. Follow this guide when your repair is complete to replace the adhesive strips that secure the display to the rear enclosure.

  24. How to find and read the Diagnostic LEDs: step 24, image 1 of 1
    • If you are replacing the display panel, you may need to transfer additional components from the old panel to the new one. Compare the back of the old display with the replacement display. Note all cables, sensors, and foam cushioning that are missing from the new display.

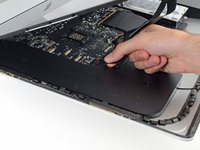
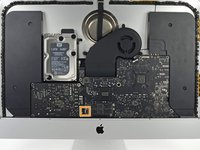
    • If there is a wire or cable underneath adhesive tape, always pull the tape off first.

    • If the cable is glued to the chassis, use a heated iOpener or a hair dryer to soften the adhesive first. You can then slide an opening pick underneath the cable to loosen it. Never pull directly on the delicate connectors.

    • Slide an opening pick underneath the foam cushion pieces to separate them from the display, and gently pull them off. You may need some double sided tape to re-attach them to the new display.

  25. How to find and read the Diagnostic LEDs, How to find and read the Diagnostic LEDs: step 25, image 1 of 3 How to find and read the Diagnostic LEDs, How to find and read the Diagnostic LEDs: step 25, image 2 of 3 How to find and read the Diagnostic LEDs, How to find and read the Diagnostic LEDs: step 25, image 3 of 3
    • Do not touch the power supply. Be very careful not to touch the capacitor leads or any exposed solder joints on the back of the power supply (boxed in red).

    • boxed in orange, are diagnostic LEDs

    • LED 1 - Indicates that the trickle voltage from the power supply is detected by the main logic board. This LED will remain ON while the iMac is connected to the AC power. The LED will remain on even when the computer has been shut down or put to sleep. The LED will turn off only if the AC power is disconnected or the power supply is faulty.

    • LED 2 - Indicates that the main logic board has detected proper power from the power supply when the computer is turned on. This LED will be ON when the computer is turned on and the power supply is working correctly.

    • LED 3 - Indicates that the computer and the video card are communicating. This LED will be ON when the computer is communicating properly with the video card. If LEDs 1 and 2 are ON and you heard the startup sound, but LED 3 is OFF, then the video card might be installed incorrectly or need replacement.

    • LED 4 - Indicates that the computer and the LCD display panel are communicating. This LED will be ON when the computer is turned on and video signal is being generated. If the LED is ON and there is no image on the LCD display panel, the LCD display panel or inverter might be installed incorrectly or need replacement.

Conclusion

To reassemble your device, follow these instructions in reverse order.

16 other people completed this guide.

Aiden

Member since: 09/19/15

17,402 Reputation

21 Guides authored

9 Comments

Hmmmm…. how do the LEDs light up if the computer isn’t plugged in? perhaps there’s another guide? How to read the LED’s

Michael Lambert - Reply

What if the first LED is blinking when plugged in? I replaced the power supply since and am still having the same issue

Bret Walters - Reply

How did you solve it?

Emilio -

I have a late 2013 27” iMac that wasn’t powering on and none of the leds were coming on. I’ve now replaced the power supply. When connected to power, led1 is on. When I push the power button, led2 starts blinking around once every 2 seconds and computer doesn’t power on (no sign of life at all). Any idea what this could be?

Julien Viel - Reply

Nvm! Reseating the ram fixed it!

Julien Viel -

Add Comment

View Statistics:

Past 24 Hours: 33

Past 7 Days: 230

Past 30 Days: 995

All Time: 39,964