-
-
Your PowerShot A4000 camera should have come with a USB cable to connect your camera to your computer.
-
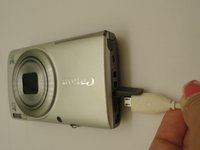
The smaller end of the cable is inserted into your camera. It is inserted in the area outlined in red, labeled A/V OUT DIGITAL.
-
To open this area and access the port underneath, place your fingernail under the flap labeled A/V OUT DIGITAL and pull upwards.
-
-
-
-
Simply line up the USB cable and the port on your camera and push the cable into the port until the white casing of the cable is flush with the camera.
-
The other end of the cable goes into the USB port on your computer. To upload pictures onto your computer, you should have installed the CD-ROM included with your camera purchase.
-
If you did not receive this CD-ROM with your camera, contact the place of purchase.
-


To reassemble your device, follow these instructions in reverse order.
Team

Clemson, Team 1-3, Benson Fall 2014 Member of Clemson, Team 1-3, Benson Fall 2014
CLEM-BENSON-F14S1G3
3 Members
17 Guides authored