Introduction
The Intergalactic Zoom Fixit Clinics showed that some of the repairs could not be completed due to the inability to troubleshoot because the participant doesn’t have a multimeter to test continuity. The design challenge asked the question: What if we could create a dirt-cheap super simple continuity tester out of low-cost commonly available parts? Peter Mui https://www.ifixit.com/User/273383/Peter... came up with the musical greeting card idea and I just picked up the idea. All credits for the idea should go to ++www.fixitclinic.org++ https://www.ifixit.com/User/1079209/Fixi.... Looks like a sustainable alternative :-)
What you need
Video Overview
-
-
Here is one of those cards that plays some annoying music once it is opened up.
-
Open the card and there will be a fold-over page that needs to be opened to get to the components. Here a long knife was used since it could not be determined how the parts underneath were oriented etc.
-
Once the glue is released from that page, fold it over to reveal the components.
-
-
-
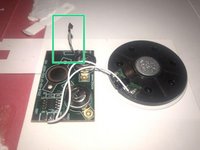
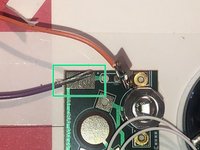
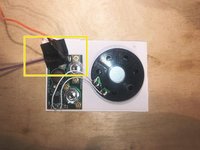
This musical card has two main components, The circuit board with the IC's for the music, batteries etc., and the speaker
-
There is a plastic divider that separates the contact from the circuit board. This is what turns the music off. It will turn on when pulled forward and allowing the contact to close the circuit.
-
Once the plastic divider is removed the contact will close the circuit and the music will play
-
-
-
-
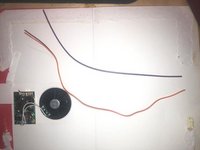
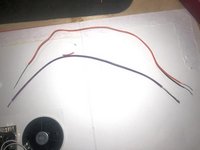
Next we will need two electrical wires. Any length will do but should be somewhat short enough to be easily managed without becoming tangled etc.
-
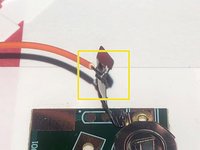
Bend the contact that was previously repsonsible for closing the on/off circuit straight up. This is thin metal so it'll bend easy and will also fatigue easy, bend only one time.
-
Remove the insulation from both ends of the two wires. on one end remove about 3/8 of an inch and the other end about one inch. No exact science just make sure that the exposed wires are long enough.
-
-
-
Wrap one wire around the bend contact a couple of times and twist the end around the wire itself.
-
Place the exposed wire from the other cable on the flat contact on the circuit board.
-
Use electric tape to secure the bottom wire and to isolate and secure the wire on the other contact as well.
-
The components are adhered via some kind of tape to the card. This tape functioned as a guide to cut the whole musical part way from the greeting card.
-
-
-
Complete Continuity Tester. Function was tested and this was a success. Now every time you check for continuity you will hear some Minions singing a happy song :-)
-


This tool does actually work and is capable of testing continuity. Build cost was $2.99 for the card.
Cancel: I did not complete this guide.
10 other people completed this guide.

Team
