
How to Mend Broken China

What you need

  1. How to Mend Broken China, How to Mend Broken China: step 1, image 1 of 1
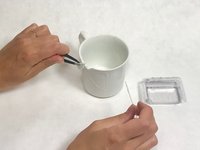
    • Wipe all broken edges with rubbing alcohol using a paper towel.

    • Do this to eliminate any grease and dirt.

    • Be aware that rubbing alcohol is highly flammable.

    • Be aware of sharp edges throughout this repair.

  2. How to Mend Broken China: step 2, image 1 of 1
    • Pour epoxy into a smooth-surfaced container.

    • We used the plastic wrapping of the razor, but any container works.

    • Don't use epoxy in a small, confined space.

    • Do not get epoxy near eyes or on skin. Consider using polyethylene or polypropylene gloves.

  3. How to Mend Broken China: step 3, image 1 of 1
    • Mix epoxy fluids with a toothpick.

    • The fluid sets in 5 minutes, so you must quickly apply it to the china. You can mix more if the first pour hardens.

  4. How to Mend Broken China: step 4, image 1 of 2 How to Mend Broken China: step 4, image 2 of 2
    • Apply the epoxy along the edges of the base piece of china and first chipped piece of china using the toothpick.

  5. How to Mend Broken China: step 5, image 1 of 3 How to Mend Broken China: step 5, image 2 of 3 How to Mend Broken China: step 5, image 3 of 3
    • Attach the first detached piece to the base carefully by hand.

    • Adjust as needed.

    • Don't worry about excess epoxy at this point. It will be removed after setting.

  6. How to Mend Broken China: step 6, image 1 of 2 How to Mend Broken China: step 6, image 2 of 2
    • Apply epoxy on the next detached piece and the already mended piece

    • Use a tweezer to attach smaller fragments.

  7. How to Mend Broken China: step 7, image 1 of 2 How to Mend Broken China: step 7, image 2 of 2
    • Attach the piece to the china.

    • Adjust as needed

    • Repeat the process of applying epoxy and attaching the chips until all broken pieces are successfully in place.

  8. How to Mend Broken China: step 8, image 1 of 1
    • Place mended china in a container of stabilizing sand or gravel.

    • This step is performed to put the right gravitational weight on the attachments so the pieces don't become unaligned during the setting of the epoxy.

    • Leave to set for at least 1 hour.

  9. How to Mend Broken China: step 9, image 1 of 2 How to Mend Broken China: step 9, image 2 of 2
    • Shave off as much excess epoxy as possible using the razor.

    • Exhibit caution when using the razors; they are very sharp!

  10. How to Mend Broken China: step 10, image 1 of 2 How to Mend Broken China: step 10, image 2 of 2
    • Use coarse sandpaper to further reduce the excess epoxy.

  11. How to Mend Broken China: step 11, image 1 of 1
    • Use fine sandpaper to smooth out remaining inconsistencies.

  12. How to Mend Broken China: step 12, image 1 of 2 How to Mend Broken China: step 12, image 2 of 2
    • Darker cracks form where the clear epoxy functions as filler, but the cup will work perfectly fine! Add colored pigment to the epoxy for a more subtle repair.

Finish Line

3 other people completed this guide.

Mikkeline Thomsen

Member since: 04/28/17

141 Reputation

1 Guide authored

Team

UC Davis, Team S1-G4, Coad Spring 2017 Member of UC Davis, Team S1-G4, Coad Spring 2017

UCD-COAD-S17S1G4

3 Members

2 Guides authored

0 Comments

Add Comment

View Statistics:

Past 24 Hours: 2

Past 7 Days: 31

Past 30 Days: 166

All Time: 20,105