
How to Fix a Broken XLR Microphone Cable

What you need

  1. How to Fix a Broken XLR Microphone Cable, How to Fix a Broken XLR Microphone Cable: step 1, image 1 of 3 How to Fix a Broken XLR Microphone Cable, How to Fix a Broken XLR Microphone Cable: step 1, image 2 of 3 How to Fix a Broken XLR Microphone Cable, How to Fix a Broken XLR Microphone Cable: step 1, image 3 of 3
    • This guide will utilize a soldering iron. Please use a heat-resistant surface and proceed with caution.

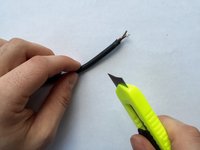
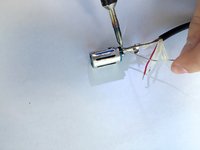
    • Place the end of the XLR Cable on a clean, uncluttered surface.

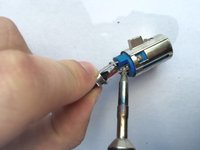
    • Using a small screwdriver, unscrew the single screw near the top of the cable.

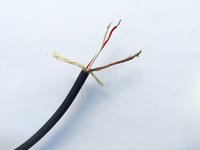
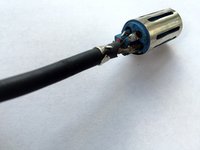
    • Gently pull apart the exterior metal from the internal mechanism.

  2. How to Fix a Broken XLR Microphone Cable: step 2, image 1 of 1
    • Assess which connections have fallen loose. In this instance, the white cable is disconnected.

  3. How to Fix a Broken XLR Microphone Cable: step 3, image 1 of 2 How to Fix a Broken XLR Microphone Cable: step 3, image 2 of 2
    • Assess whether or not there's enough exposed wire to reconnect loose cables. In this instance, the exposed cables are too short to effectively reconnect.

    • If the exposed wires are too short, use wire strippers or a razor to cut back the insulation.

    • Separate the wires.

  4. How to Fix a Broken XLR Microphone Cable: step 4, image 1 of 3 How to Fix a Broken XLR Microphone Cable: step 4, image 2 of 3 How to Fix a Broken XLR Microphone Cable: step 4, image 3 of 3
    • Soldering irons are extremely hot. Proceed with extreme caution.

    • Solder each of the loose wires to the coinciding metal prong.

    • For more information on effectively soldering wire, please visit iFixit's Soldering Guide.

    • If necessary, use a thin wire to further manipulate the connection.

  5. How to Fix a Broken XLR Microphone Cable: step 5, image 1 of 2 How to Fix a Broken XLR Microphone Cable: step 5, image 2 of 2
    • When the soldering is complete, reconnect the metal exterior to the head of the cable.

    • Using a small screwdriver, reattach the single screw.

Conclusion

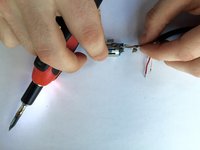
To reassemble your device, follow these instructions in reverse order.

4 other people completed this guide.

Abbie Zajac

Member since: 01/19/16

203 Reputation

1 Guide authored

One Comment

Great repair. If the cabke is broken I have a video on resolving that issue. https://youtu.be/E8CiX4cnc-U

DIM Tips - Reply

Add Comment

View Statistics:

Past 24 Hours: 4

Past 7 Days: 27

Past 30 Days: 128

All Time: 24,923