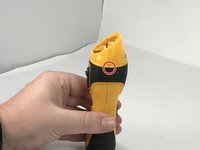
How To Replace the Battery on a Conair Trimmer (GMT15NCS)

What you need

  1. How To Replace the Battery on a Conair Trimmer (GMT15NCS), Conair Trimmer (GMT15NCS) Battery Replacement: step 1, image 1 of 3 How To Replace the Battery on a Conair Trimmer (GMT15NCS), Conair Trimmer (GMT15NCS) Battery Replacement: step 1, image 2 of 3 How To Replace the Battery on a Conair Trimmer (GMT15NCS), Conair Trimmer (GMT15NCS) Battery Replacement: step 1, image 3 of 3
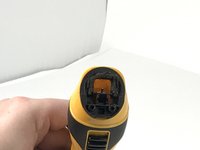
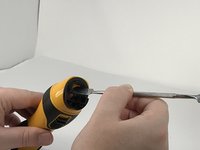
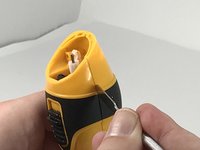
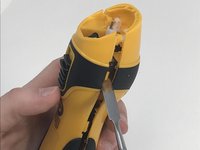
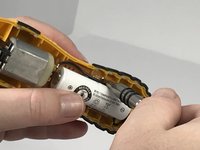
    • Using a Phillips #0 screwdriver, remove the two screws holding the trimmer blade in place.

    • Hold down the trimmer blades to make it easier to remove the screws.

  2. How To Replace the Battery on a Conair Trimmer (GMT15NCS): step 2, image 1 of 2 How To Replace the Battery on a Conair Trimmer (GMT15NCS): step 2, image 2 of 2
    • Lift both of the trimmer blades off of the plastic guard.

  3. How To Replace the Battery on a Conair Trimmer (GMT15NCS): step 3, image 1 of 3 How To Replace the Battery on a Conair Trimmer (GMT15NCS): step 3, image 2 of 3 How To Replace the Battery on a Conair Trimmer (GMT15NCS): step 3, image 3 of 3
    • Separate the plastic guard from the casing by using the metal spudger tool.

    • Pry up at the top of the plastic guard, NOT the bottom.

  4. How To Replace the Battery on a Conair Trimmer (GMT15NCS): step 4, image 1 of 2 How To Replace the Battery on a Conair Trimmer (GMT15NCS): step 4, image 2 of 2
    • Using a Phillips #000 screwdriver, remove the two screws inside the casing.

    • Tilt the trimmer to prevent the screws from falling into the casing.

  5. How To Replace the Battery on a Conair Trimmer (GMT15NCS): step 5, image 1 of 1
    • Using a Phillips #000 screwdriver, remove the casing screw at the bottom of the trimmer.

    • Tilt the trimmer so gravity helps the screw fall out.

  6. How To Replace the Battery on a Conair Trimmer (GMT15NCS): step 6, image 1 of 3 How To Replace the Battery on a Conair Trimmer (GMT15NCS): step 6, image 2 of 3 How To Replace the Battery on a Conair Trimmer (GMT15NCS): step 6, image 3 of 3
    • Fire Hazard: Be careful not to stick the metal spudger too deep when prying to avoid puncturing the battery.

    • Separate the casing at the seam using the metal spudger to release the clips.

    • Use a twisting or prying motion, in any direction, to separate the casing.

    • The same process may be needed on the other side's seam to release clips.

  7. How To Replace the Battery on a Conair Trimmer (GMT15NCS): step 7, image 1 of 3 How To Replace the Battery on a Conair Trimmer (GMT15NCS): step 7, image 2 of 3 How To Replace the Battery on a Conair Trimmer (GMT15NCS): step 7, image 3 of 3
    • Remove the two screws holding the battery setup in place.

    • Take note of the position of the positive and negative terminals of the battery on the setup.

  8. How To Replace the Battery on a Conair Trimmer (GMT15NCS): step 8, image 1 of 1
    • Lift the battery setup out of the casing.

    • Take note of how the battery setup lays in the casing.

  9. How To Replace the Battery on a Conair Trimmer (GMT15NCS): step 9, image 1 of 3 How To Replace the Battery on a Conair Trimmer (GMT15NCS): step 9, image 2 of 3 How To Replace the Battery on a Conair Trimmer (GMT15NCS): step 9, image 3 of 3
    • The soldering iron with be hot.

    • Using the soldering iron, desolder the battery at the connection to remove the battery from the setup.

    • Use iFixit's guide on How To Solder and Desolder Connections if you are not familiar using a soldering tool.

Conclusion

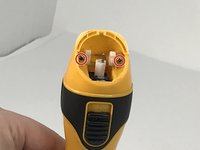
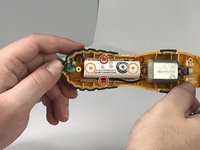
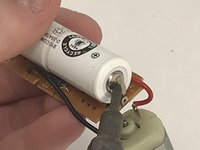
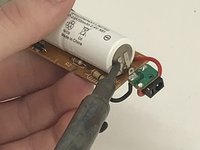
To reassemble your device, solder the new 2.4 V battery into the setup, and follow the instructions in reverse.

2 other people completed this guide.

One Comment

Where can I buy the batery

Wenceslao Hernandez - Reply

Add Comment

View Statistics:

Past 24 Hours: 3

Past 7 Days: 22

Past 30 Days: 80

All Time: 9,858